Qwen3-VL 模型结构解析(DeepStack解析)
Qwen3 VL MoE 和 Qwen2 VL 对比概述
Qwen3 VL MoE 的文本部分采用了专家混合架构,共有默认60个专家,每次只激活部分专家(如 top-k=4),还可以控制哪些层使用 MoE; Qwen2 VL 是全连接结构。
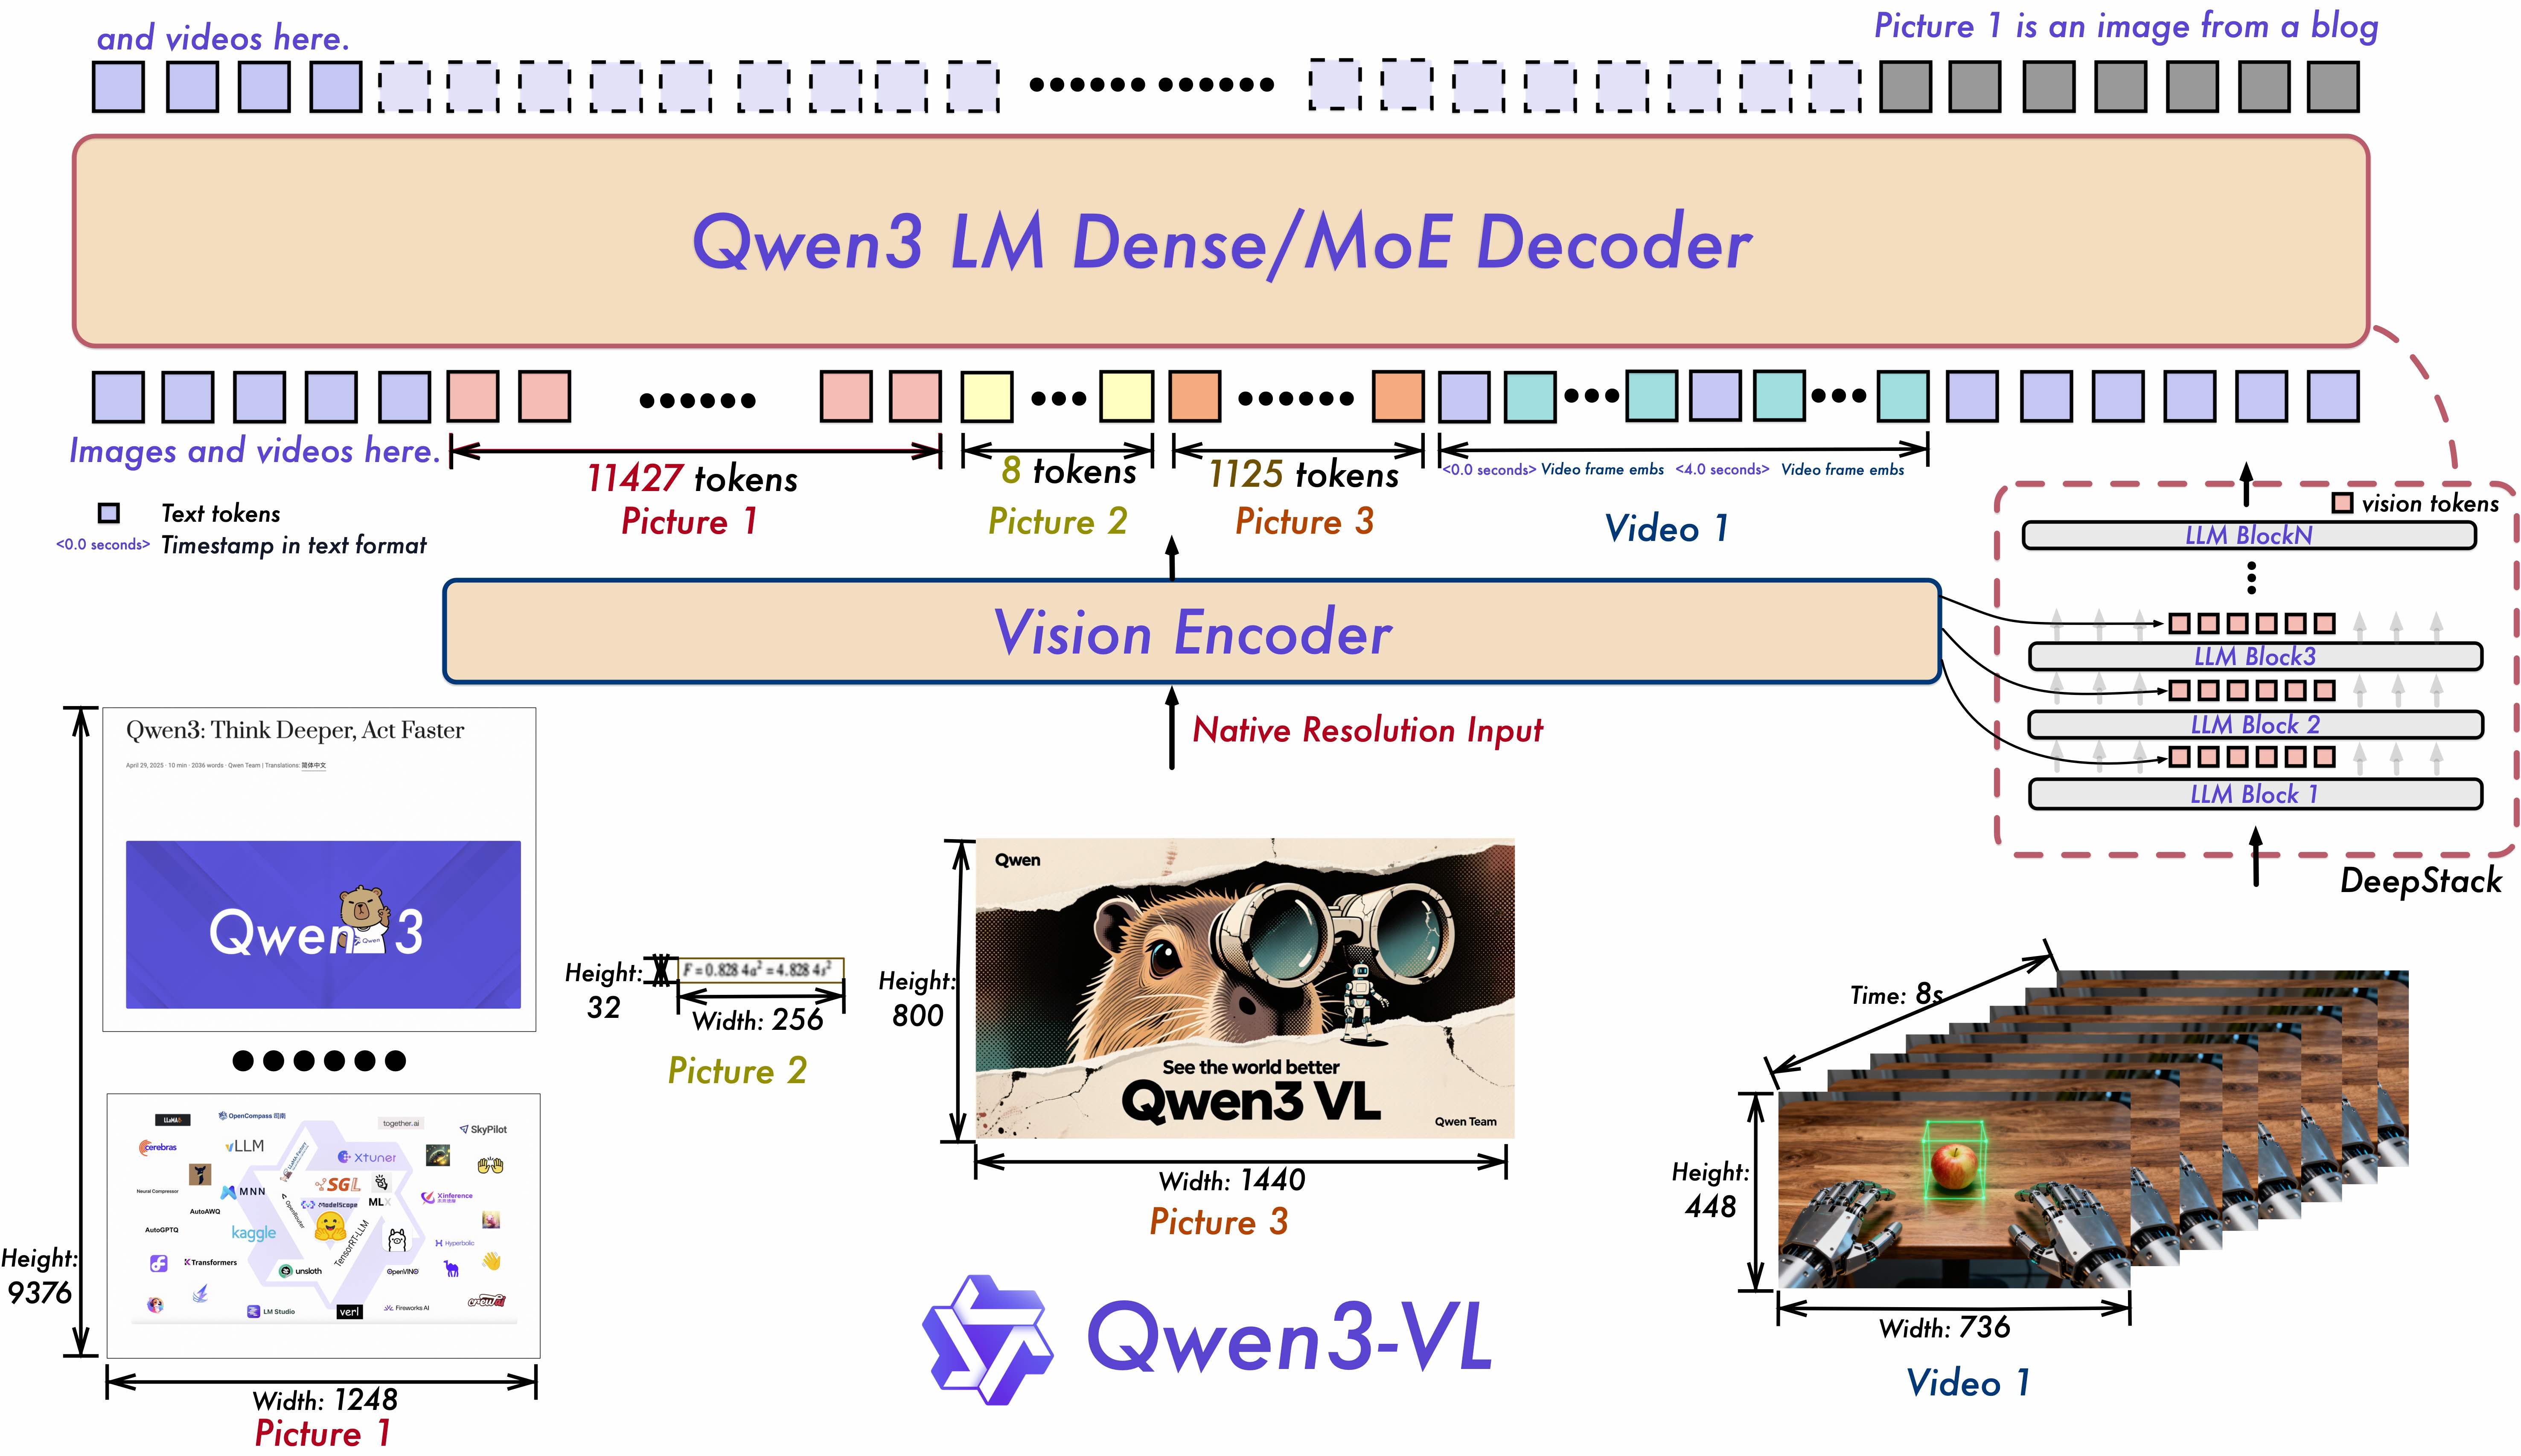
Qwen3 VL MoE 使用了 DeepStack 特征融合。在Qwen2 VL 中,只提取最后一层的视觉特征,在文本输入层一次性注入所有视觉信息;在 Qwen3 VL MoE 中,视觉提取部分采用了多阶段特征提取,在文本解码的不同层级逐步注入对应的视觉特征。
其中 MoE 和 Qwen3 MoE 类似,可参考:https://github.com/datawhalechina/self-llm/blob/master/models/Qwen3/01-Qwen3-%E6%A8%A1%E5%9E%8B%E7%BB%93%E6%9E%84%E8%A7%A3%E6%9E%90-Blog.md
Qwen3 VL MoE 模型 DeepStack 架构详解
DeepStack 论文原文:https://arxiv.org/pdf/2406.04334 本节主要讲述 Qwen3 VL MoE 模型是如何讲 DeepStack 的思想应用到模型中的。
特征抽取
# class Qwen3VLMoeModel
def get_image_features(self, pixel_values: torch.FloatTensor, image_grid_thw: Optional[torch.LongTensor] = None):
    pixel_values = pixel_values.type(self.visual.dtype
    # 获取 image_embeds,deepstack_image_embeds
    image_embeds, deepstack_image_embeds = self.visual(pixel_values, grid_thw=image_grid_thw)
    split_sizes = (image_grid_thw.prod(-1) // self.visual.spatial_merge_size**2).tolist()
    image_embeds = torch.split(image_embeds, split_sizes)
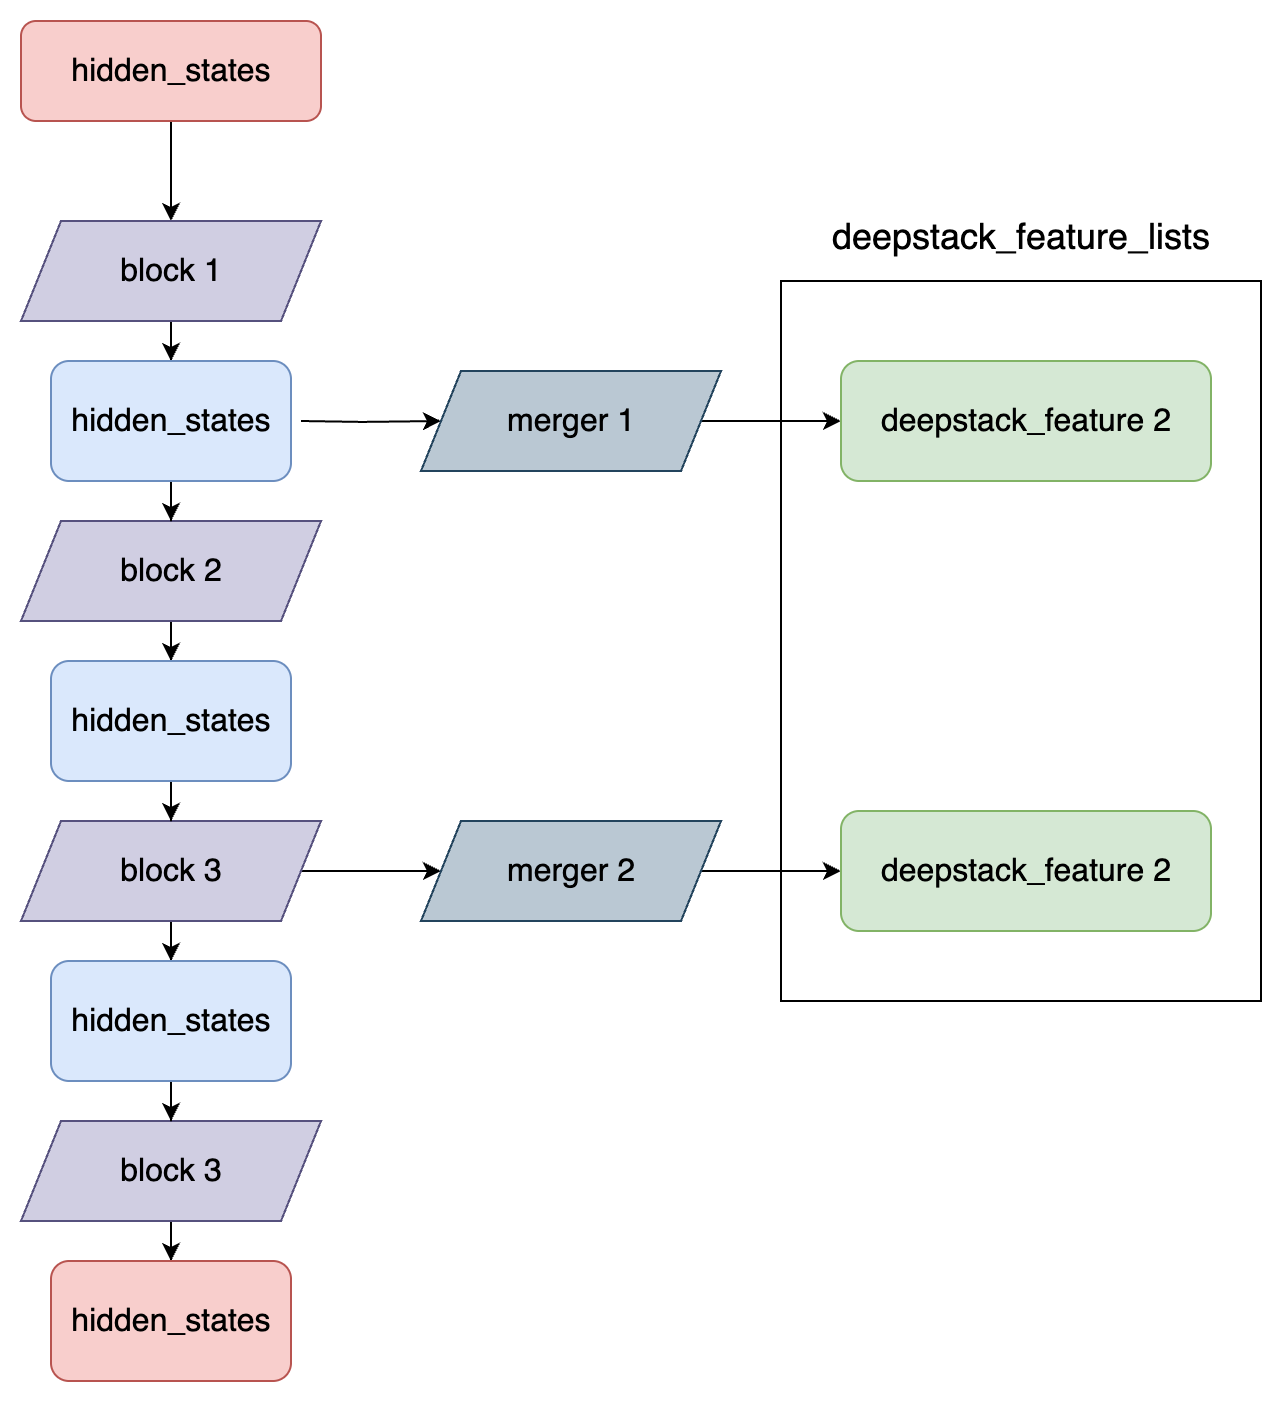
return image_embeds, deepstack_image_embeds可以看到,使用 self.visual 方法获取到了 image_embeds 和 deepstack_image_embeds。image_embeds 直接放到 input tokens 中,而 deepstack_image_embeds 则在后续逐层加入。 接下来,我们看一下 self.visual 是如何实现的。 self.visual 默认是一个 Qwen3VLMoeVisionModel 对象(如果魔改模型的话可以替换成别的),forward 核心代码如下:
def forward(self, hidden_states: torch.Tensor, grid_thw: torch.Tensor, **kwargs) -> torch.Tensor:
        ...
        # 定义 deepstack 特征列表
        deepstack_feature_lists = []
        for layer_num, blk in enumerate(self.blocks):
            # 特征提取
            hidden_states = blk(hidden_states, cu_seqlens=cu_seqlens, position_embeddings=position_embeddings, **kwargs)
            # 只在特定的层收集 deepstack 特征
            if layer_num in self.deepstack_visual_indexes:
                # 注意这里提取到的特征并不是直接用的,而是每个特征又经过了一个不同的 merger 层
                deepstack_feature = self.deepstack_merger_list[self.deepstack_visual_indexes.index(layer_num)](
                    hidden_states
                )
                # 记录 deepstack_feature
                deepstack_feature_lists.append(deepstack_feature)

        hidden_states = self.merger(hidden_states)

return hidden_states, deepstack_feature_lists特征成抽取流程图:
特征注入
代码详解:
# class Qwen3VLMoeTextModel
def forward(..., deepstack_visual_embeds) -> Union[tuple, BaseModelOutputWithPast]:
    ...
    # decoder layers
    for layer_idx, decoder_layer in enumerate(self.layers):
        layer_outputs = decoder_layer(...)
        hidden_states = layer_outputs

        # 在前几层(取决于 deepstack 大小)的隐藏状态中添加 deepstack_feature_list 中的视觉特征
        if deepstack_visual_embeds is not None and layer_idx in range(len(deepstack_visual_embeds)):
            hidden_states = self._deepstack_process(
                hidden_states,
                visual_pos_masks,
                deepstack_visual_embeds[layer_idx],
            )

    hidden_states = self.norm(hidden_states)

    return BaseModelOutputWithPast(
        last_hidden_state=hidden_states,
        past_key_values=past_key_values,
    )


def _deepstack_process(
    self, hidden_states: torch.Tensor, visual_pos_masks: torch.Tensor, visual_embeds: torch.Tensor
):
    # 设备对齐:确保所有张量在同一设备上
    visual_pos_masks = visual_pos_masks.to(hidden_states.device)
    visual_embeds = visual_embeds.to(hidden_states.device, hidden_states.dtype)
    # 特征融合:残差连接,只在视觉token对应位置进行注入,保持文本token的原有特征
    local_this = hidden_states[visual_pos_masks, :].clone() + visual_embeds
    hidden_states[visual_pos_masks, :] = local_this
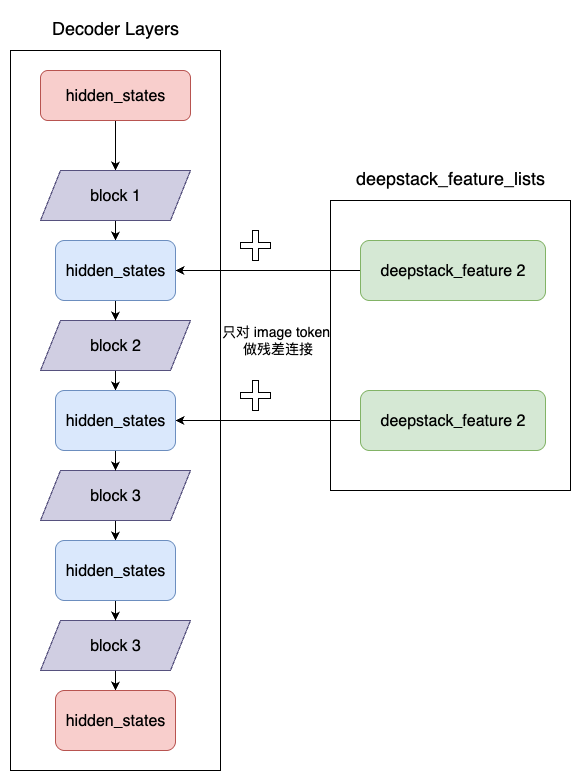
return hidden_states可以看到,在 Qwen3VLMoeTextModel 中,逐层进行 Decode,其中前 n 个(n 为 deepstack 的个数) decoder layer 分别使用上述的 deepstack_image_embeds 以残差连接的方式进行注入。
视觉特征注入流程图:
Qwen3-VL-4B-Instruct FastApi 部署调用
环境准备
基础环境:
----------------
ubuntu 22.04
python 3.12
cuda 12.8
pytorch 2.8.0
----------------本文默认学习者已安装好以上 PyTorch (cuda) 环境,如未安装请自行安装。
显卡配置说明
本教程基于RTX 4090显卡进行部署,该显卡具有24GB显存,完全满足Qwen3-VL-4B-Instruct模型的运行需求。
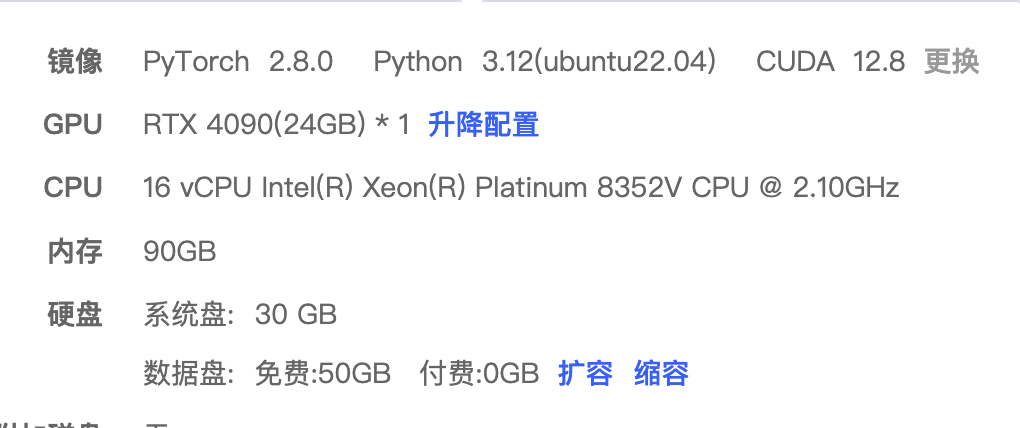
环境安装
首先 pip 换源加速下载并安装依赖包
pip config set global.index-url https://pypi.tuna.tsinghua.edu.cn/simple

pip install modelscope==1.20.0
pip install fastapi==0.115.4
pip install uvicorn==0.32.0
pip install transformers>=4.51.0
pip install accelerate==1.1.1
pip install torchvision==0.19.0
pip install av==13.1.0
pip install qwen-vl-utils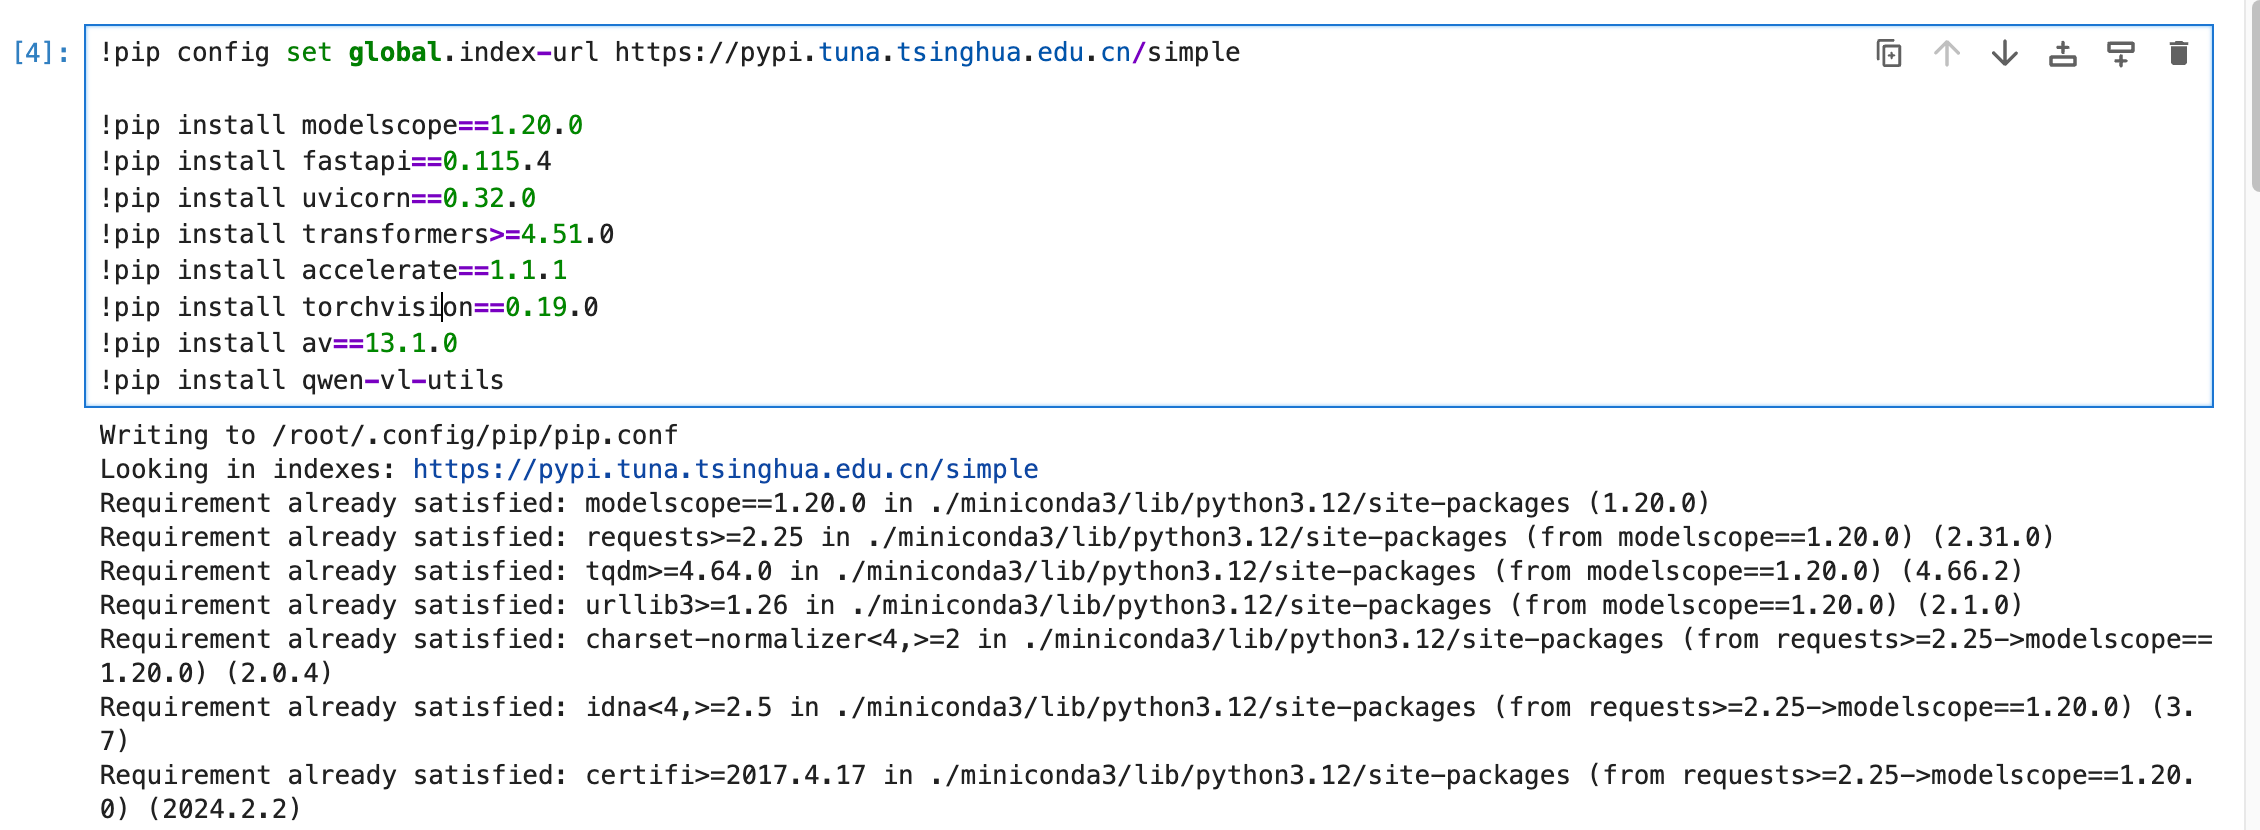
模型下载
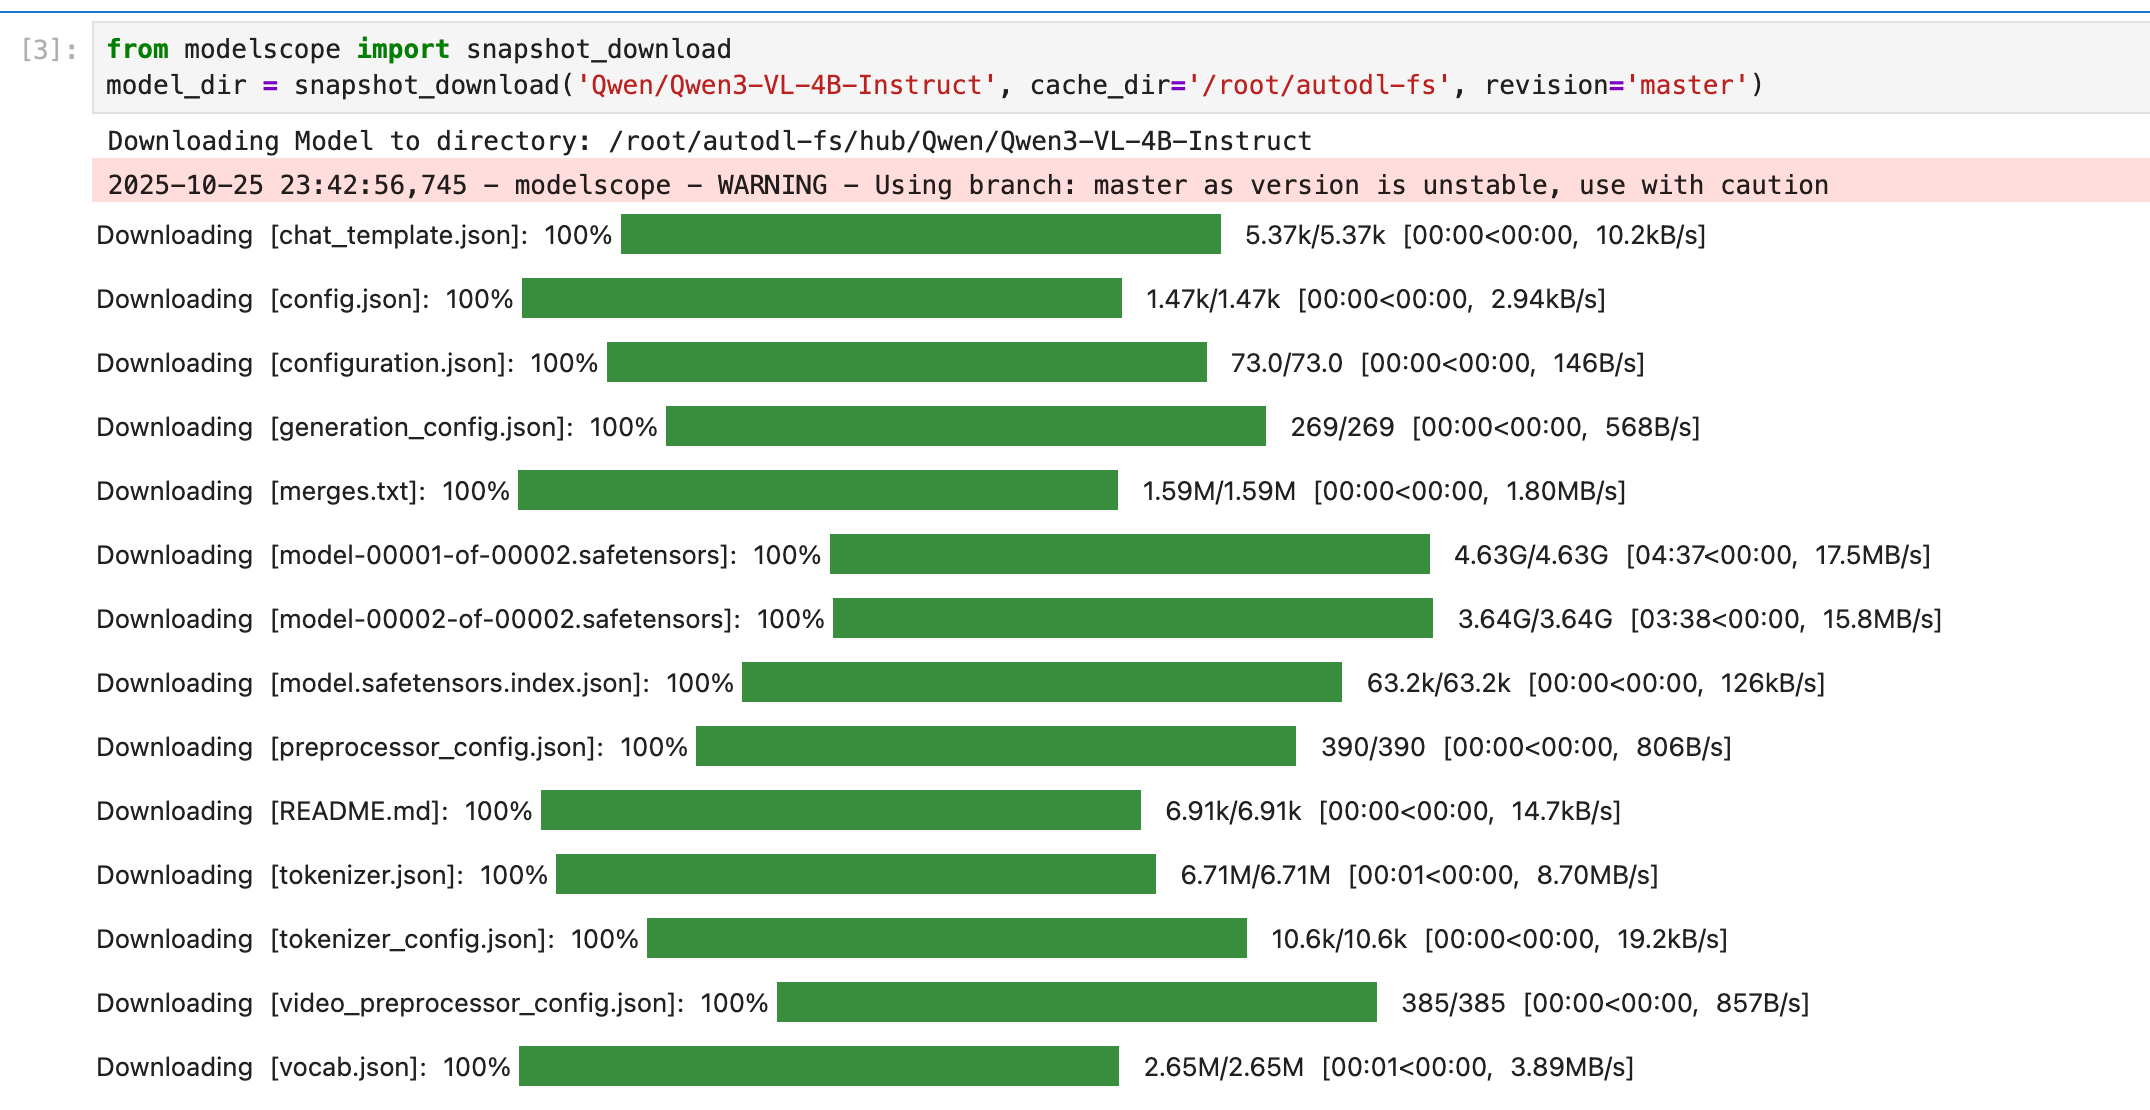
使用 modelscope 中的 snapshot_download 函数下载模型,第一个参数为模型名称,参数 cache_dir 为模型的下载路径。
新建 model_download.py 文件输入以下代码,并运行 python model_download.py 执行下载。
# model_download.py
from modelscope import snapshot_download
model_dir = snapshot_download('Qwen/Qwen3-VL-4B-Instruct', cache_dir='/root/autodl-fs', revision='master')注意:请记得修改
cache_dir为你自己的模型下载路径。建议使用/root/autodl-fs目录,这是持久化存储目录,重启机器后数据不会丢失。Qwen3-VL-4B-Instruct模型实际大小约为9.2GB(包含所有配置文件和权重文件),下载时间根据网络速度而定。
代码准备
API服务端代码
创建API服务端文件 api_server_qwen3vl_simple.py,该文件包含了完整的FastAPI服务实现,支持文本和图像的多模态问答功能。
#!/usr/bin/env python3
# -*- coding: utf-8 -*-

import os
import torch
from transformers import AutoProcessor, Qwen3VLForConditionalGeneration
from qwen_vl_utils import process_vision_info
from fastapi import FastAPI
import uvicorn
from pydantic import BaseModel
from typing import List, Dict, Any, Optional

# 设置环境变量
os.environ["TOKENIZERS_PARALLELISM"] = "false"
os.environ["CUDA_VISIBLE_DEVICES"] = "0"
torch.set_num_threads(8)

# 创建FastAPI应用
app = FastAPI(title="Qwen3-VL-4B Simple API", version="1.0.0")

# 模型路径
model_name_or_path = '/root/autodl-fs/Qwen/Qwen3-VL-4B-Instruct'

# 初始化模型和处理器
model = Qwen3VLForConditionalGeneration.from_pretrained(
    model_name_or_path,
    torch_dtype=torch.bfloat16,
    device_map="auto",
    trust_remote_code=True
)

processor = AutoProcessor.from_pretrained(
    model_name_or_path,
    trust_remote_code=True
)

# 请求模型
class ChatRequest(BaseModel):
    messages: List[Dict[str, Any]]
    max_tokens: Optional[int] = 512
    temperature: Optional[float] = 0.7
    top_p: Optional[float] = 0.9

# 响应模型
class ChatResponse(BaseModel):
    response: str
    model: str = "Qwen3-VL-4B-Instruct"
    usage: Dict[str, int]

@app.get("/")
async def root():
    return {"message": "Qwen3-VL-4B-Instruct API Server is running!"}

@app.get("/health")
async def health_check():
    return {
        "status": "healthy",
        "model": "Qwen3-VL-4B-Instruct",
        "device": str(model.device),
        "torch_version": torch.__version__,
        "cuda_available": torch.cuda.is_available(),
        "gpu_memory": f"{torch.cuda.get_device_properties(0).total_memory / 1024**3:.1f}GB" if torch.cuda.is_available() else "N/A"
    }

@app.post("/v1/chat/completions", response_model=ChatResponse)
async def chat_completions(request: ChatRequest):
    try:
        # 处理消息
        messages = request.messages

        # 处理视觉信息
        text = processor.apply_chat_template(
            messages,
            tokenize=False,
            add_generation_prompt=True
        )

        image_inputs, video_inputs = process_vision_info(messages)

        # 准备输入
        inputs = processor(
            text=[text],
            images=image_inputs,
            videos=video_inputs,
            padding=True,
            return_tensors="pt",
        )
        inputs = inputs.to(model.device)

        # 生成响应
        with torch.no_grad():
            generated_ids = model.generate(
                **inputs,
                max_new_tokens=request.max_tokens,
                temperature=request.temperature,
                top_p=request.top_p,
                do_sample=True,
                pad_token_id=processor.tokenizer.eos_token_id
            )

        # 解码响应
        generated_ids_trimmed = [
            out_ids[len(in_ids):] for in_ids, out_ids in zip(inputs.input_ids, generated_ids)
        ]

        response_text = processor.batch_decode(
            generated_ids_trimmed,
            skip_special_tokens=True,
            clean_up_tokenization_spaces=False
        )[0]

        # 计算token使用量
        input_tokens = inputs.input_ids.shape[1]
        output_tokens = len(generated_ids_trimmed[0])

        return ChatResponse(
            response=response_text,
            usage={
                "prompt_tokens": input_tokens,
                "completion_tokens": output_tokens,
                "total_tokens": input_tokens + output_tokens
            }
        )

    except Exception as e:
        return ChatResponse(
            response=f"Error: {str(e)}",
            usage={"prompt_tokens": 0, "completion_tokens": 0, "total_tokens": 0}
        )

if __name__ == "__main__":
    uvicorn.run(
        app,
        host="0.0.0.0",
        port=8000,
        log_level="info"
)重要提示:根据实际情况修改
model_name_or_path变量中的模型路径。
启动API服务
在终端中运行以下命令启动API服务:
python api_server_qwen3vl_simple.py启动成功后,你将看到类似以下的输出:
INFO:     Started server process [12345]
INFO:     Waiting for application startup.
INFO:     Application startup complete.
INFO:     Uvicorn running on http://0.0.0.0:8000 (Press CTRL+C to quit)
测试API服务
测试客户端代码
创建测试脚本 test_simple_api.py,用于验证图像问答API服务的功能。
#!/usr/bin/env python3
# -*- coding: utf-8 -*-

import requests
import json

# API服务地址
API_BASE_URL = "http://localhost:8000"

def test_health_check():
    """测试健康检查接口"""
    print("=== 测试健康检查接口 ===")
    try:
        response = requests.get(f"{API_BASE_URL}/health")
        if response.status_code == 200:
            result = response.json()
            print("✅ 健康检查通过")
            print(f"模型: {result.get('model')}")
            print(f"设备: {result.get('device')}")
            print(f"GPU内存: {result.get('gpu_memory')}")
            return True
        else:
            print(f"❌ 健康检查失败: {response.status_code}")
            return False
    except Exception as e:
        print(f"❌ 健康检查异常: {e}")
        return False

def test_text_chat():
    """测试纯文本对话"""
    print("\n=== 测试纯文本对话 ===")

    messages = [
        {
            "role": "user",
            "content": "你好,请介绍一下你自己。"
        }
    ]

    payload = {
        "messages": messages,
        "max_tokens": 256,
        "temperature": 0.7
    }

    try:
        response = requests.post(
            f"{API_BASE_URL}/v1/chat/completions",
            json=payload,
            headers={"Content-Type": "application/json"}
        )

        if response.status_code == 200:
            result = response.json()
            print("✅ 文本对话测试成功")
            print(f"回复: {result['response']}")
            print(f"Token使用: {result['usage']}")
            return True
        else:
            print(f"❌ 文本对话测试失败: {response.status_code}")
            print(f"错误信息: {response.text}")
            return False

    except Exception as e:
        print(f"❌ 文本对话测试异常: {e}")
        return False

def test_image_chat():
    """测试图像对话"""
    print("\n=== 测试图像对话 ===")

    # 使用在线图片进行测试
    image_url = "https://qianwen-res.oss-cn-beijing.aliyuncs.com/Qwen-VL/assets/demo.jpeg"

    try:
        messages = [
            {
                "role": "user",
                "content": [
                    {
                        "type": "image",
                        "image": image_url
                    },
                    {
                        "type": "text",
                        "text": "请描述这张图片的内容。"
                    }
                ]
            }
        ]

        payload = {
            "messages": messages,
            "max_tokens": 512,
            "temperature": 0.7
        }

        response = requests.post(
            f"{API_BASE_URL}/v1/chat/completions",
            json=payload,
            headers={"Content-Type": "application/json"}
        )

        if response.status_code == 200:
            result = response.json()
            print("✅ 图像对话测试成功")
            print(f"回复: {result['response']}")
            print(f"Token使用: {result['usage']}")
            return True
        else:
            print(f"❌ 图像对话测试失败: {response.status_code}")
            print(f"错误信息: {response.text}")
            return False

    except Exception as e:
        print(f"❌ 图像对话测试异常: {e}")
        return False

def main():
    """主测试函数"""
    print("开始测试 Qwen3-VL-4B-Instruct API 服务")
    print("=" * 50)

    # 执行测试
    health_ok = test_health_check()
    text_ok = test_text_chat()
    image_ok = test_image_chat()

    # 总结测试结果
    print("\n" + "=" * 50)
    print("测试结果总结:")
    print(f"健康检查: {'✅ 通过' if health_ok else '❌ 失败'}")
    print(f"文本对话: {'✅ 通过' if text_ok else '❌ 失败'}")
    print(f"图像对话: {'✅ 通过' if image_ok else '❌ 失败'}")

    if health_ok and text_ok:
        print("\n🎉 API服务运行正常!")
    else:
        print("\n⚠️  部分功能存在问题,请检查服务状态")

if __name__ == "__main__":
main()重要提示:该测试脚本使用在线图片链接进行测试,无需本地图片文件,更加便于使用。测试图片来源:
https://qianwen-res.oss-cn-beijing.aliyuncs.com/Qwen-VL/assets/demo.jpeg
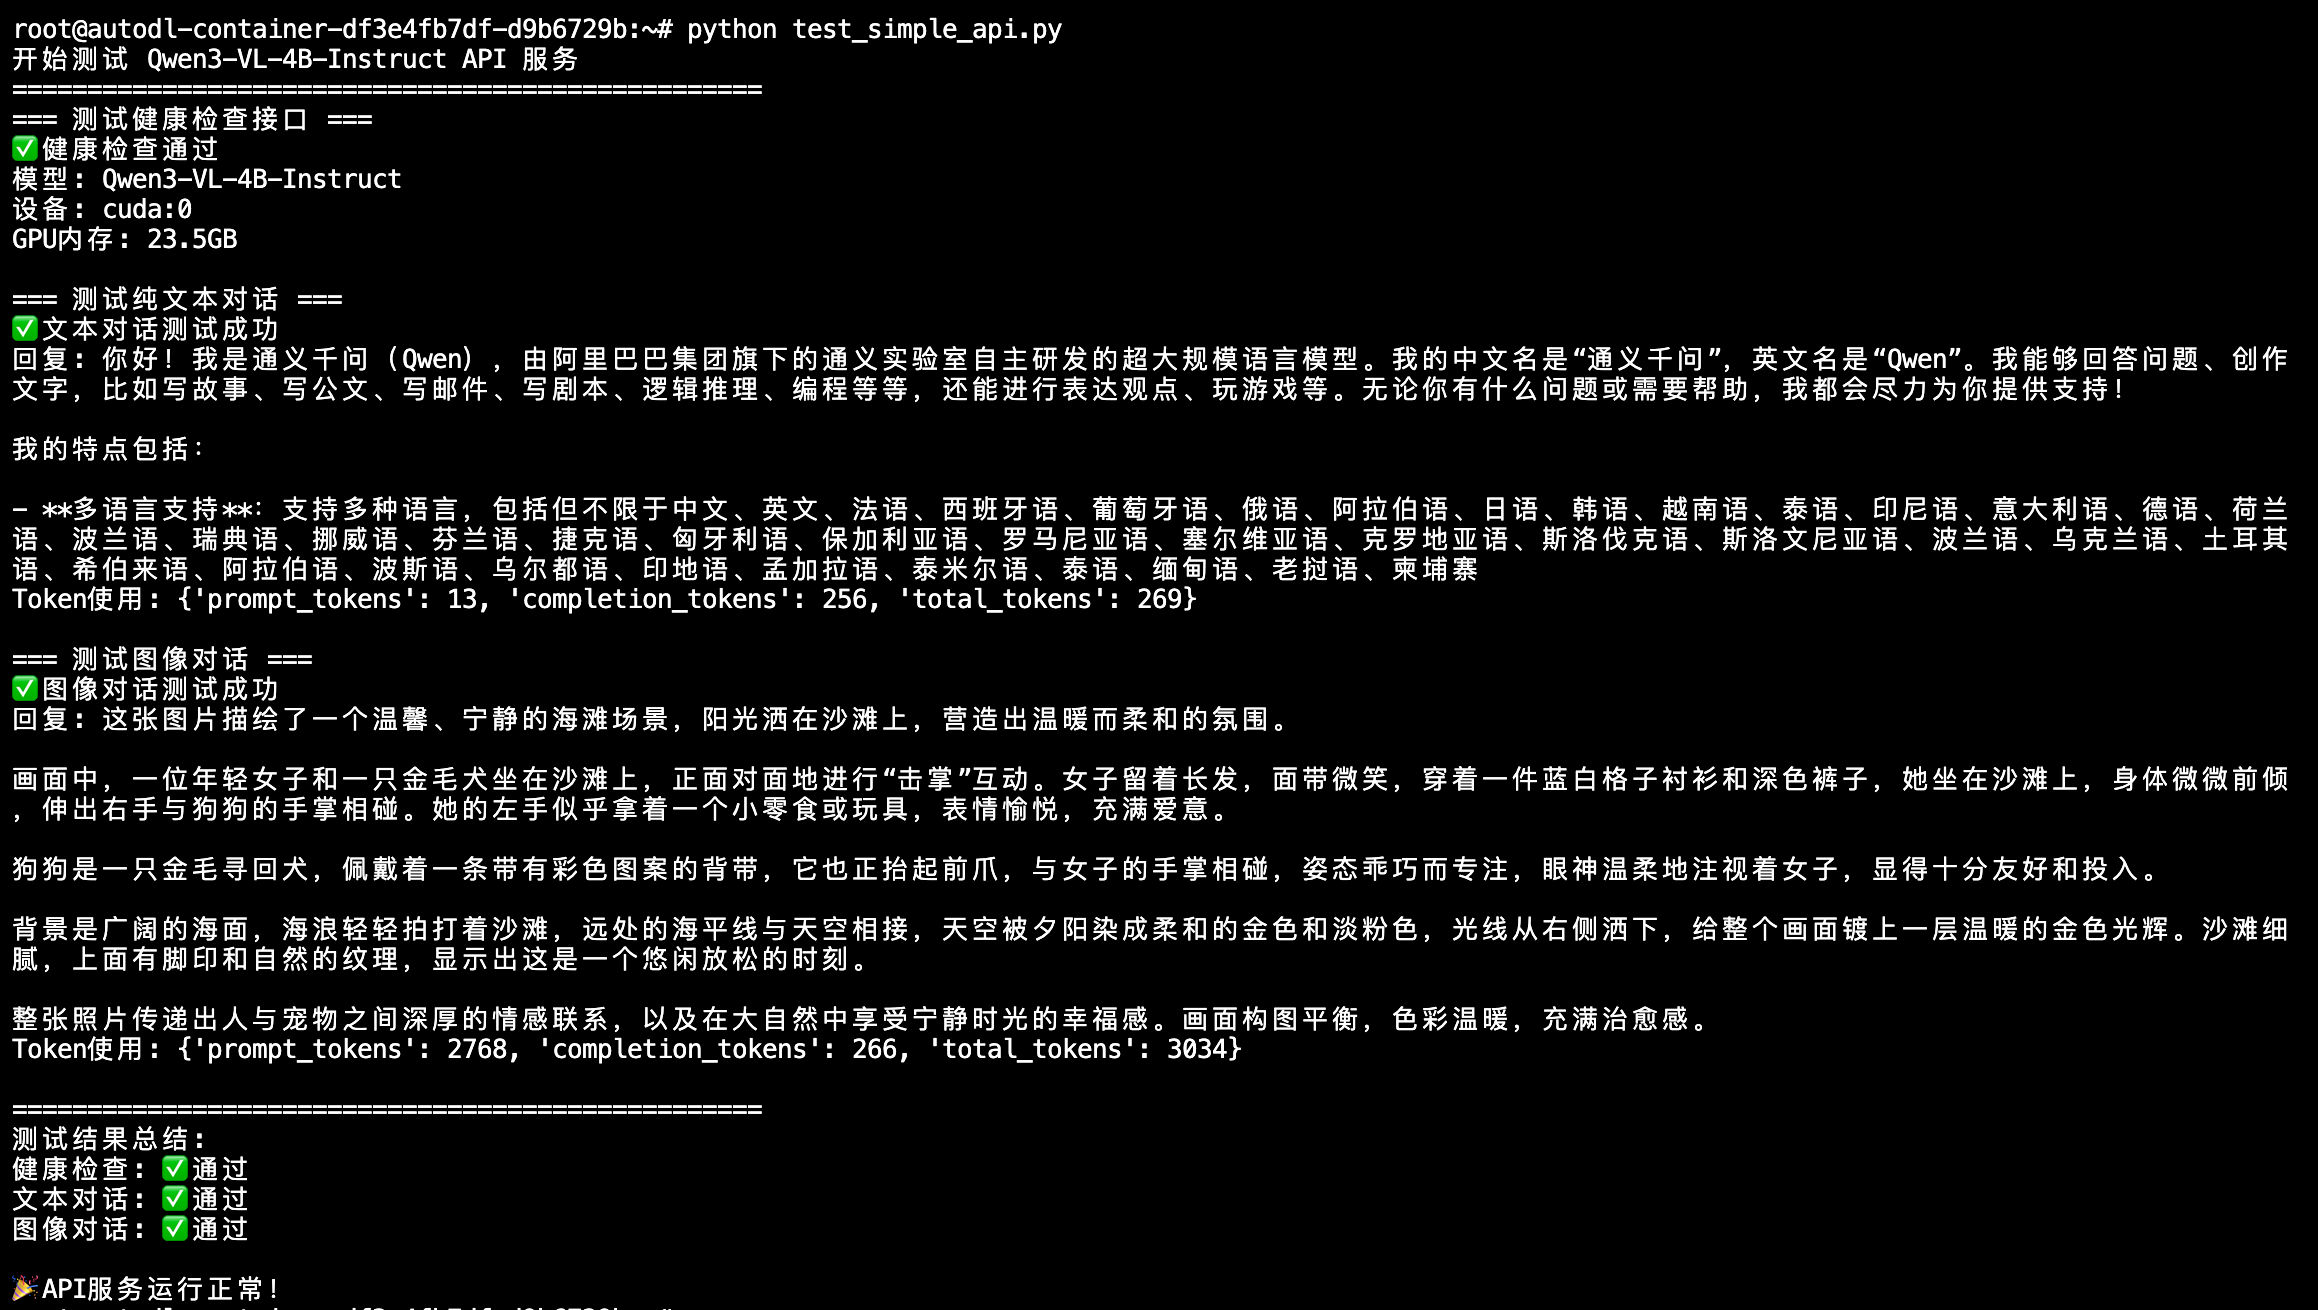
执行后得到的返回结果如下所示:
常见问题
Q1: 模型加载失败
问题: 出现 "CUDA out of memory" 错误 解决方案:
确保RTX 4090有足够的显存空间
尝试使用量化配置减少显存占用
检查是否有其他程序占用显存
Q2: 推理速度慢
问题: 模型推理响应时间过长 解决方案:
减少 max_tokens 参数值
使用量化模型
确保CUDA和PyTorch版本兼容
视频问答API服务
除了基础的图像问答功能,Qwen3-VL-4B-Instruct还支持视频内容理解。我们可以创建一个增强版的API服务来支持视频输入。
创建视频问答服务
新建 api_server_qwen3vl_video.py 文件:
#!/usr/bin/env python3
# -*- coding: utf-8 -*-

import os
import torch
from transformers import AutoProcessor, Qwen3VLForConditionalGeneration
from qwen_vl_utils import process_vision_info
from fastapi import FastAPI
import uvicorn
from pydantic import BaseModel
from typing import List, Dict, Any, Optional

# 设置环境变量
os.environ["TOKENIZERS_PARALLELISM"] = "false"
os.environ["CUDA_VISIBLE_DEVICES"] = "0"
torch.set_num_threads(8)

# 创建FastAPI应用
app = FastAPI(title="Qwen3-VL-4B Video API", version="1.0.0")

# 模型路径
model_name_or_path = '/root/autodl-fs/Qwen/Qwen3-VL-4B-Instruct'

# 初始化模型和处理器
model = Qwen3VLForConditionalGeneration.from_pretrained(
    model_name_or_path,
    torch_dtype=torch.bfloat16,
    device_map="auto",
    trust_remote_code=True
)

processor = AutoProcessor.from_pretrained(
    model_name_or_path,
    trust_remote_code=True
)

# 请求模型
class ChatRequest(BaseModel):
    messages: List[Dict[str, Any]]
    max_tokens: Optional[int] = 512
    temperature: Optional[float] = 0.7
    top_p: Optional[float] = 0.9

# 响应模型
class ChatResponse(BaseModel):
    response: str
    model: str = "Qwen3-VL-4B-Instruct"
    usage: Dict[str, int]

@app.get("/")
async def root():
    return {"message": "Qwen3-VL-4B-Instruct Video API Server is running!"}

@app.get("/health")
async def health_check():
    return {
        "status": "healthy",
        "model": "Qwen3-VL-4B-Instruct",
        "device": str(model.device),
        "torch_version": torch.__version__,
        "cuda_available": torch.cuda.is_available(),
        "gpu_memory": f"{torch.cuda.get_device_properties(0).total_memory / 1024**3:.1f}GB" if torch.cuda.is_available() else "N/A",
        "supported_formats": ["image", "video"]
    }

@app.post("/v1/chat/completions", response_model=ChatResponse)
async def chat_completions(request: ChatRequest):
    try:
        # 处理消息
        messages = request.messages

        # 处理视觉信息(包括图像和视频)
        text = processor.apply_chat_template(
            messages,
            tokenize=False,
            add_generation_prompt=True
        )

        image_inputs, video_inputs = process_vision_info(messages)

        # 准备输入
        inputs = processor(
            text=[text],
            images=image_inputs,
            videos=video_inputs,
            padding=True,
            return_tensors="pt",
        )
        inputs = inputs.to(model.device)

        # 生成响应
        with torch.no_grad():
            generated_ids = model.generate(
                **inputs,
                max_new_tokens=request.max_tokens,
                temperature=request.temperature,
                top_p=request.top_p,
                do_sample=True,
                pad_token_id=processor.tokenizer.eos_token_id
            )

        # 解码响应
        generated_ids_trimmed = [
            out_ids[len(in_ids):] for in_ids, out_ids in zip(inputs.input_ids, generated_ids)
        ]

        response_text = processor.batch_decode(
            generated_ids_trimmed,
            skip_special_tokens=True,
            clean_up_tokenization_spaces=False
        )[0]

        # 计算token使用量
        input_tokens = inputs.input_ids.shape[1]
        output_tokens = len(generated_ids_trimmed[0])

        return ChatResponse(
            response=response_text,
            usage={
                "prompt_tokens": input_tokens,
                "completion_tokens": output_tokens,
                "total_tokens": input_tokens + output_tokens
            }
        )

    except Exception as e:
        return ChatResponse(
            response=f"Error: {str(e)}",
            usage={"prompt_tokens": 0, "completion_tokens": 0, "total_tokens": 0}
        )

# 兼容原有的 /generate 接口
@app.post("/generate")
async def generate_response(request: ChatRequest):
    """兼容原有接口格式"""
    result = await chat_completions(request)
    return {"response": result.response}

if __name__ == "__main__":
    uvicorn.run(
        app,
        host="0.0.0.0",
        port=8000,
        log_level="info"
)启动视频问答服务
python api_server_qwen3vl_video.py
视频问答测试
创建测试脚本
新建 test_video_api.py 文件:
#!/usr/bin/env python3
# -*- coding: utf-8 -*-

import requests
import json
import time

# API服务地址
API_BASE_URL = "http://localhost:8000"

def test_health_check():
    """测试健康检查接口"""
    print("=== 健康检查测试 ===")
    try:
        response = requests.get(f"{API_BASE_URL}/health")
        if response.status_code == 200:
            result = response.json()
            print("✅ 健康检查通过")
            print(f"模型: {result.get('model')}")
            print(f"设备: {result.get('device')}")
            print(f"CUDA可用: {result.get('cuda_available')}")
            print(f"GPU内存: {result.get('gpu_memory')}")
            print(f"支持格式: {result.get('supported_formats')}")
            return True
        else:
            print(f"❌ 健康检查失败: {response.status_code}")
            return False
    except Exception as e:
        print(f"❌ 健康检查异常: {e}")
        return False

def test_video_conversation():
    """测试视频对话"""
    print("\n=== 视频对话测试 ===")
    try:
        # 使用本地视频文件(请确保视频文件存在)
        video_path = "./test_video.mp4"

        payload = {
            "messages": [
                {
                    "role": "user",
                    "content": [
                        {
                            "type": "video",
                            "video": video_path,
                            "fps": 1.0,
                            "max_pixels": 360 * 420
                        },
                        {
                            "type": "text",
                            "text": "请描述这个视频的内容,包括主要场景和动作。"
                        }
                    ]
                }
            ],
            "max_tokens": 512,
            "temperature": 0.7
        }

        response = requests.post(
            f"{API_BASE_URL}/v1/chat/completions",
            json=payload,
            headers={"Content-Type": "application/json"}
        )

        if response.status_code == 200:
            result = response.json()
            print("✅ 视频对话测试成功")
            print(f"视频文件: {video_path}")
            print(f"回复: {result['response']}")
            print(f"Token使用: {result['usage']}")
            return True
        else:
            print(f"❌ 视频对话测试失败: {response.status_code}")
            print(f"错误信息: {response.text}")
            return False

    except Exception as e:
        print(f"❌ 视频对话测试异常: {e}")
        return False

def main():
    """主测试函数"""
    print("开始测试 Qwen3-VL-4B-Instruct Video API")
    print("=" * 50)

    # 等待服务启动
    print("等待API服务启动...")
    time.sleep(2)

    # 执行测试
    tests = [
        test_health_check,
        test_video_conversation
    ]

    passed = 0
    total = len(tests)

    for test_func in tests:
        if test_func():
            passed += 1
        time.sleep(1)  # 测试间隔

    print("\n" + "=" * 50)
    print(f"测试完成: {passed}/{total} 通过")

    if passed == total:
        print("🎉 所有测试通过!")
    else:
        print("⚠️  部分测试失败,请检查API服务状态")

if __name__ == "__main__":
main()运行测试
python test_video_api.py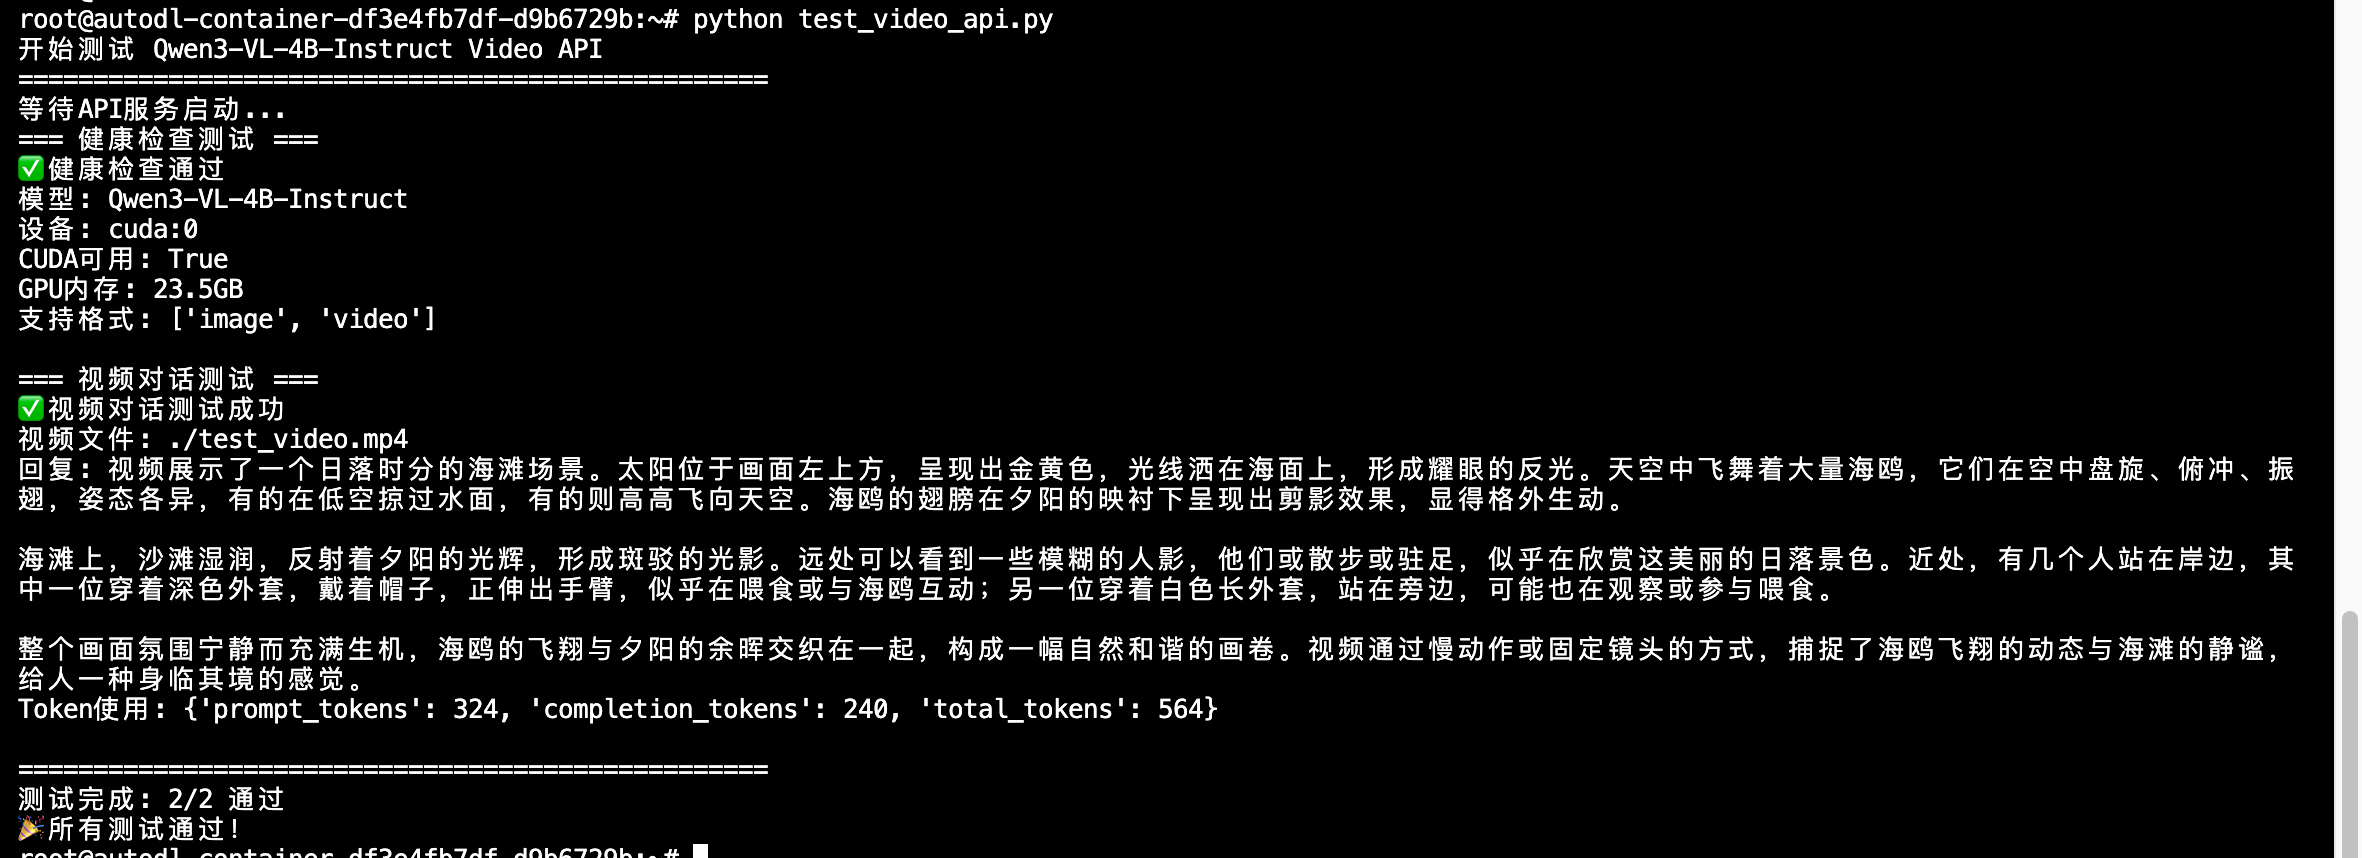
04-Qwen3-VL-4B-Instruct-vLLM
vLLM 简介
vLLM 是一个高性能的大语言模型推理与服务框架,具备以下特点:
高效的 KV 缓存与内存管理:基于 PagedAttention 显著降低显存浪费,提升长文本与高并发场景下的吞吐。
兼容 OpenAI 接口:可直接以 OpenAI API 形式对外提供 completions 与 chat completions 能力,便于与现有生态集成。
多 GPU 并行与易扩展:支持 Tensor Parallel 等策略,参数简单、易于横向扩展吞吐与上下文长度上限。
生态良好:与 HuggingFace/ModelScope 模型仓库无缝衔接,支持多种推理优化与特性(如推理/思考内容解析、工具调用)。
环境准备
推荐基础环境如下:
显存预算建议:1 * NVIDIA RTX 5090
----------------
ubuntu 22.04
python 3.12
cuda 12.8
pytorch 2.8.0
----------------虚拟环境配置
pip install vllm==0.11.0
pip install openai==2.3.0
pip install modelscope==1.30.0
pip install qwen_vl_utils==0.0.14提示:请确保环境中 NVIDIA 驱动、CUDA 与 PyTorch CUDA 编译版本匹配,可用
nvidia-smi与python -c "import torch; print(torch.version.cuda, torch.cuda.is_available())"进行快速自检。
模型下载
# model_download.py
# 注意修改cache_dir为保存的路径
from modelscope import snapshot_download
model_dir = snapshot_download('Qwen/Qwen3-VL-4B-Instruct', cache_dir='请修改我!!!', revision='master')

print(f"模型下载完成,保存路径为:{model_dir}")模型简介
Qwen3-VL-4B-Instruct 是Qwen3-VL系列中的视觉语言模型,有着优秀的文本理解和生成能力、视觉感知和推理能力以及空间和视频动态理解能力。 评测结果表明,该模型在STEM、VQA、OCR、视频理解、智能体等多个任务中与GPT-5-Mini和Cluade-4-Sonnet相媲美。 另外,该模型是非推理模型,如果想要体验更强且带有thinking mode的模型,可以下载同尺寸的Qwen3-VL-30B-A3B-Thinking或者更大的旗舰模型Qwen3-VL-235B-A22B-Thinking。


vLLM Serving
Python命令行启动服务
CUDA_VISIBLE_DEVICES=0 python -m vllm.entrypoints.openai.api_server \
  --model 请修改我!!!/Qwen/Qwen3-VL-4B-Instruct \
  --served-model-name Qwen3-VL-4B-Instruct \
  --max-model-len 8192 \
  --tensor-parallel-size 1 \
  --port 8085 \
  --trust_remote_code \
--gpu_memory_utilization 0.9参数说明
CUDA_VISIBLE_DEVICES: 指定可见的GPU。
--tensor-parallel-size:张量并行划分数。使用多 GPU时使用;多卡可提升吞吐和可用上下文长度上限。
--max-model-len:单请求最大上下文长度(输入+输出)。越大显存占用越高,易触发 OOM。可按显存情况下调,如 8192。
--gpu_memory_utilization:vLLM 目标可用显存比例(0~1)。若 OOM 可尝试增加。
--served-model-name:对外暴露的模型名。客户端需用同名 model 调用。
--port/--host:服务监听端口/地址,默认为8080。
--trust_remote_code:允许加载仓库中的自定义代码(必需,否则部分模型无法正确初始化)。
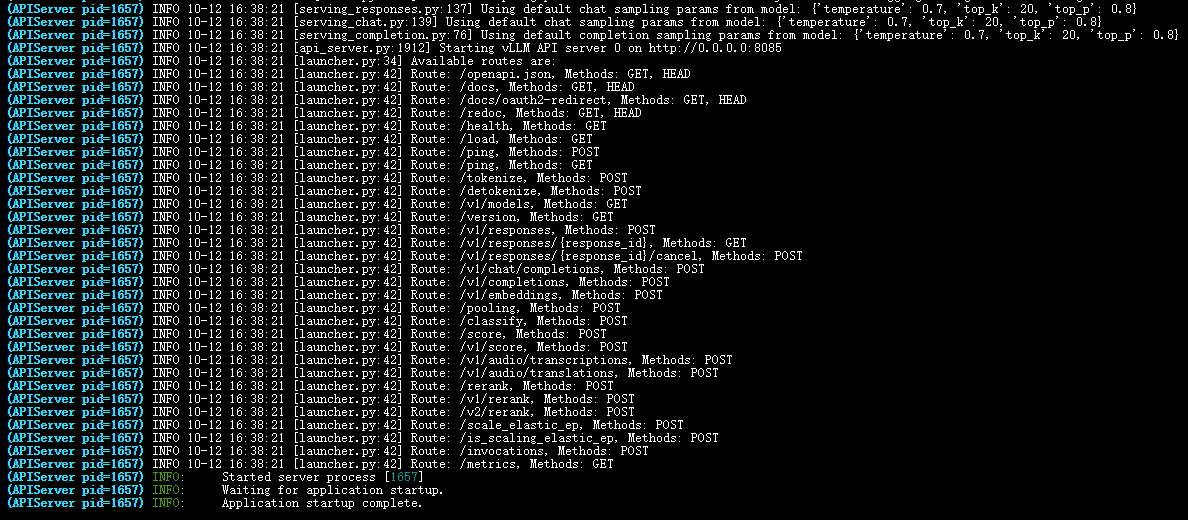
成功启动后,你将看到 Application startup complete 的输出如图:
我们通过上述 vLLM 启动的服务兼容 OpenAI 接口,因此可以很方便地通过 Python 的 OpenAI 库进行调用。下面我们通过日常问答,图片描述和视频推理的实际案例来测试 Qwen3-VL-4B-Instruct 的能力。
日常及图像描述测试
from openai import OpenAI

openai_api_key = "EMPTY"
openai_api_base = "http://127.0.0.1:8085/v1" # 使用正确的端口
daily_chat_message = "将“I love Qwen3-VL-4B-Instruct”这句话的所有内容反过来写"

# 实例化OpenAI client
client = OpenAI(
    api_key=openai_api_key,
    base_url=openai_api_base,
)

# 日常问答
daily_chat_response = client.chat.completions.create(
    model="Qwen3-VL-4B-Instruct",
    messages = [
        {
            "role": "user",
            "content": daily_chat_message
        }
    ]
)
print(f"Qwen3-VL-4B-Instruct日常问答: {daily_chat_response.choices[0].message.content}")
print("-"*100)

# 图片描述
image_des_response = client.chat.completions.create(
    model="Qwen3-VL-4B-Instruct",
    messages = [
        {
            "role": "user",
            "content": [
                {
                    "type": "image_url",
                    "image_url": {
                        "url": "https://qianwen-res.oss-cn-beijing.aliyuncs.com/Qwen-VL/assets/demo.jpeg"
                    }
                },
                {"type": "text", "text": "Describe this image."},
            ],
        }
    ]
)
print(f"Qwen3-VL-4B-Instruct图片描述: {image_des_response.choices[0].message.content}")测试结果如下:
Qwen3-VL-4B-Instruct日常问答: 我们来一步一步地将这句话 "I love Qwen3-VL-4B-Instruct" 反过来写。

将句子 “I love Qwen3-VL-4B-Instruct” 的所有内容反过来写,即逐字符反转,结果如下:

tcurtsnI-B4-LV-3newQ evol I

----------------------------------------------------------------------------------------------------
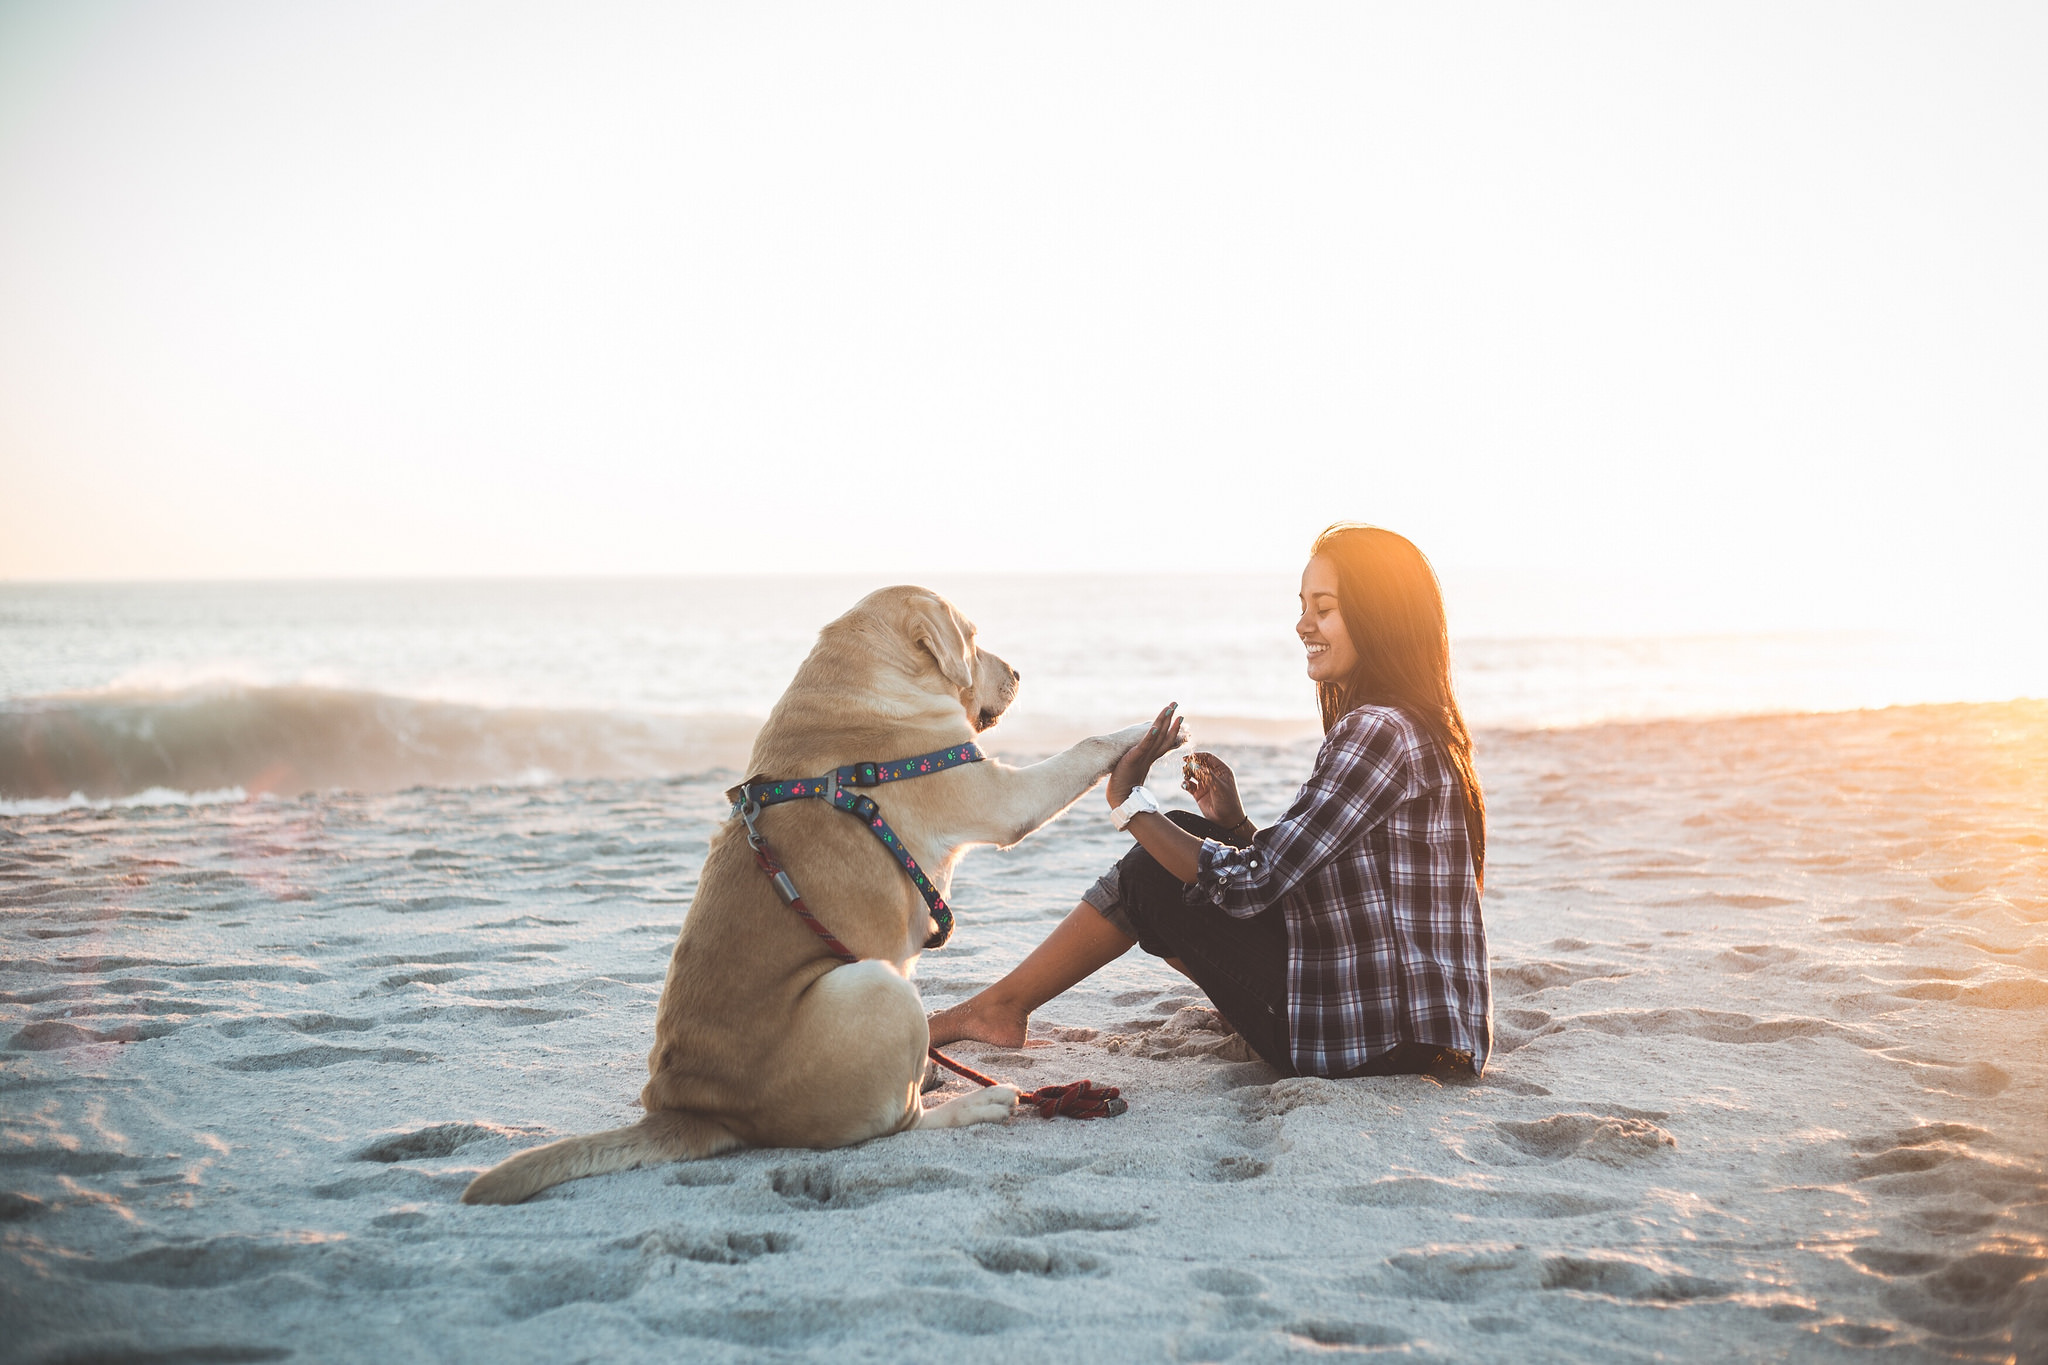
Qwen3-VL-4B-Instruct图片描述: Of course. Here is a detailed description of the image.

This is a heartwarming and serene photograph capturing a tender moment between a woman and her dog on a sandy beach during what appears to be sunrise or sunset.

- **Main Subjects and Interaction:** The central focus is a woman and a large, light-colored dog, likely a yellow Labrador Retriever, sitting on the sand. They are engaged in a playful and affectionate interaction. The dog is sitting upright, extending its right front paw to meet the woman's hand in a "high-five" gesture. The woman, sitting cross-legged, is smiling warmly and looking at the dog, reciprocating the high-five. Her expression conveys joy and affection.

- **Setting and Environment:** The scene is set on a wide, open beach. The sand is light-colored and appears soft, with gentle ripples and footprints visible. In the background, the ocean stretches out to the horizon, with a small, gentle wave breaking near the shore. The overall atmosphere is peaceful and tranquil.

- **Lighting and Atmosphere:** The image is bathed in the warm, golden light of the sun, which is low in the sky, likely just above the horizon. This creates a beautiful lens flare and a soft, hazy glow, particularly on the right side of the image where the sun is positioned. The light illuminates the woman's hair and the dog's fur, creating a warm and inviting ambiance. The sky is a bright, pale white, indicating the intensity of the sunlight.

- **Details and Attire:** The woman has long, dark brown hair and is wearing a black and white plaid flannel shirt over dark pants. She is barefoot, which adds to the relaxed and natural feel of the scene. The dog is wearing a blue harness adorned with a pattern of small, colorful paw prints. A red leash lies on the sand near the dog.

- **Composition:** The subjects are positioned slightly off-center, creating a balanced and dynamic composition. The shallow depth of field keeps the woman and dog in sharp focus while softly blurring the background, which draws the viewer's attention to their interaction. The overall mood of the image is one of happiness, companionship, and the simple joy of a shared moment with a beloved pet.分析
Q1
Q2
I love Qwen3-VL-4B-Instruct → tcurtsnI-B4-LV-3newQ evol I
经过人工检验,这两个问题 Qwen3-VL-4B-Instruct 的回复都挺不错的,倒叙句子完全正确,图片描述非常详尽清晰且符合原图。同样的图片描述对比 Qwen2-VL 的测试结果可见 self-llm Qwen2-VL-2B-Instruct FastApi 部署调用。
| 评估维度 | Qwen3-VL-4B-Instruct | Qwen2-VL-2B-Instruct |
| 细节丰富度与画面还原度 | 提供了极为详尽的视觉细节:包括狗的品种(黄色拉布拉多)、女子的发色(深棕色)、衣着(黑白格子法兰绒衬衫+深色裤子)、狗的配饰(蓝色带彩色爪印图案的胸背带)、 leash 的颜色(红色)以及沙滩上的脚印、波纹等环境细节。这些信息不仅增强了画面的真实感,也帮助读者在脑海中精准构建图像。 | 虽然也提到了基本元素(如格子衬衫、高举的狗爪、海洋背景),但描述较为笼统,缺乏具体特征(如狗的品种、颜色、配饰等),画面感较弱。 |
| 情感与氛围营造 | 不仅描述了“微笑”,还深入刻画了人物情绪(“温暖的笑容”,“喜悦与爱意”)和整体氛围(“宁静”,“温馨”,“简单快乐的陪伴”),并通过光线(“金色晨昏光”,“柔光晕染”,“镜头光晕”)强化了情感基调。 | 虽提到“平静而喜悦”,但情感表达较为表面,缺乏细腻的情绪层次和氛围渲染。 |
| 结构与逻辑性 | 采用清晰的分段结构(主体互动、环境、光线、服饰、构图),逻辑严谨,层次分明,便于读者系统理解图像内容。 | 则为一段式叙述,信息堆砌,缺乏组织,阅读体验不如前者流畅。 |
| 语言表现力 | 使用了更具文学性和画面感的词汇,如“沐浴在金色阳光中”“柔焦背景突出主体”“轻柔的波浪拍岸”等,语言生动、富有感染力。 | 语言较为平实,偏向功能性描述,缺乏美感和感染力。 |
Qwen3-VL-4B-Instruct 在细节还原、情感表达、结构组织和语言表现力四个方面均显著优于 Qwen2-VL-2B-Instruct。不仅准确传达了图像内容,还成功唤起了读者的情感共鸣,作为图像描述显然质量更高。
视频推理测试
输入视频预览如下:

import torch
from qwen_vl_utils import process_vision_info
from modelscope import AutoProcessor
from vllm import LLM, SamplingParams

import os
os.environ['VLLM_WORKER_MULTIPROC_METHOD'] = 'spawn'

def prepare_inputs_for_vllm(messages, processor):
    text = processor.apply_chat_template(messages, tokenize=False, add_generation_prompt=True)
    # qwen_vl_utils 0.0.14+ reqired
    image_inputs, video_inputs, video_kwargs = process_vision_info(
        messages,
        image_patch_size=processor.image_processor.patch_size,
        return_video_kwargs=True,
        return_video_metadata=True
    )
    print(f"video_kwargs: {video_kwargs}")

    mm_data = {}
    if image_inputs is not None:
        mm_data['image'] = image_inputs
    if video_inputs is not None:
        mm_data['video'] = video_inputs

    return {
        'prompt': text,
        'multi_modal_data': mm_data,
        'mm_processor_kwargs': video_kwargs
    }


if __name__ == '__main__':
    messages = [
        {
            "role": "user",
            "content": [
                {
                    "type": "video",
                    "video": "./space_woaudio.mp4",
                },
                {"type": "text", "text": "Describe this video. And guess what is the man going to do?"},
            ],
        }
    ]

    checkpoint_path = "请修改我!!!/Qwen/Qwen3-VL-4B-Instruct"
    processor = AutoProcessor.from_pretrained(checkpoint_path)
    inputs = [prepare_inputs_for_vllm(message, processor) for message in [messages]]

    llm = LLM(
        model=checkpoint_path,
        trust_remote_code=True,
        gpu_memory_utilization=0.99,
        enforce_eager=False,
        tensor_parallel_size=torch.cuda.device_count(),
        seed=0
    )

    sampling_params = SamplingParams(
        temperature=0,
        max_tokens=128,
        top_k=-1,
        stop_token_ids=[],
    )

    for i, input_ in enumerate(inputs):
        print()
        print('=' * 40)
        print(f"Inputs[{i}]: {input_['prompt']=!r}")
    print('\n' + '>' * 40)

    outputs = llm.generate(inputs, sampling_params=sampling_params)
    for i, output in enumerate(outputs):
        generated_text = output.outputs[0].text
        print()
        print('=' * 40)
print(f"Generated Response: {generated_text!r}")测试结果:
========================================
Inputs[0]: input_['prompt']='<|im_start|>user\n<|vision_start|><|video_pad|><|vision_end|>Describe this video. And guess what is the man going to do?<|im_end|>\n<|im_start|>assistant\n'

>>>>>>>>>>>>>>>>>>>>>>>>>>>>>>>>>>>>>>>>
Adding requests: 100%|██████████████████████████████████████████████████████████████████████████████████████████████████████████████████████████████████████████████████████████████████████████████████████████████████████████████████████████████████████████████████████████████████████| 1/1 [00:03<00:00,  3.58s/it]
Processed prompts: 100%|████████████████████████████████████████████████████████████████████████████████████████████████████████████████████████████████████████████████████████████████████████████████████████████████████████████| 1/1 [00:01<00:00,  1.64s/it, est. speed input: 1270.83 toks/s, output: 77.94 toks/s]

========================================
Generated Response: "Based on the provided video frames, here is a detailed description and a logical guess about the man's next action.\n\n### Video Description\n\nThe video is set inside a high-tech **Mission Control Center**, as indicated by the prominent sign above the main display. The environment is filled with advanced technology, suggesting a setting for monitoring and managing a space mission.\n\n- **The Man:** A middle-aged man with short, graying hair is the central figure. He is dressed in a dark blue polo shirt with a small NASA logo on the left chest and khaki pants. He is actively speaking and gesturing with both hands, indicating he is giving..." (备注:超出`max_tokens`后续被截断)注意视频推理需要大量显存,可能需要设置比较极限的推理参数,例如上述代码中的max_tokens=128,gpu_memory_utilization=0.99,这也是测试被截断的原因。但是依然能够从已生成的内容中看出模型有良好的视频理解和推理能力。
Qwen/Qwen3-VL-4B-Instruct Lora 可视化微调案例 - LaTexOCR
Qwen3-VL在文本理解和生成、视觉感知和推理、扩展的上下文长度、增强的空间和视频动态理解方面都有显著改进。具有适用于从边缘到云的 Dense 和 MoE架构,并具有 Instruct 和推理增强型 Thinking 版本,可实现灵活的按需部署。
值得注意的一个增强功能是OCR能力,模型卡片中介绍到模型能支持 32 种语言(从 19 种增加);在弱光、模糊和倾斜条件下表现稳健;更适合处理稀有/古代字符和行话;改进了长文档结构解析。
本文我们将简要介绍基于 transformers、peft 等框架,使用 Qwen/Qwen3-VL-30B-A3B-Instruct 和 Qwen3-VL-4B-Instruct 模型在 LaTeX_OCR 上进行Lora微调训练,同时使用 SwanLab 监控训练过程与评估模型效果。
备注:本教程使用的代码同时支持 2.5 系列的模型,比如 Qwen/Qwen2.5-VL-3B-Instruct 在本脚本上可以正常运行。
训练使用代码:在同级目录同名目录下
数据集:LaTeX_OCR
模型:Qwen3-VL-30B-A3B-Instruct & Qwen3-VL-4B-Instruct
Qwen/Qwen3-VL-30B-A3B-Instruct 显存需求:124+GB,如果显存不足,可以将per_device_train_batch_size调小,笔者使用两张 H20 进行训练,batch size 默认是8,基于此设置,大概需要 20 分钟,批次大小对时间有影响。
Qwen/Qwen2.5-VL-3B-Instruct 显存需求:20+GB,笔者使用 1 张 H20 进行训练,你也可以使用 24 GB显存的显卡,比如 3090,4090 等,batch size 为 1 的时候需要消耗 7 分钟,batch size 为 8 的时候需要消耗 4 分钟。
目录
Qwen/Qwen3-VL-4B-Instruct Lora 可视化微调案例 - LaTexOCR
环境配置
准备数据集
模型下载
集成SwanLab
Lora 简介
Lora 配置
微调的完整代码
代码
训练配置
模型路径设置
数据集加载
对比微调前后模型的输出结果
代码
运行配置
测试使用的测试集加载
模型微调效果
Qwen/Qwen3-VL-30B-A3B-Instruct
Qwen/Qwen3-VL-4B-Instruct
微调后模型效果展示
Qwen/Qwen3-VL-30B-A3B-Instruct
Qwen/Qwen3-VL-4B-Instruct
总结
补充模型训练信息
常见错误解决办法
环境配置
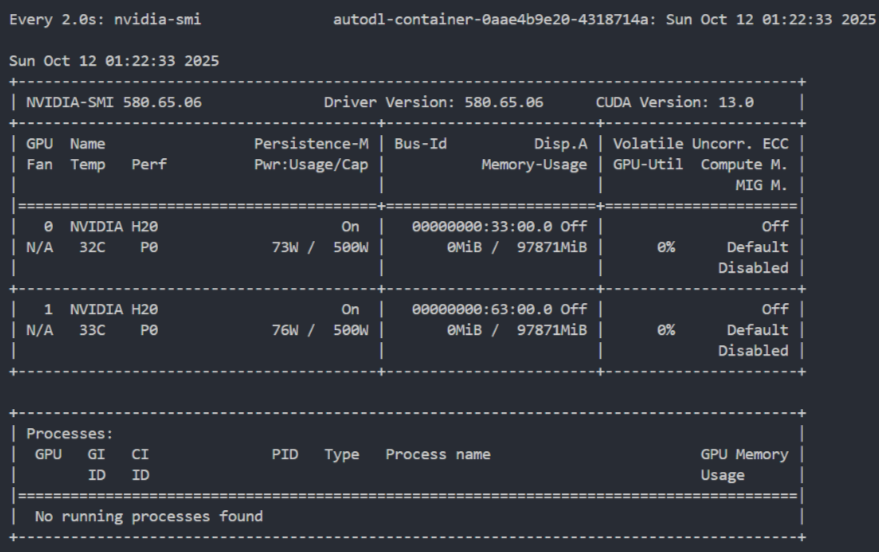
确保你的电脑上至少有一张英伟达显卡,并已安装好了CUDA环境。本次的训练的模型如果你选择的是Qwen/Qwen3-VL-30B-A3B-Instruct,那么是比较大的,需要大概124GB的显存,建议用两张H20才能够完成本次实验。
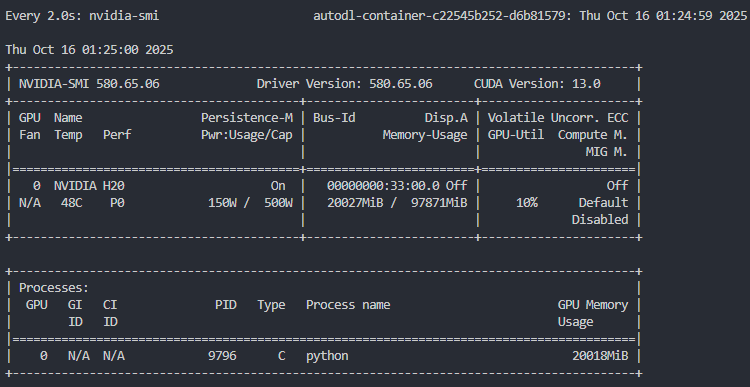
如果计算资源有限,建议使用 Qwen3-VL-4B-Instruct 完成本次实验,只需要一张 24 GB 的显卡即可完成本次实验。
安装Python(版本>=3.12)以及能够调用CUDA加速的PyTorch,镜像采用 Pytorch2.8.0 Python3.12 CUDA12.8。
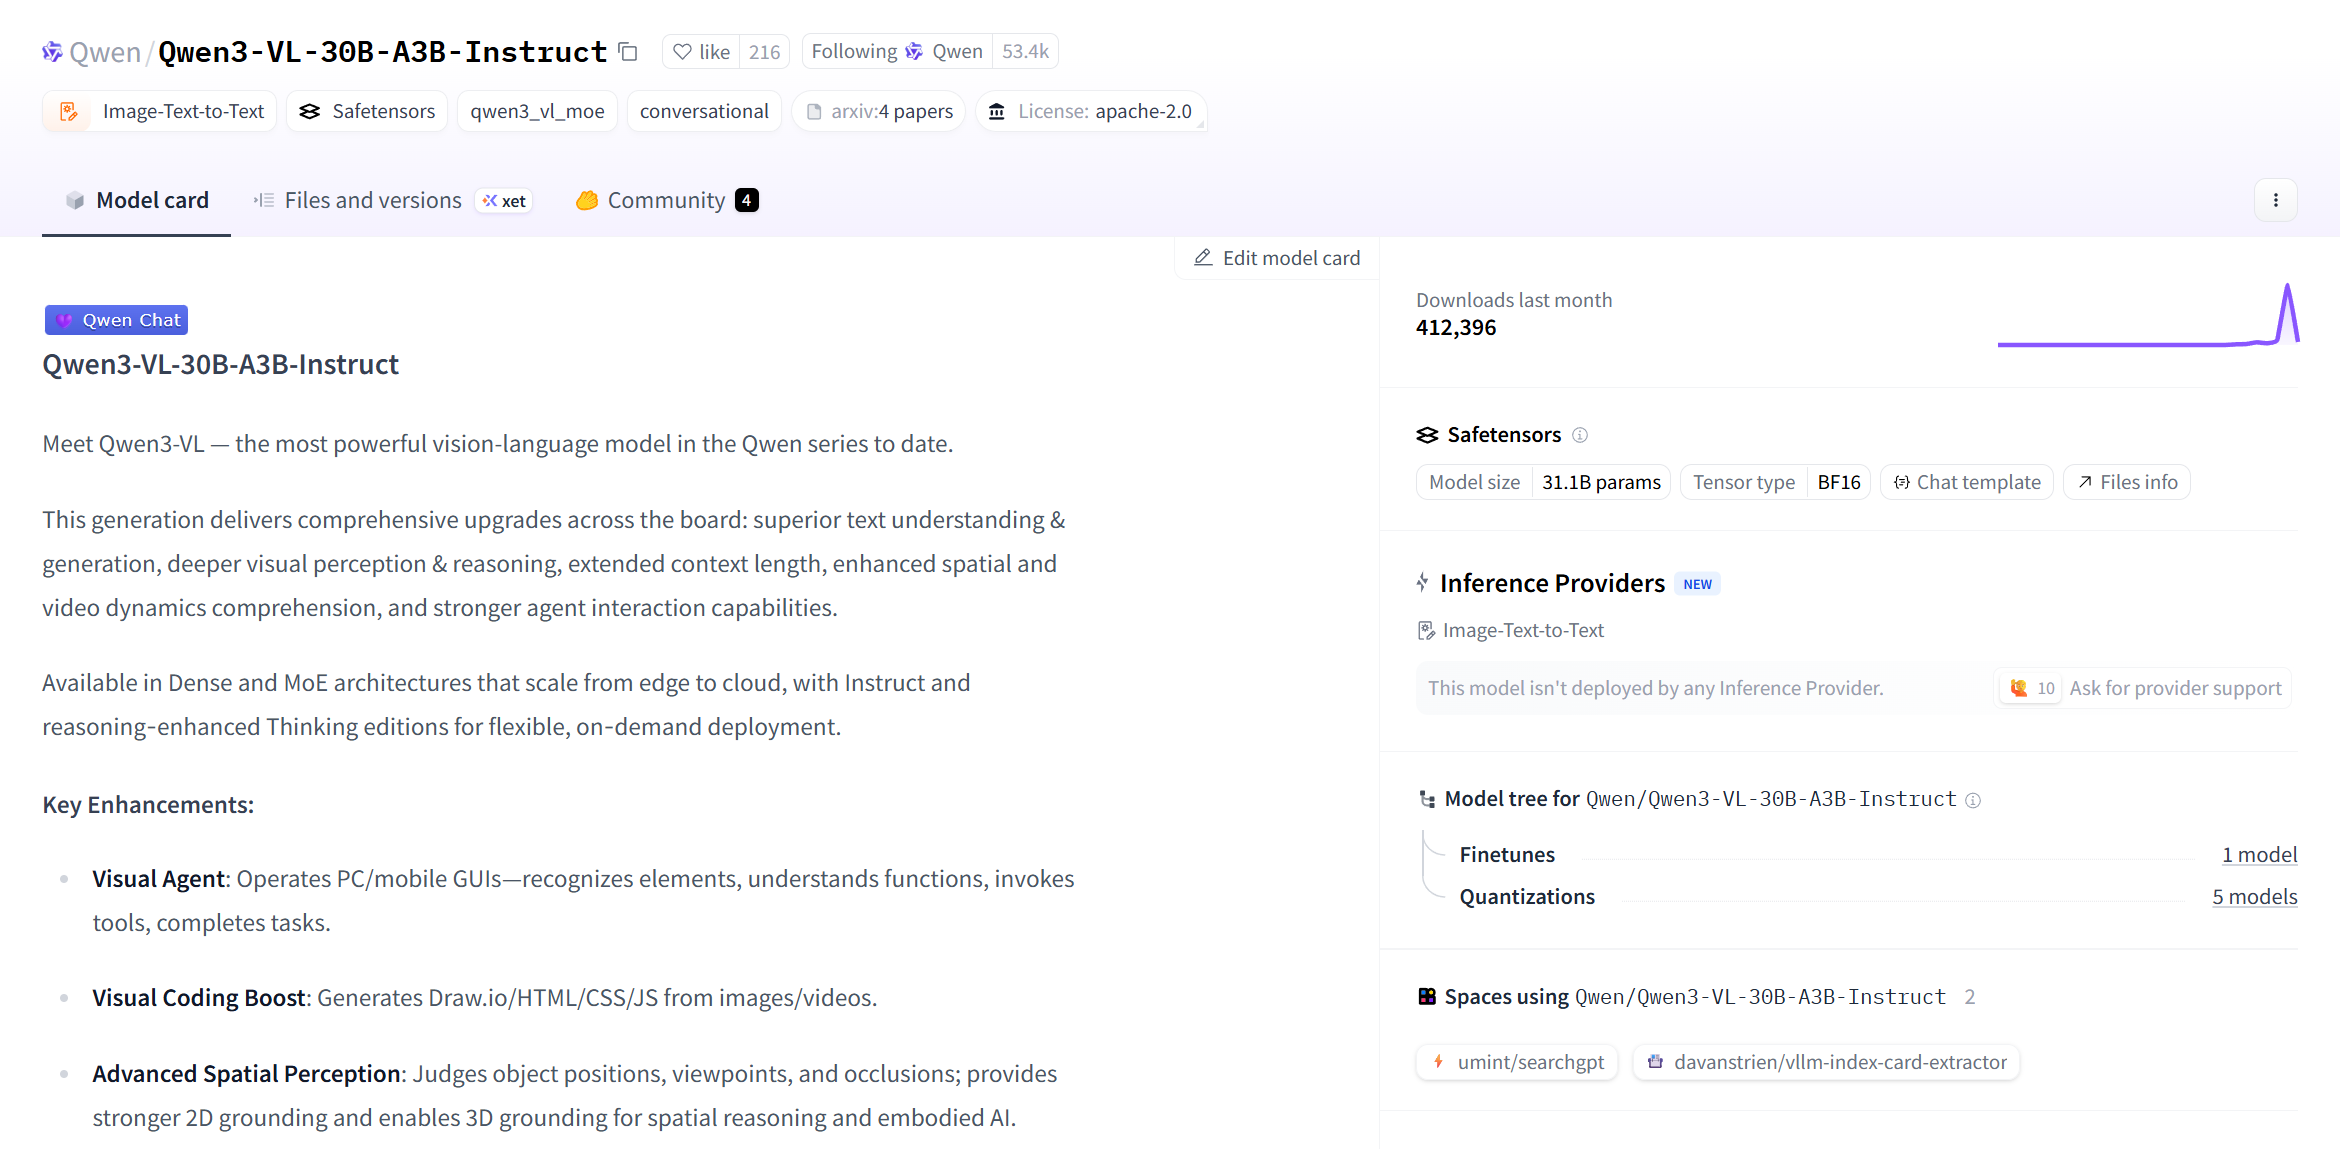
安装与Qwen3-VL微调相关的第三方库,可以使用以下命令:
python -m pip install --upgrade pip更换 pypi 源,加速库的安装
pip config set global.index-url https://pypi.tuna.tsinghua.edu.cn/simple我们本次主要用到的一些依赖库如下:
notebook==7.4.7
numpy<2.0
datasets==4.2.0
peft==0.17.1
accelerate==1.10.1
mpmath==1.3.0
networkx==3.4.2
regex==2025.9.18
sympy==1.14.0
tokenizers==0.22.1
torch==2.8.0
torchvision>=0.23.0
transformers>=4.41.2
triton==3.4.0
qwen-vl-utils==0.0.14
matplotlib>=3.10.7
modelscope==1.30.0
python-dotenv>=1.1.1
swanlab你可以复制上面的内容,并写入到requirements.txt文件中,然后运行下面的命令安装所有依赖库:
pip install -r requirements.txt准备数据集
small 是小数据集,样本数 110 条,用于测试。
full 是印刷体约 100k 的完整数据集。实际上样本数略小于 100k,因为他们用 LaTeX 的抽象语法树剔除了很多不能渲染的 LaTeX。
synthetic_handwrite 是手写体 100k 的完整数据集,基于 full 的公式,使用手写字体合成而来,可以视为人类在纸上的手写体。样本数实际上略小于 100k,理由同上。
human_handwrite 是手写体较小数据集,更符合人类在电子屏上的手写体。主要来源于 CROHME。他们用 LaTeX 的抽象语法树校验过了。
5.human_handwrite_print 是来自 human_handwrite 的印刷体数据集,公式部分和 human_handwrite 相同,图片部分由公式用 LaTeX 渲染而来。
你可以去源数据集的页面查看数据集的子集,比如下图显示的就是数据集的各个子集字段名。 每个数据集基本都是只有两个字段,比如text和image。
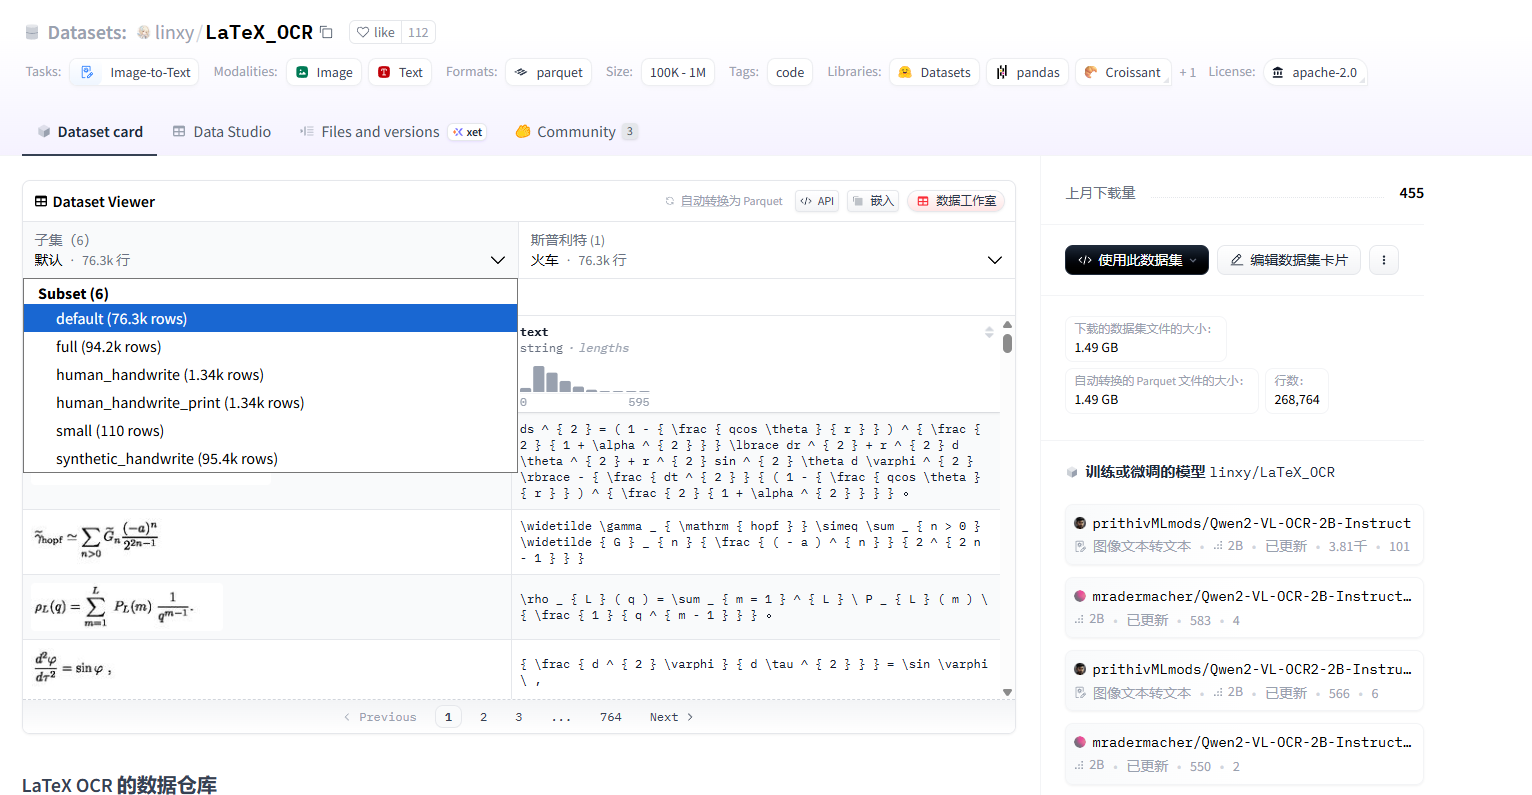
我们可以使用下面的代码进行数据集的加载。
为了便于实验,你可以在 name 中选择 small、full、synthetic_handwrite、human_handwrite 或 human_handwrite_print,并通过 split 指定 train、validation、test 等划分。
下面示例展示如何加载训练划分并快速检查样本:
from datasets import load_dataset

train_dataset = load_dataset("linxy/LaTeX_OCR", name="small", split="train")
print(train_dataset[2]["text"])
print(train_dataset[2])
print(len(train_dataset))输出:
\rho _ { L } ( q ) = \sum _ { m = 1 } ^ { L } \ P _ { L } ( m ) \ { \frac { 1 } { q ^ { m - 1 } } } .

{
'image': <PIL.PngImagePlugin.PngImageFile image mode=RGB size=200x50 at 0x15A5D6CE210>,

'text': '\\rho _ { L } ( q ) = \\sum _ { m = 1 } ^ { L } \\ P _ { L } ( m ) \\ { \\frac { 1 } { q ^ { m - 1 } } } .'
}

50若需同时获取训练、验证、测试三个划分,可直接加载整个 DatasetDict:
from datasets import load_dataset

dataset = load_dataset("linxy/LaTeX_OCR", name="small")
print(dataset)输出:
DatasetDict({
    train: Dataset({
        features: ['image', 'text'],
        num_rows: 50
    })
    validation: Dataset({
        features: ['image', 'text'],
        num_rows: 30
    })
    test: Dataset({
        features: ['image', 'text'],
        num_rows: 30
    })
})模型下载
在开始模型训练之前,我们需要下载对应的模型。
为了避免由于网络问题导致的模型下载失败,我们使用modelscope对模型进行下载。
模型的地址在:
你可以使用下面的命令,将模型下载到指定的目录下面,下面是以将模型下载到 ./Qwen3-VL-30B-A3B-Instruct 目录下为例:
modelscope download --model Qwen/Qwen3-VL-30B-A3B-Instruct --local_dir ./Qwen3-VL-30B-A3B-Instruct或者是使用下面的命令,下载Qwen/Qwen3-VL-4B-Instruct模型到指定的目录下:
modelscope download --model Qwen/Qwen3-VL-4B-Instruct --local_dir ./Qwen3-VL-4B-Instruct需要注意的是,Qwen/Qwen3-VL-30B-A3B-Instruct 大概需要60GB的存储空间,Qwen/Qwen3-VL-4B-Instruct 大概需要8GB的存储空间,在开始下载之前,如果需要微调的是 30 B的模型,确保磁盘空间闲置大小在 65 GB 以上,如果是 4 B 的模型,存储空间大小要在 10 GB 以上。
如果你需要使用我的代码在AutoDL上直接运行,那么你需要将模型下载到/root/autodl-fs/Qwen3-VL-30B-A3B-Instruct。
fs会长时间占用用户的空间,如果用户没有及时清理的话会一直扣费,所以我建议你换成 auto-tmp 比较好,注意,换成了 auto-tmp 之后你需要修改下加载模型的代码。
集成SwanLab
SwanLab与Transformers已经做好了集成,用法是在Trainer的callbacks参数中添加SwanLabCallback实例,就可以自动记录超参数和训练指标,简化代码如下:
from swanlab.integration.transformers import SwanLabCallback
from transformers import Trainer

swanlab_callback = SwanLabCallback()

trainer = Trainer(
    ...
    callbacks=[swanlab_callback],
)注意:SwanLab的使用是免费的,个人使用的情况下。
登录完成之后的页面是下图所示的样子。
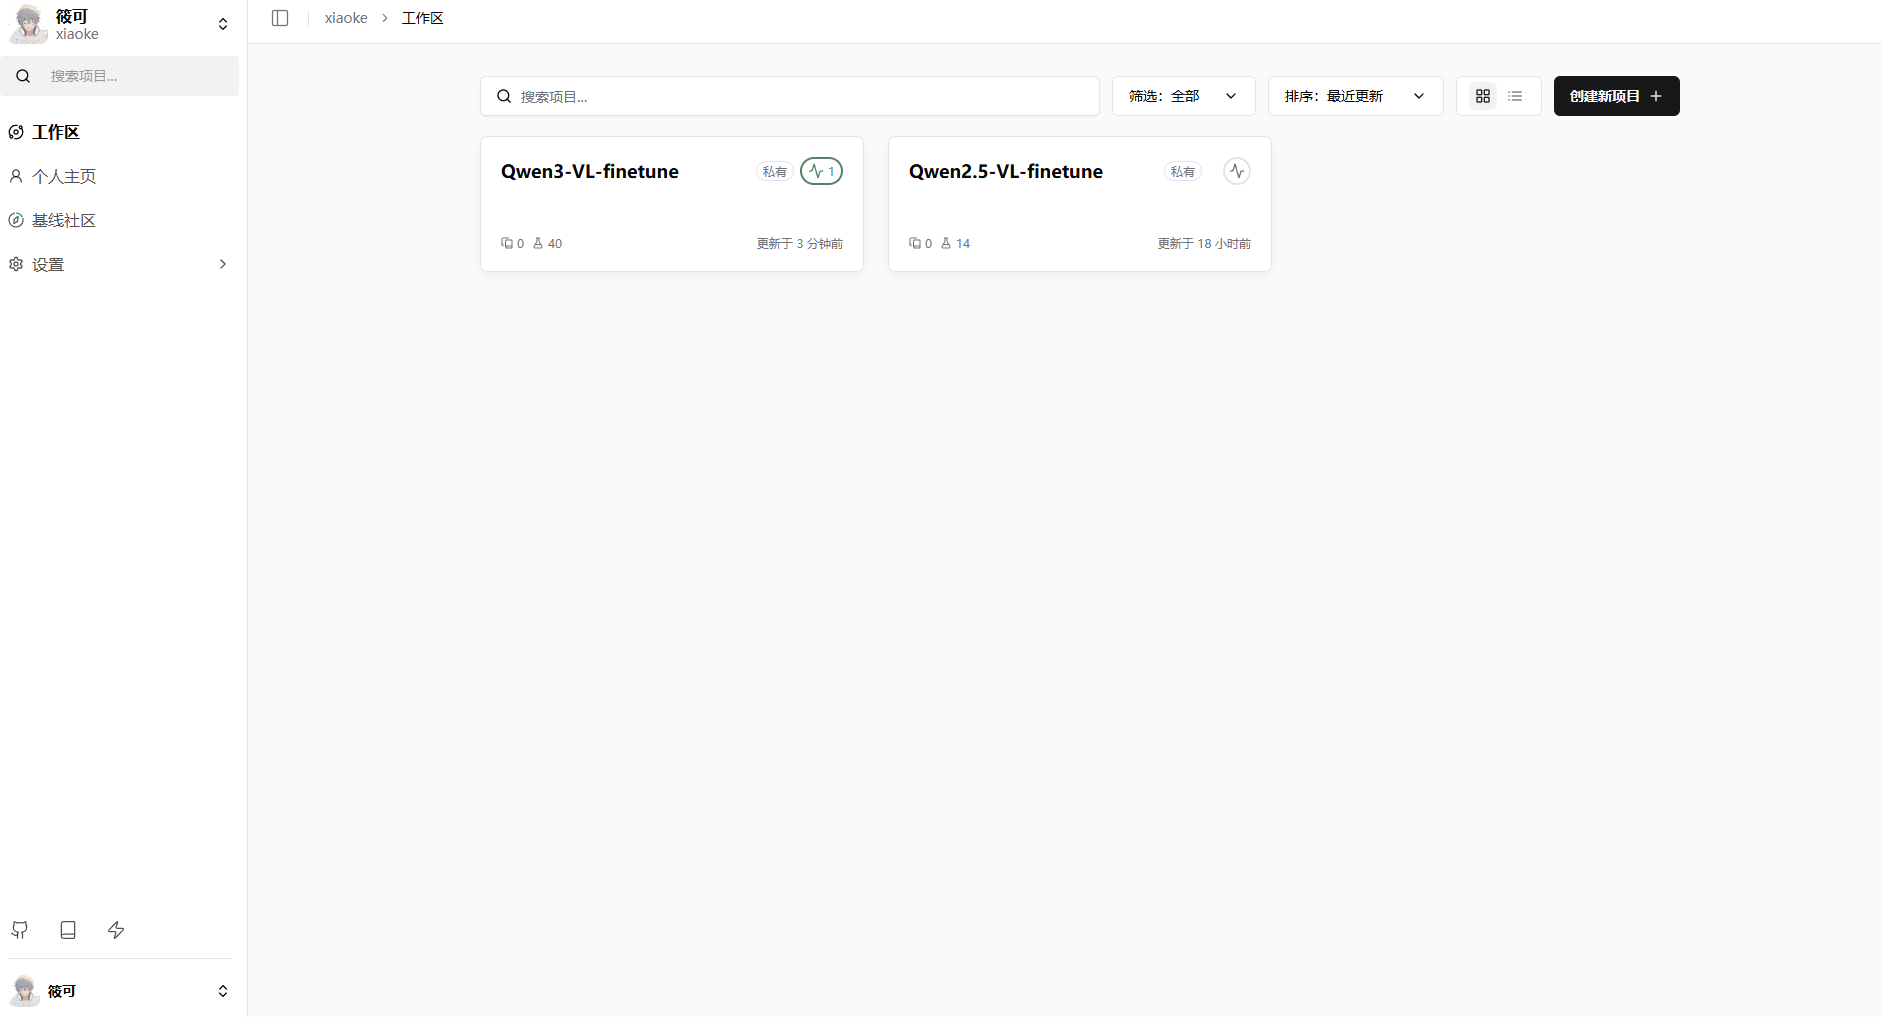
点击其中一个,你可以看到具体的实验训练详情。
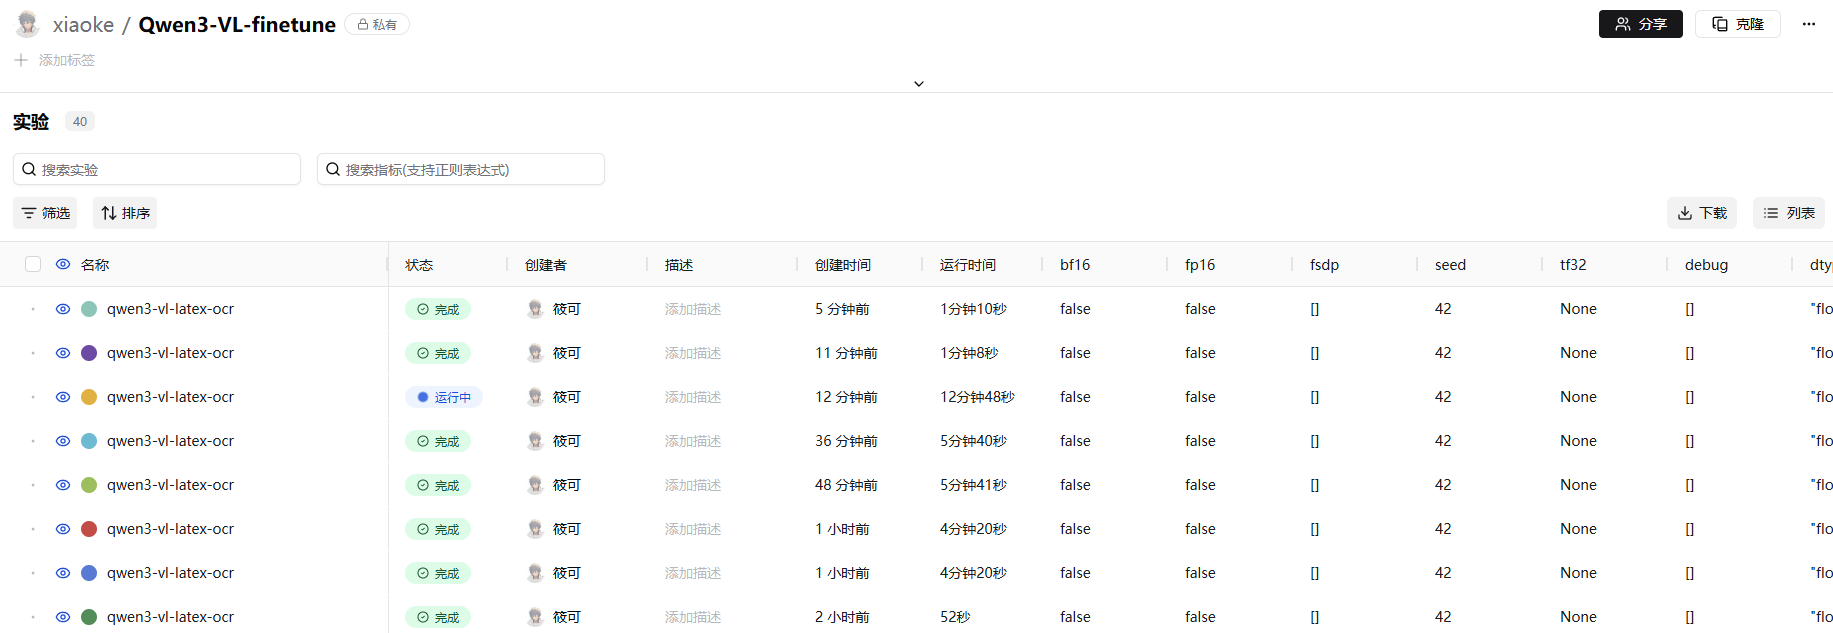
点击其中一个就会显示具体的loss变化,还有其他的一些指标。当然,SwanLab还有其他的指标可以进行监控,你可以去官网的文档中查看。
SwanLab地址:
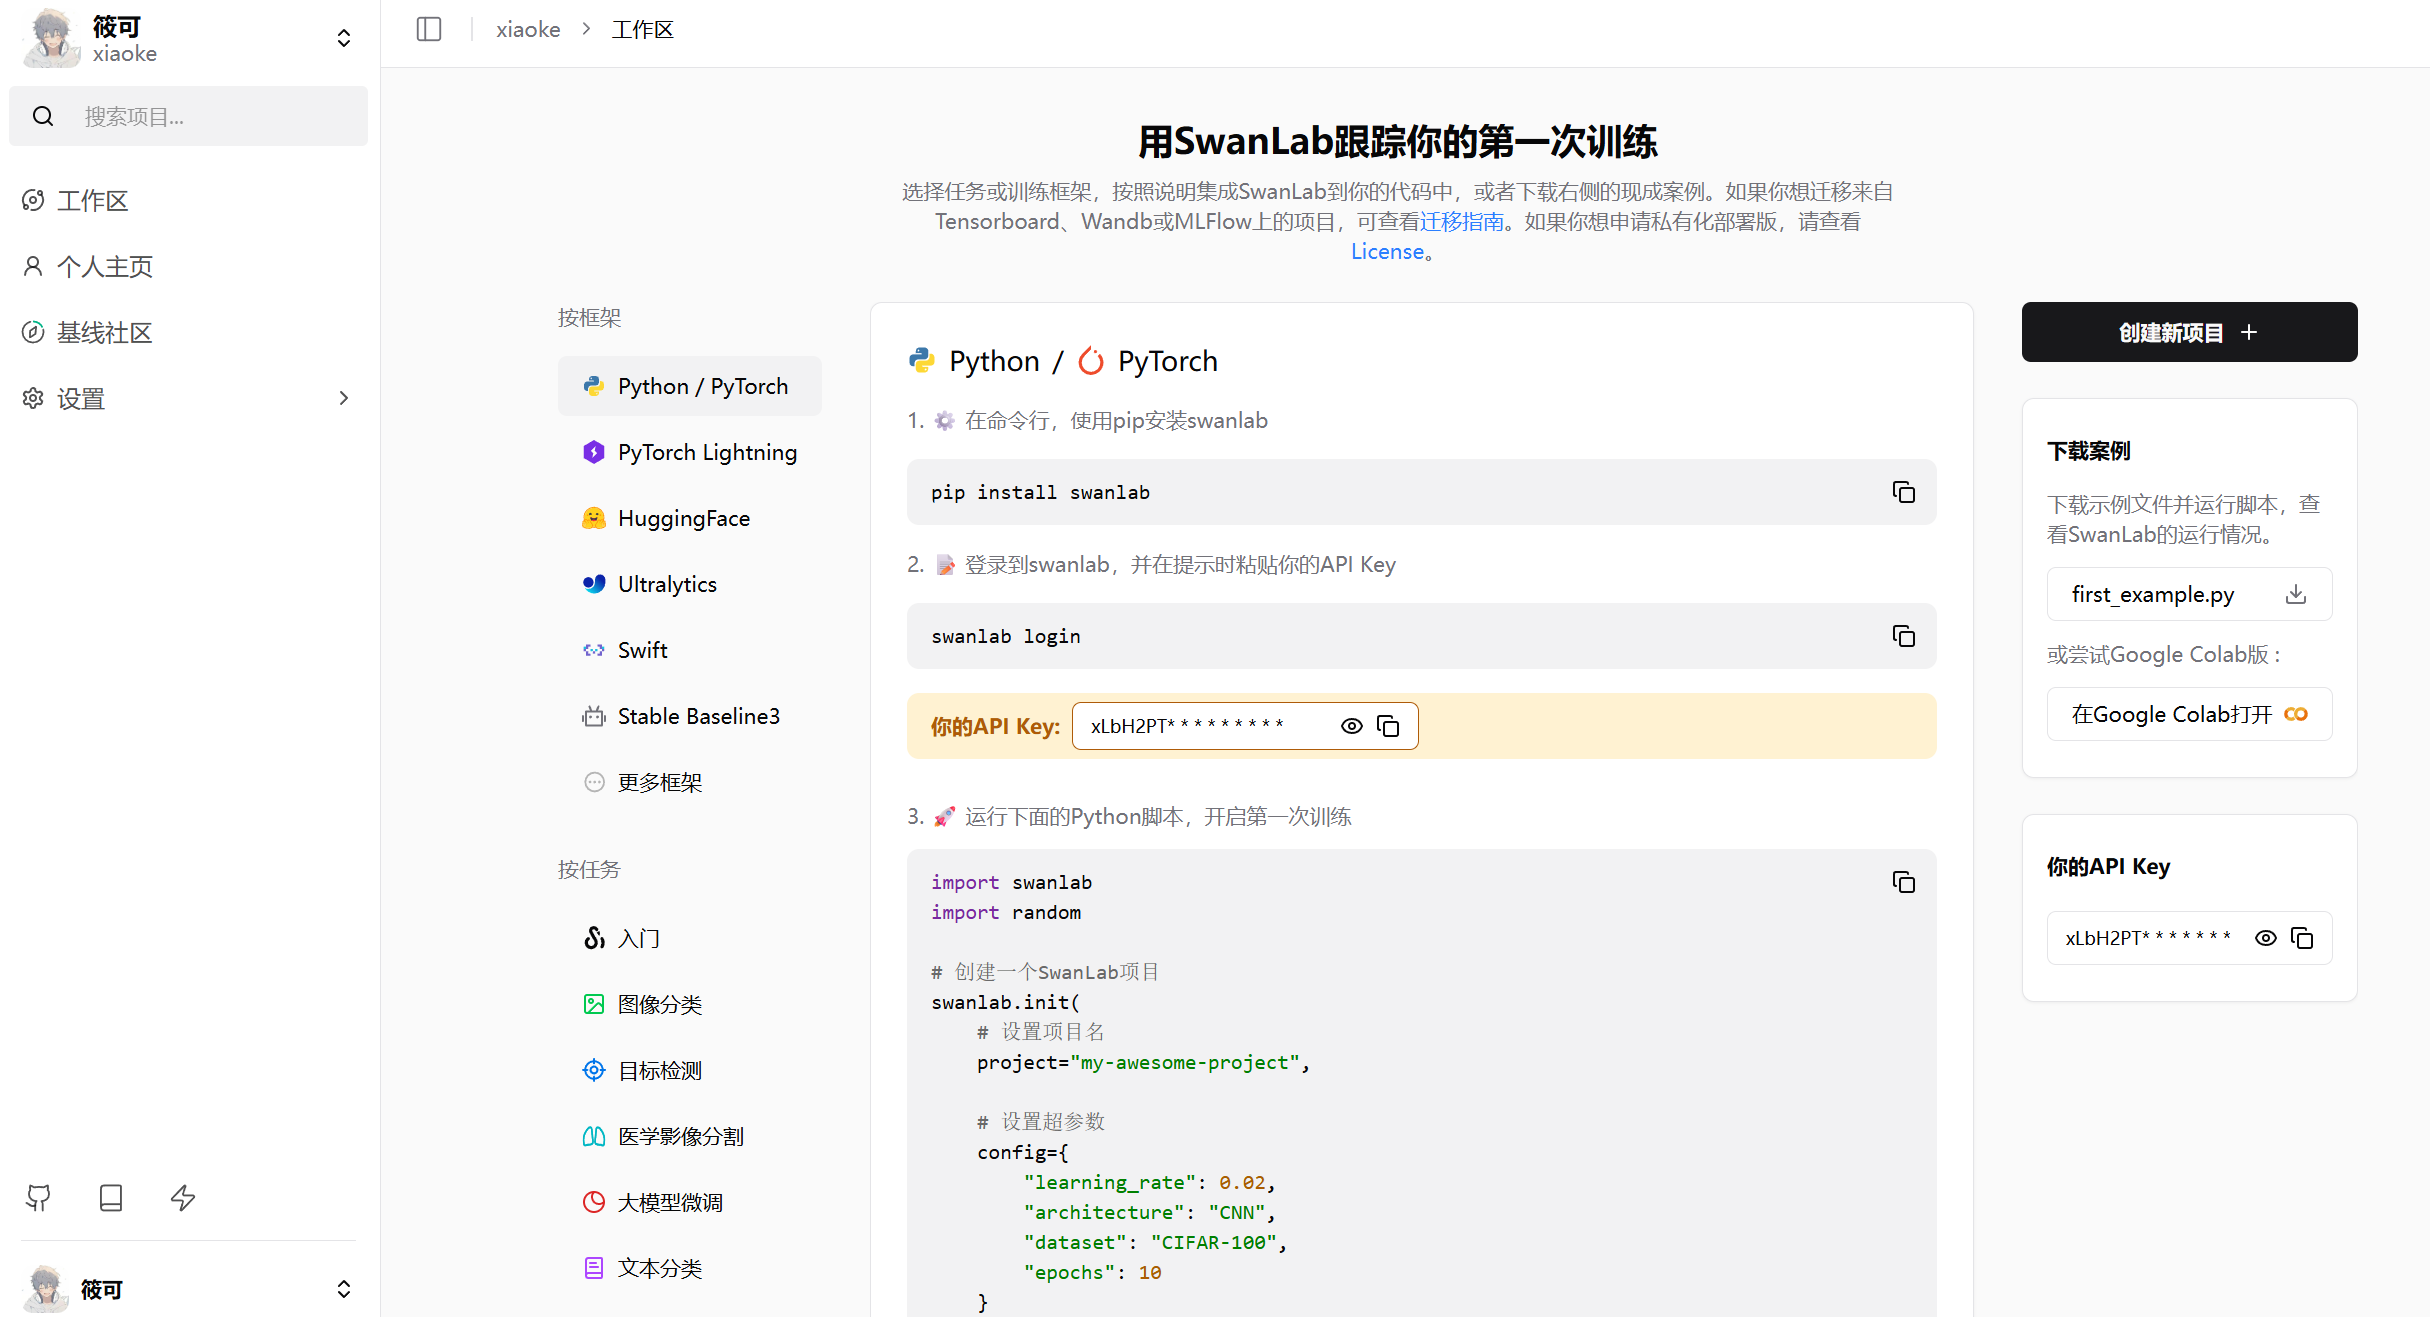
在我的代码里面,api_key我设置成了从环境变量中加载,所以你需要创建一个名为.env的文件,并添加SWAN_LAB=你的API Key。
SWAN_LAB=你的API Key其中api_key可以在下面这个图中显示的位置上获取。
Lora 简介
Lora 的全称是 Low-Rank Adaptation,也就是低秩适配。 传统的模型微调方法,也就是全参数微调,需要更新模型中所有的参数。
Lora的核心思想是权重变化矩阵 $\Delta W$ 可以被近似地分解为两个更小的矩阵的乘积,然后仅更新两个较小的矩阵。
它在推理时不会增加额外的计算延迟。这是因为它旁路的结构可以在推理前被合并回原始的权重矩阵中。
也就是说,我们可以通过简单的矩阵加法 $W' = W_0 + BA$,将适配器的权重融合进主干网络,从而得到一个新的权重矩阵。
《LoRA: Low-Rank Adaptation of Large Language Models
》论文地址:
Lora 配置
lora_config_dict = {
        "lora_rank": 128,
        "lora_alpha": 16,
        "lora_dropout": 0,
    }

    target_modules = ["q_proj", "k_proj", "v_proj", "o_proj"]
    config = LoraConfig(
        task_type=TaskType.CAUSAL_LM,
        target_modules=target_modules,
        inference_mode=False,
        r=lora_config_dict["lora_rank"],
        lora_alpha=lora_config_dict["lora_alpha"],
        lora_dropout=lora_config_dict["lora_dropout"],
        bias="none",
)上面是我们创建Lora配置的代码。如果你需要调整,可以调整lora_config_dict和target_modules,主要是设置了他们。
target_modules:LoRA 适配器要作用于模型中的哪些模块。这里设置为 ["q_proj", "k_proj", "v_proj", "o_proj"].
这些都是 Transformer 模型自注意力机制中的 核心线性投射层,负责生成查询、键、值和输出。
r=128: 这是 LoRA 的 秩 rank。
lora_alpha=16: 这是 LoRA 的 缩放因子 alpha,也就是公式中的α 。
lora_dropout=0: 这个参数设置了 LoRA 层的 丢弃率 dropout rate。 论文中完整的前向传播公式是下面这样的。
$$h=W_{0}x+\Delta Wx=W_{0}x+BAx$$
α 是一个常量,这样做的好处是当改变秩 r 的大小时,可以减少重新调整超参数的需要 。
带上 α 的前向传播公式是下面这样的。
$$h = W_{0}x + \frac{α}{r}BAx$$
微调的完整代码
代码
点击展开/收起微调的完整代码
import os

import torch
from typing import Any, Dict, List

from datasets import load_dataset
from qwen_vl_utils import process_vision_info
from peft import LoraConfig, TaskType, get_peft_model
from transformers import (
    TrainingArguments,
    Trainer,
    AutoProcessor,
    AutoTokenizer,
    AutoConfig,
)
import importlib
import matplotlib.pyplot as plt
from swanlab.integration.transformers import SwanLabCallback
from dotenv import load_dotenv


class Qwen3VLDataCollator:

    def __init__(self, tokenizer):
        self.tokenizer = tokenizer

    def __call__(self, features: List[Dict[str, Any]]) -> Dict[str, torch.Tensor]:
        input_id_tensors = [
            torch.as_tensor(sample["input_ids"], dtype=torch.long) for sample in features
        ]
        attention_tensors = [
            torch.as_tensor(sample["attention_mask"], dtype=torch.long) for sample in features
        ]
        label_tensors = [
            torch.as_tensor(sample["labels"], dtype=torch.long) for sample in features
        ]

        max_length = max(t.size(0) for t in input_id_tensors)
        pad_id = (
            self.tokenizer.pad_token_id
            if getattr(self.tokenizer, "pad_token_id", None) is not None
            else self.tokenizer.eos_token_id
        )
        if pad_id is None:
            raise ValueError("pad_token_id 与 eos_token_id 均为 None,无法进行padding。")

        input_ids = torch.full((len(features), max_length), pad_id, dtype=torch.long)
        attention_mask = torch.zeros((len(features), max_length), dtype=torch.long)
        labels = torch.full((len(features), max_length), -100, dtype=torch.long)

        for idx, (ids, attn, lbl) in enumerate(zip(input_id_tensors, attention_tensors, label_tensors)):
            length = ids.size(0)
            input_ids[idx, :length] = ids
            attention_mask[idx, :length] = attn
            labels[idx, :length] = lbl

        pixel_tensors = []
        for sample in features:
            pv = sample["pixel_values"]
            if not isinstance(pv, torch.Tensor):
                pv = torch.tensor(pv, dtype=torch.float32)
            pixel_tensors.append(pv)
        pixel_values = torch.cat(pixel_tensors, dim=0)

        image_grid_thw = torch.stack(
            [torch.as_tensor(sample["image_grid_thw"], dtype=torch.long).view(-1) for sample in features], dim=0
        )

        return {
            "input_ids": input_ids,
            "attention_mask": attention_mask,
            "labels": labels,
            "pixel_values": pixel_values,
            "image_grid_thw": image_grid_thw,
        }


PROMPT_TEXT = "Transcribe the LaTeX of this image."


def process_func(example, tokenizer, processor):
    MAX_LENGTH = 8192
    image = example["image"]
    output_content = example["text"]
    messages = [
        {
            "role": "user",
            "content": [
                {
                    "type": "image",
                    "image": image,
                },
                {"type": "text", "text": PROMPT_TEXT},
            ],
        }
    ]
    text = processor.apply_chat_template(
        messages, tokenize=False, add_generation_prompt=True
    )
    image_inputs, video_inputs = process_vision_info(messages)
    inputs = processor(
        text=[text],
        images=image_inputs,
        videos=video_inputs,
        do_resize=True,
    )

    instruction_input_ids = inputs["input_ids"][0]

    instruction_attention_mask = inputs["attention_mask"][0]

    instruction_pixel_values = inputs["pixel_values"]

    instruction_image_grid_thw = inputs["image_grid_thw"][0]

    response = tokenizer(f"{output_content}", add_special_tokens=False)
    response_input_ids = response["input_ids"]
    response_attention_mask = response.get(
        "attention_mask", [1] * len(response_input_ids)
    )

    eos_token_id = tokenizer.eos_token_id
    if eos_token_id is not None:
        if not response_input_ids or response_input_ids[-1] != eos_token_id:
            response_input_ids = response_input_ids + [eos_token_id]
            response_attention_mask = response_attention_mask + [1]
    else:
        pad_token_id = tokenizer.pad_token_id
        if pad_token_id is None:
            raise ValueError("需要定义 eos_token_id 或 pad_token_id 才能结束响应序列。")
        response_input_ids = response_input_ids + [pad_token_id]
        response_attention_mask = response_attention_mask + [1]

    input_ids = instruction_input_ids + response_input_ids
    attention_mask = instruction_attention_mask + response_attention_mask
    labels = (
        [-100] * len(instruction_input_ids) + response_input_ids
    )
    if len(input_ids) > MAX_LENGTH:
        input_ids = input_ids[:MAX_LENGTH]
        attention_mask = attention_mask[:MAX_LENGTH]
        labels = labels[:MAX_LENGTH]

    return {
        "input_ids": input_ids,
        "attention_mask": attention_mask,
        "labels": labels,
        "pixel_values": instruction_pixel_values,
        "image_grid_thw": instruction_image_grid_thw,
    }


def main():
    load_dotenv()
    os.environ["SWANLAB_API_KEY"] = os.getenv("SWAN_LAB")

    data_fraction = 0.002

    ds = load_dataset("linxy/LaTeX_OCR", "synthetic_handwrite")

    ds = ds.shuffle(seed=222)

    train_data = ds["train"].select(range(int(len(ds["train"]) * data_fraction)))
    print(f"训练数据大小: {len(train_data)}")
    test_data = ds["test"].select(range(int(len(ds["test"]) * data_fraction)))
    print(f"测试数据大小: {len(test_data)}")

    # model_id = "/root/autodl-fs/Qwen3-VL-30B-A3B-Instruct"
    # model_id = "Qwen/Qwen2.5-VL-3B-Instruct"
    # output_dir = "/root/autodl-fs/output/Qwen3-VL-30B"

    model_id = "/root/autodl-tmp/Qwen3-VL-4B-Instruct"
    output_dir = "/root/autodl-tmp/Qwen3-VL-4B"


    tokenizer = AutoTokenizer.from_pretrained(model_id, cache_dir=os.environ.get("HF_HOME", "./"), use_fast=False, trust_remote_code=True)
    processor = AutoProcessor.from_pretrained(model_id, cache_dir=os.environ.get("HF_HOME", "./"), use_fast=False)

    config = AutoConfig.from_pretrained(model_id, cache_dir=os.environ.get("HF_HOME", "./"), trust_remote_code=True)
    arch = (config.architectures or [None])[0]
    module_name = f"transformers.models.{config.model_type}.modeling_{config.model_type}"
    module = importlib.import_module(module_name)
    model_cls = getattr(module, arch)
    model = model_cls.from_pretrained(
        model_id,
        cache_dir=os.environ.get("HF_HOME", "./"),
        device_map="auto",
        trust_remote_code=True,
    )

    model.to(dtype=torch.bfloat16)

    model.config.use_cache = False

    map_kwargs = {"tokenizer": tokenizer, "processor": processor}
    train_dataset = train_data.map(
        process_func,
        remove_columns=train_data.column_names,
        fn_kwargs=map_kwargs,
    )

    lora_config_dict = {
        "lora_rank": 128,
        "lora_alpha": 16,
        "lora_dropout": 0,
    }

    target_modules = ["q_proj", "k_proj", "v_proj", "o_proj"]
    config = LoraConfig(
        task_type=TaskType.CAUSAL_LM,
        target_modules=target_modules,
        inference_mode=False,
        r=lora_config_dict["lora_rank"],
        lora_alpha=lora_config_dict["lora_alpha"],
        lora_dropout=lora_config_dict["lora_dropout"],
        bias="none",
    )

    peft_model = get_peft_model(model, config)

    peft_model.enable_input_require_grads()

    swanlab_callback = SwanLabCallback(
        project="Qwen3-VL-finetune",
        experiment_name="qwen3-vl-latex-ocr",
        config={
            "model": model_id,
            "dataset": "linxy/LaTeX_OCR",
            "prompt": PROMPT_TEXT,
            "train_data_number": len(train_data),
            "lora_rank": lora_config_dict["lora_rank"],
            "lora_alpha": lora_config_dict["lora_alpha"],
            "lora_dropout": lora_config_dict["lora_dropout"],
        },
    )

    args = TrainingArguments(
        output_dir=output_dir,
        per_device_train_batch_size=8, # 每个GPU的batch size
        gradient_accumulation_steps=1, # 梯度累积步数
        logging_steps=10,
        logging_first_step=5,
        num_train_epochs=8, # 训练轮数
        save_steps=50, # 每多少步保存一次模型
        save_total_limit=3, # 最多保存模型数量
        learning_rate=1e-4, # 学习率
        gradient_checkpointing=True, # 梯度检查点
        gradient_checkpointing_kwargs={"use_reentrant": False},
        report_to="none",
    )

    eval_dataset = test_data.map(
        process_func,
        remove_columns=test_data.column_names,
        fn_kwargs=map_kwargs,
    )

    trainer = Trainer(
        model=peft_model,
        args=args,
        train_dataset=train_dataset,
        eval_dataset=eval_dataset,
        data_collator=Qwen3VLDataCollator(tokenizer=tokenizer),
        callbacks=[swanlab_callback],
    )

    trainer.train()

    logs = trainer.state.log_history
    steps = [log['step'] for log in logs if 'loss' in log]
    losses = [log['loss'] for log in logs if 'loss' in log]
    plt.plot(steps, losses)
    plt.xlabel('Step')
    plt.ylabel('Loss')
    plt.title('Training Loss (Qwen3-VL-30B)')

    os.makedirs(output_dir, exist_ok=True)
    plt.savefig(os.path.join(output_dir, "training_loss.png"))

    trainer.model.save_pretrained(output_dir)
    tokenizer.save_pretrained(output_dir)
    processor.save_pretrained(output_dir)

if __name__ == "__main__":
main()训练配置
训练配置如下:
args = TrainingArguments(
    output_dir=output_dir,
    per_device_train_batch_size=8, # 每个GPU的batch size
    gradient_accumulation_steps=1, # 梯度累积步数
    logging_steps=10,
    logging_first_step=5,
    num_train_epochs=8, # 训练轮数
    save_steps=50, # 每多少步保存一次模型
    save_total_limit=3, # 最多保存模型数量
    learning_rate=1e-4, # 学习率
    gradient_checkpointing=True, # 梯度检查点
    gradient_checkpointing_kwargs={"use_reentrant": False},
    report_to="none",
)模型路径设置
模型路径设置的部分是:
# model_id = "/root/autodl-fs/Qwen3-VL-30B-A3B-Instruct"
# model_id = "Qwen/Qwen2.5-VL-3B-Instruct"
# output_dir = "/root/autodl-fs/output/Qwen3-VL-30B"

model_id = "/root/autodl-tmp/Qwen3-VL-4B-Instruct"
output_dir = "/root/autodl-tmp/Qwen3-VL-4B"你可以基于我原有的代码进行修改,可以替换成你想要进行微调的模型。
数据集加载
data_fraction = 0.002

ds = load_dataset("linxy/LaTeX_OCR", "synthetic_handwrite")

ds = ds.shuffle(seed=222)

train_data = ds["train"].select(range(int(len(ds["train"]) * data_fraction)))
print(f"训练数据大小: {len(train_data)}")
test_data = ds["test"].select(range(int(len(ds["test"]) * data_fraction)))
print(f"测试数据大小: {len(test_data)}")模型训练部分的数据集加载主要是通过data_fraction参数进行数据集的比例采样,因为一次性全量加载出来的话需要微调很长的时间,所以你可以使用这个参数对数据进行比例采样,也能够快速进行训练,及时通过训练效果进行参数优化。
对比微调前后模型的输出结果
代码
我们可以使用下面的代码来对比微调前后模型的输出结果。 点击查看代码
import os
import sys
from typing import List, Tuple

import torch
from datasets import load_dataset
from peft import PeftModel
from transformers import AutoProcessor, AutoTokenizer, AutoConfig
import importlib

from qwen_vl_utils import process_vision_info


PROMPT_TEXT = "Transcribe the LaTeX of this image."
# 使用本地基础模型与LoRA目录
# BASE_MODEL_ID = "/root/autodl-fs/Qwen3-VL-30B-A3B-Instruct"
# PEFT_DIR = "/root/autodl-fs/output/Qwen3-VL-30B"
BASE_MODEL_ID = "/root/autodl-tmp/Qwen3-VL-4B-Instruct"
PEFT_DIR = "/root/autodl-tmp/Qwen3-VL-4B"
# 是否在内存内合并LoRA(不落盘)
MERGE_LORA_IN_MEMORY = True
NUM_TEST_SAMPLES = 5

DEVICE = torch.device("cuda" if torch.cuda.is_available() else "cpu")
DTYPE = torch.bfloat16 if DEVICE.type == "cuda" else torch.float32


def load_backbone(model_id: str):
    tokenizer = AutoTokenizer.from_pretrained(model_id, cache_dir=os.environ.get("HF_HOME", "./"), use_fast=False, trust_remote_code=True)
    processor = AutoProcessor.from_pretrained(model_id, cache_dir=os.environ.get("HF_HOME", "./"), use_fast=False, trust_remote_code=True)

    config = AutoConfig.from_pretrained(model_id, cache_dir=os.environ.get("HF_HOME", "./"), trust_remote_code=True)
    arch = (config.architectures or [None])[0]
    module_name = f"transformers.models.{config.model_type}.modeling_{config.model_type}"
    module = importlib.import_module(module_name)
    model_cls = getattr(module, arch)

    model = model_cls.from_pretrained(
        model_id,
        cache_dir=os.environ.get("HF_HOME", "./"),
        device_map="auto" if DEVICE.type == "cuda" else None,
        trust_remote_code=True,
    )
    model.to(dtype=DTYPE)

    return model, tokenizer, processor


def load_lora_model(peft_dir: str, base_model_id: str = BASE_MODEL_ID):
    if not os.path.isdir(peft_dir):
        raise FileNotFoundError(f"未找到微调模型目录: {peft_dir}")

    # 基座
    base_model, _base_tok, _base_proc = load_backbone(base_model_id)

    # 先加载LoRA
    peft_model = PeftModel.from_pretrained(base_model, peft_dir)
    model = peft_model
    if MERGE_LORA_IN_MEMORY:
        try:
            model = peft_model.merge_and_unload()
            print("LoRA内存合并成功。")
        except Exception:
            print("警告: LoRA内存合并失败,继续使用未合并模型。")
            # 合并失败则退回未合并模型
            model = peft_model
    model.to(dtype=DTYPE)
    model.eval()


    # tokenizer/processor 优先从LoRA目录读取,保证chat_template与词表一致
    tokenizer = AutoTokenizer.from_pretrained(peft_dir, cache_dir=os.environ.get("HF_HOME", "./"), use_fast=False, trust_remote_code=True)
    processor = AutoProcessor.from_pretrained(peft_dir, cache_dir=os.environ.get("HF_HOME", "./"), use_fast=False, trust_remote_code=True)
    return model, tokenizer, processor


def build_inputs(processor, image, prompt_text: str):
    messages = [
        {
            "role": "user",
            "content": [
                {"type": "image", "image": image},
                {"type": "text", "text": prompt_text},
            ],
        }
    ]
    text = processor.apply_chat_template(messages, tokenize=False, add_generation_prompt=True)
    image_inputs, video_inputs = process_vision_info(messages)
    inputs = processor(text=[text], images=image_inputs, videos=video_inputs, do_resize=True)
    return inputs


def ensure_block_dollars(text: str) -> str:
    if text is None:
        return "$$$$"
    s = str(text).strip()
    if s.startswith("$$") and s.endswith("$$"):
        return s
    if s.startswith("$") and s.endswith("$") and not s.startswith("$$") and not s.endswith("$$"):
        inner = s[1:-1].strip()
        return f"$${inner}$$"
    if s.count("$$") >= 2:
        return s
    return f"$${s}$$"


@torch.inference_mode()
def generate_answer(model, tokenizer, processor, image, max_new_tokens: int = 512) -> str:
    inputs = build_inputs(processor, image, PROMPT_TEXT)

    input_ids = torch.as_tensor(inputs["input_ids"], device=DEVICE)
    if input_ids.ndim == 1:
        input_ids = input_ids.unsqueeze(0)
    attention_mask = inputs.get("attention_mask", None)
    if attention_mask is not None:
        attention_mask = torch.as_tensor(attention_mask, device=DEVICE)
        if attention_mask.ndim == 1:
            attention_mask = attention_mask.unsqueeze(0)

    pixel_values = inputs.get("pixel_values")
    pixel_values = torch.as_tensor(pixel_values, device=DEVICE)

    image_grid_thw = inputs.get("image_grid_thw")
    image_grid_thw = torch.as_tensor(image_grid_thw, device=DEVICE)

    gen_kwargs = {
        "input_ids": input_ids,
        "pixel_values": pixel_values,
        "max_new_tokens": max_new_tokens,
        "do_sample": False,
        "use_cache": True,
    }
    if attention_mask is not None:
        gen_kwargs["attention_mask"] = attention_mask
    if image_grid_thw is not None:
        gen_kwargs["image_grid_thw"] = image_grid_thw

    outputs = model.generate(**gen_kwargs)
    gen_seq = outputs[0].tolist()
    prompt_len = input_ids.shape[1]
    gen_ids = gen_seq[prompt_len:]
    text = tokenizer.decode(gen_ids, skip_special_tokens=True)
    return text.strip()


def main():
    print("Loading dataset linxy/LaTeX_OCR (synthetic_handwrite)...")
    ds = load_dataset("linxy/LaTeX_OCR", "synthetic_handwrite")
    ds = ds.shuffle(seed=222)
    # test_split = ds["train"].select(range(NUM_TEST_SAMPLES))
    test_split = ds["test"].select(range(NUM_TEST_SAMPLES))

    print("Loading base model...")
    base_model, base_tokenizer, base_processor = load_backbone(BASE_MODEL_ID)
    try:
        if hasattr(base_model, "gradient_checkpointing"):
            base_model.gradient_checkpointing_disable()
        if hasattr(base_model, "config"):
            base_model.config.use_cache = True
        if hasattr(base_model, "generation_config") and base_model.generation_config is not None:
            base_model.generation_config.use_cache = True
    except Exception:
        pass
    base_model.eval()

    print(f"Loading LoRA fine-tuned model from: {PEFT_DIR}")
    try:
        lora_model, lora_tokenizer, lora_processor = load_lora_model(PEFT_DIR, BASE_MODEL_ID)
        try:
            if hasattr(lora_model, "gradient_checkpointing"):
                lora_model.gradient_checkpointing_disable()
            if hasattr(lora_model, "config"):
                lora_model.config.use_cache = True
        except Exception:
            pass
    except Exception as e:
        print(f"加载微调模型失败: {e}")
        print("仅对基础模型进行推理对比。")
        lora_model = None
        lora_tokenizer = base_tokenizer
        lora_processor = base_processor

    print(f"\n===== Inference Comparison on {NUM_TEST_SAMPLES} samples =====\n")
    for idx, sample in enumerate(test_split):
        image = sample["image"]
        gt = sample.get("text", "")
        print(f"[Sample {idx}]------------------------------")
        print(f"GT: {ensure_block_dollars(gt)}")

        base_pred = ensure_block_dollars(generate_answer(base_model, base_tokenizer, base_processor, image))
        print(f"Base: {base_pred}")

        if lora_model is not None:
            lora_pred = ensure_block_dollars(generate_answer(lora_model, lora_tokenizer, lora_processor, image))
            print(f"LoRA: {lora_pred}")
        else:
            print("LoRA: <not loaded>")

        print()


if __name__ == "__main__":
main()运行配置
模型路径设置的位置和其他的一些设置项,在文件的开始部分代码中,具体如下。
PROMPT_TEXT = "Transcribe the LaTeX of this image." # 使用的提示词。

# 使用本地基础模型与LoRA目录
# BASE_MODEL_ID = "/root/autodl-fs/Qwen3-VL-30B-A3B-Instruct"
# PEFT_DIR = "/root/autodl-fs/output/Qwen3-VL-30B"
BASE_MODEL_ID = "/root/autodl-tmp/Qwen3-VL-4B-Instruct"
PEFT_DIR = "/root/autodl-tmp/Qwen3-VL-4B"
# 是否在内存内合并LoRA(不落盘)
MERGE_LORA_IN_MEMORY = True
NUM_TEST_SAMPLES = 5 # 是使用的测试样本数测试使用的测试集加载
ds = load_dataset("linxy/LaTeX_OCR", "synthetic_handwrite")
ds = ds.shuffle(seed=222)
# test_split = ds["train"].select(range(NUM_TEST_SAMPLES))
test_split = ds["test"].select(range(NUM_TEST_SAMPLES))这里是用来加载测试使用的数据集的代码,其中 NUM_TEST_SAMPLES 是用来控制样本数的。
模型微调效果
Qwen/Qwen3-VL-30B-A3B-Instruct
下面的图是Qwen/Qwen3-VL-30B-A3B-Instruct模型微调图表,使用的batch size为8。
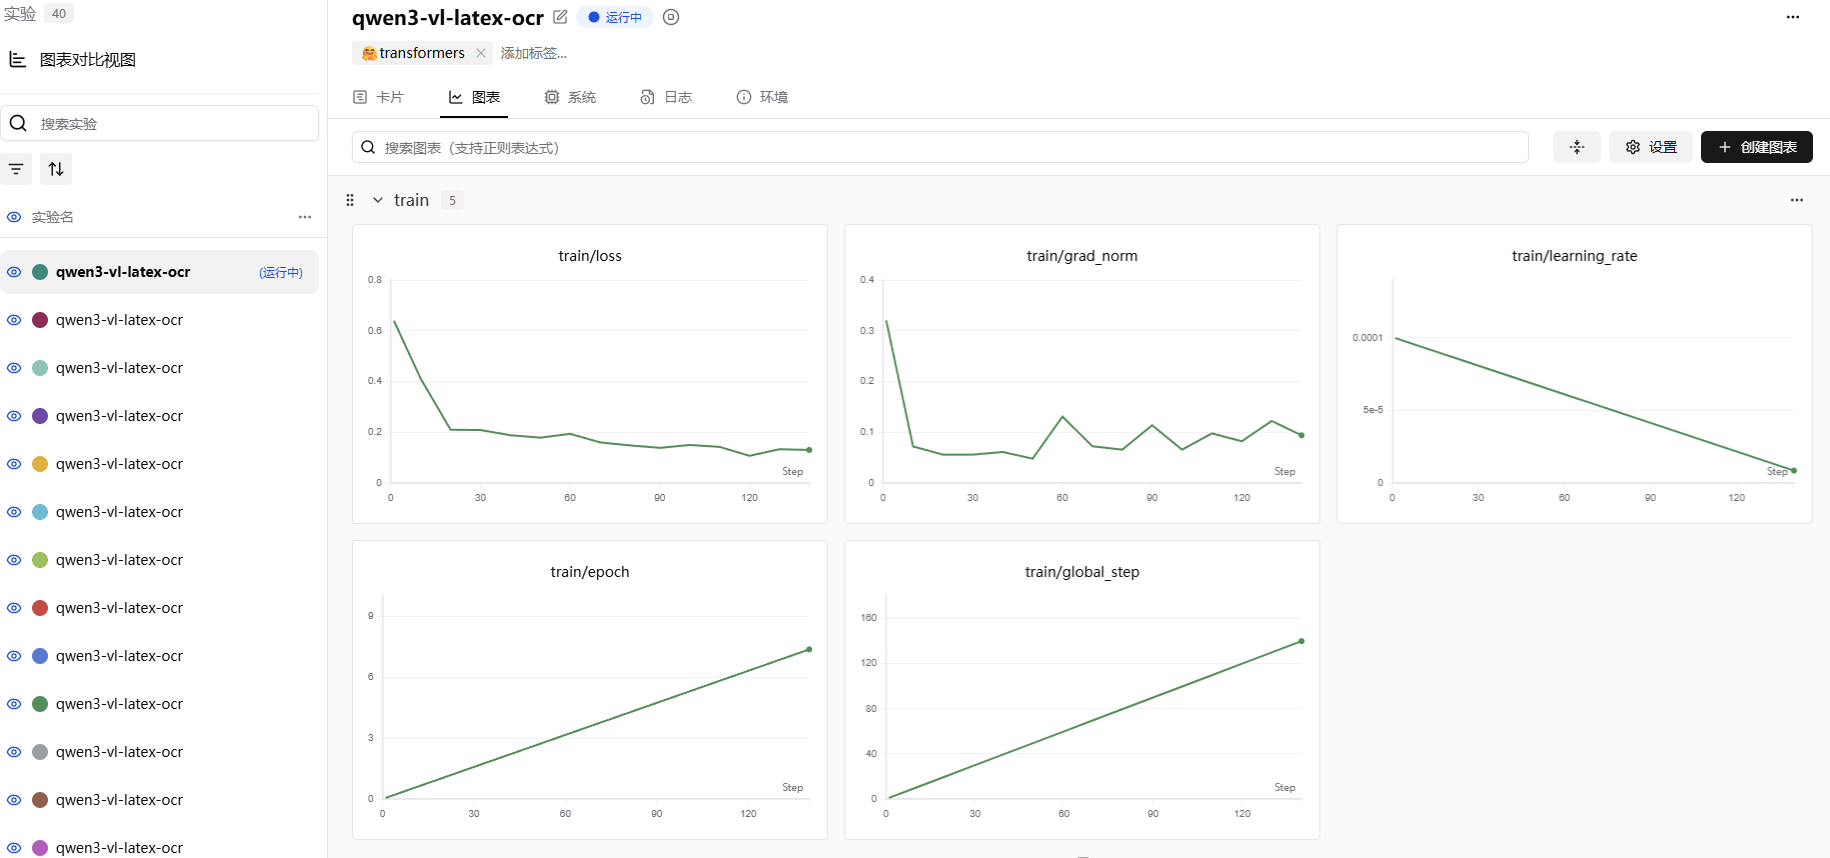
从图的效果看,loss基本都处于一个稳定下降的状态,证明我们的训练效果是在拟合数据集的。
Qwen/Qwen3-VL-4B-Instruct
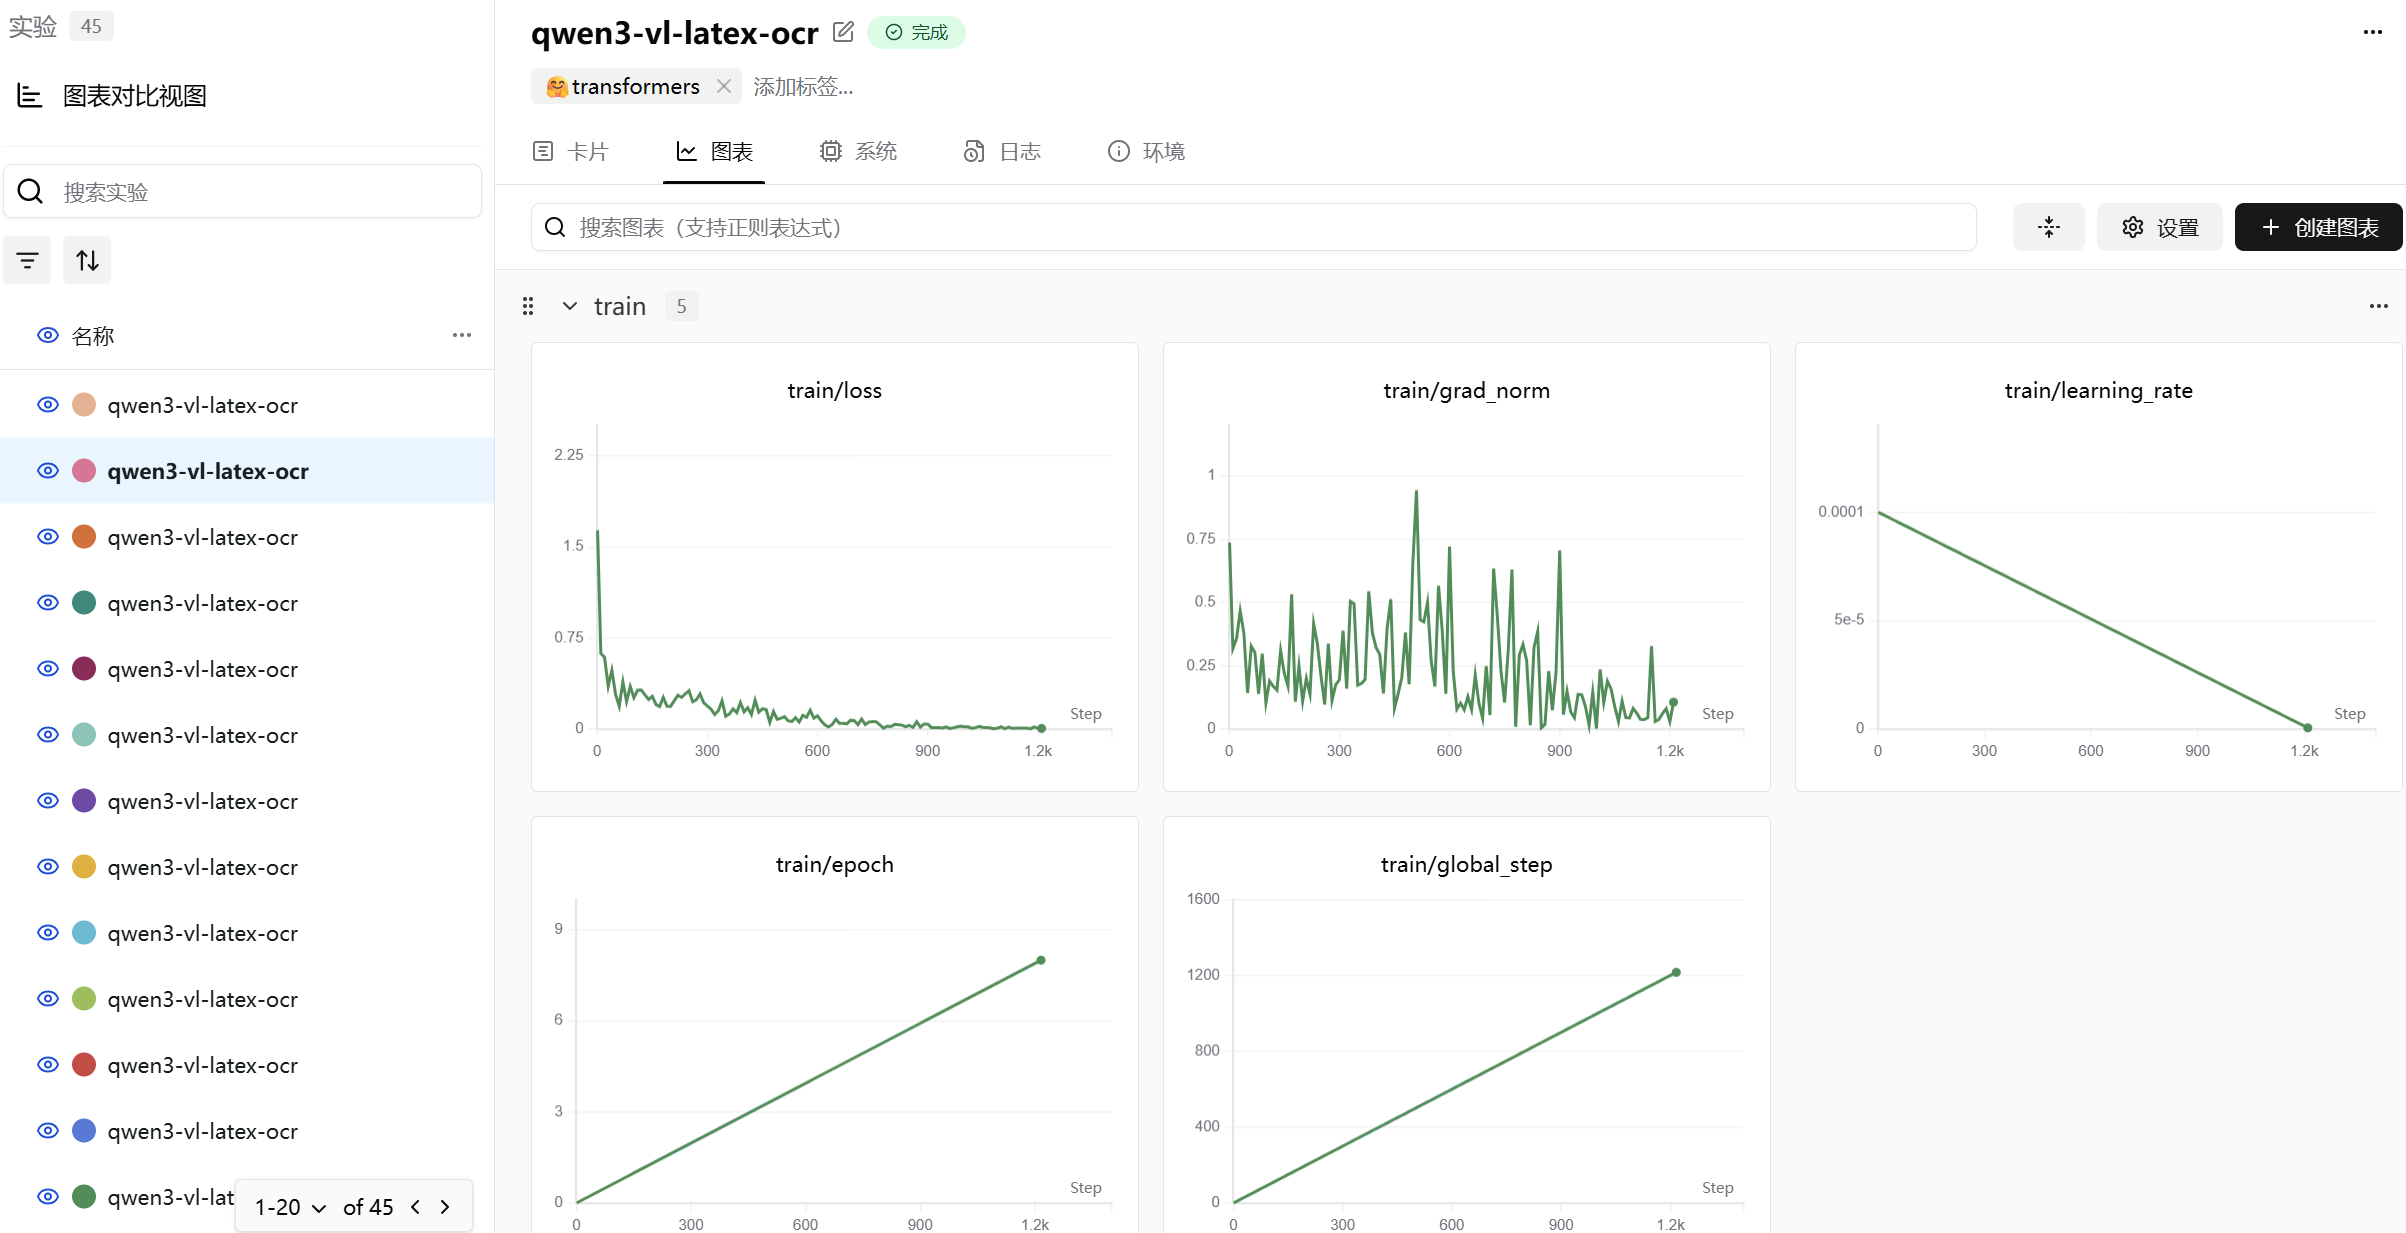
下面的图是Qwen/Qwen3-VL-4B-Instruct模型微调图表,batch size为1。
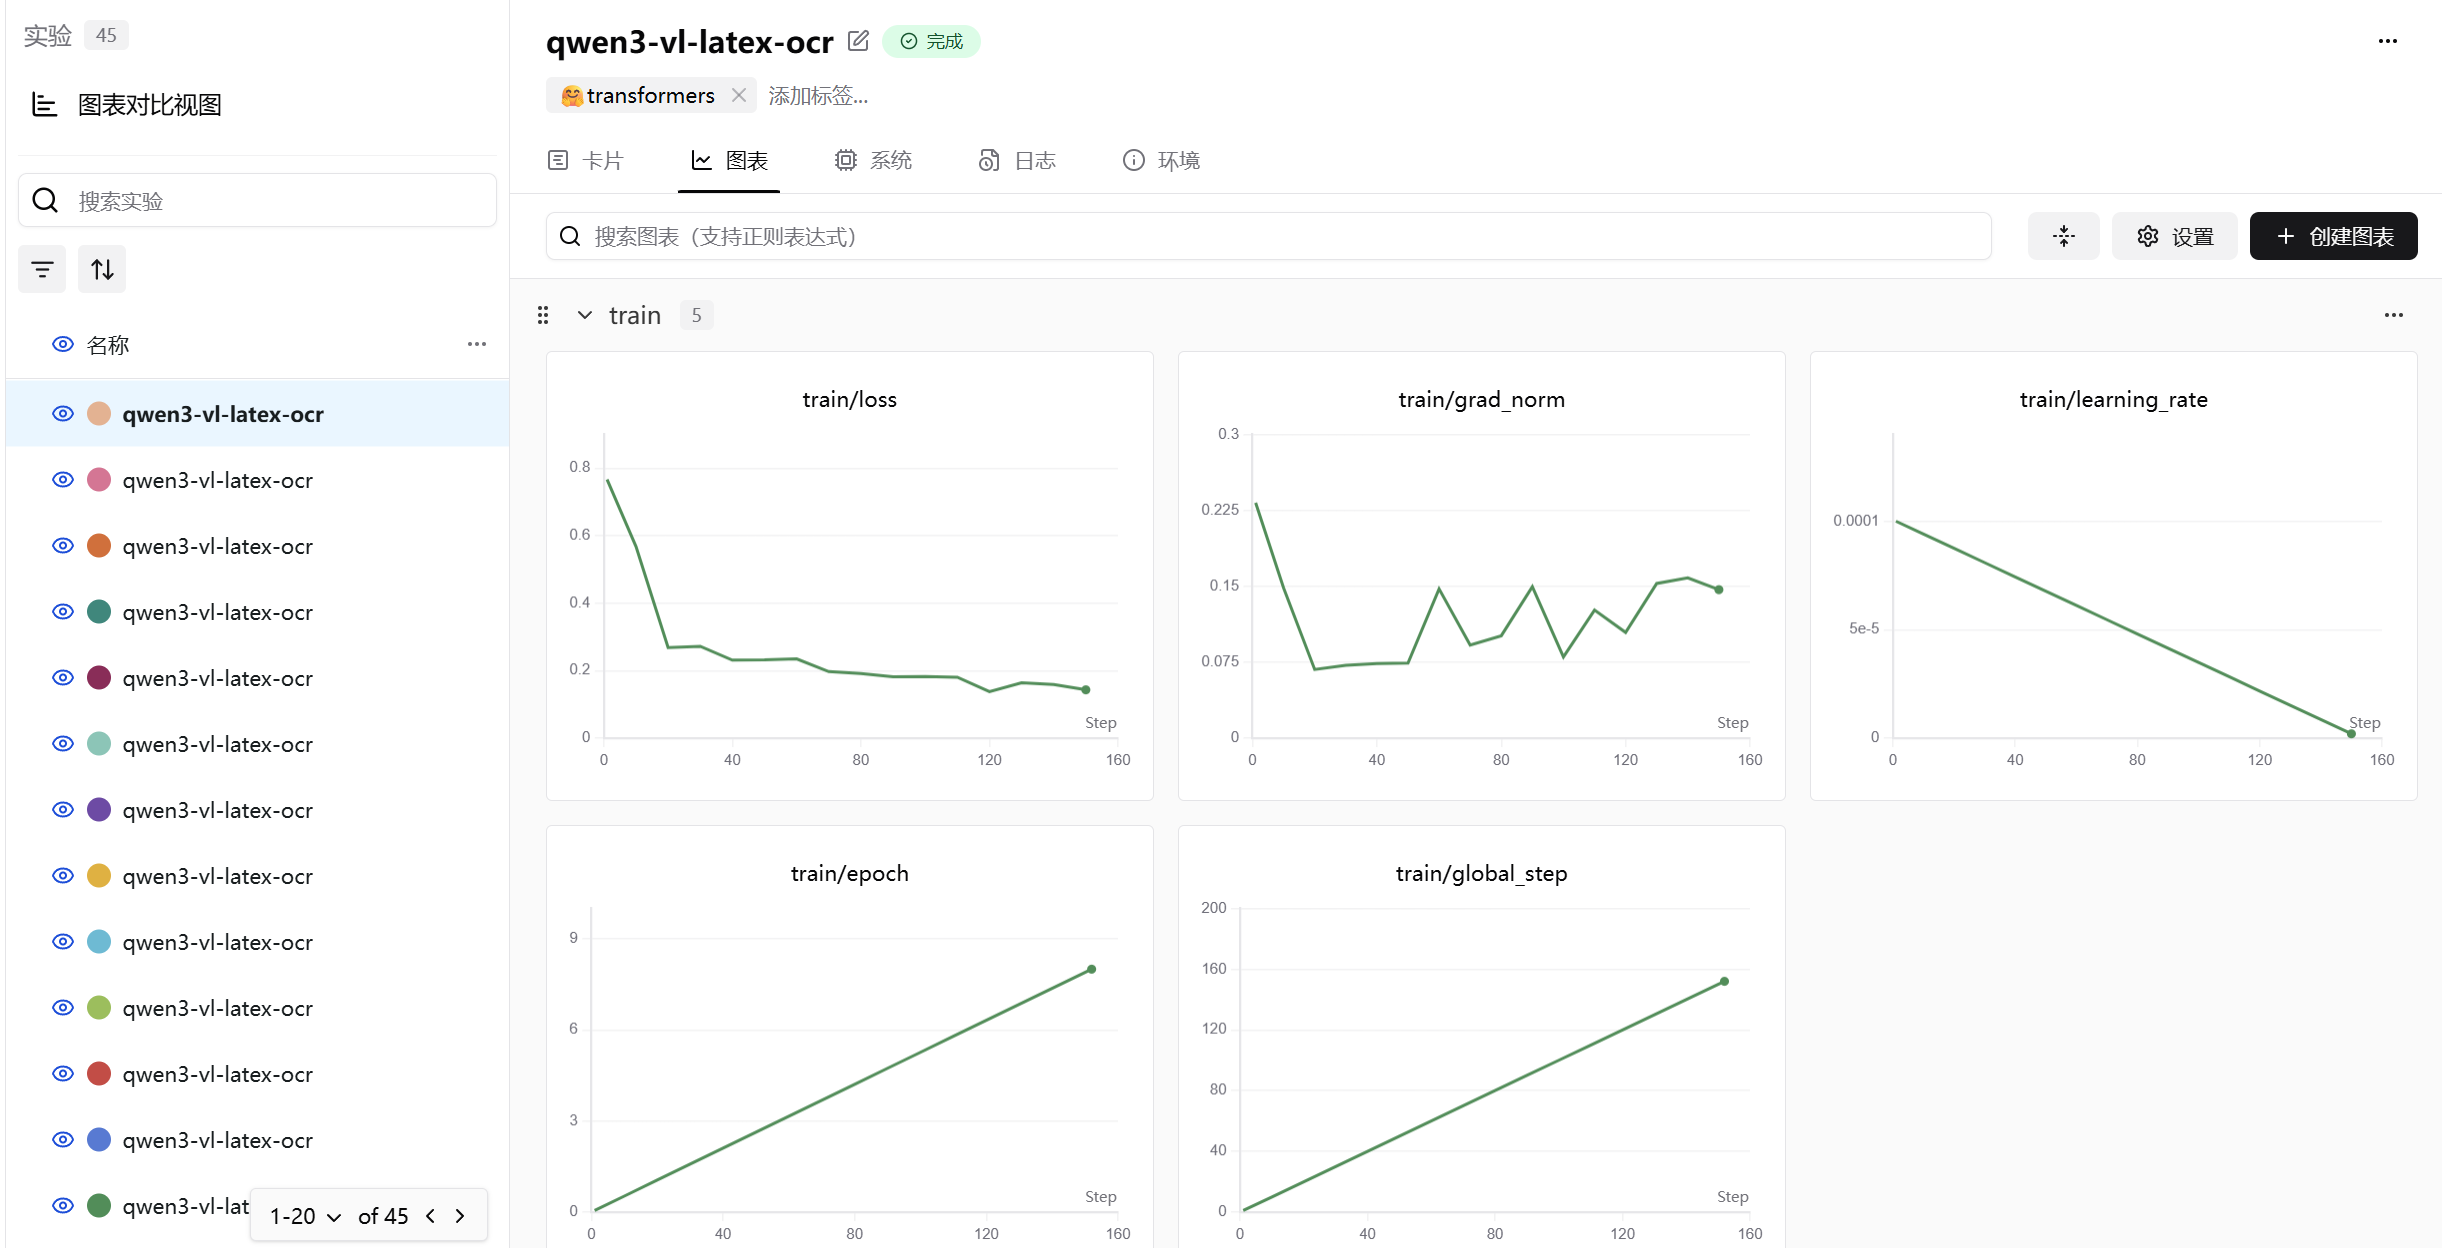
下面的图是qwen/Qwen3-VL-4B-Instruct模型微调图表,batch size为8。
微调后模型效果展示
Qwen/Qwen3-VL-30B-A3B-Instruct
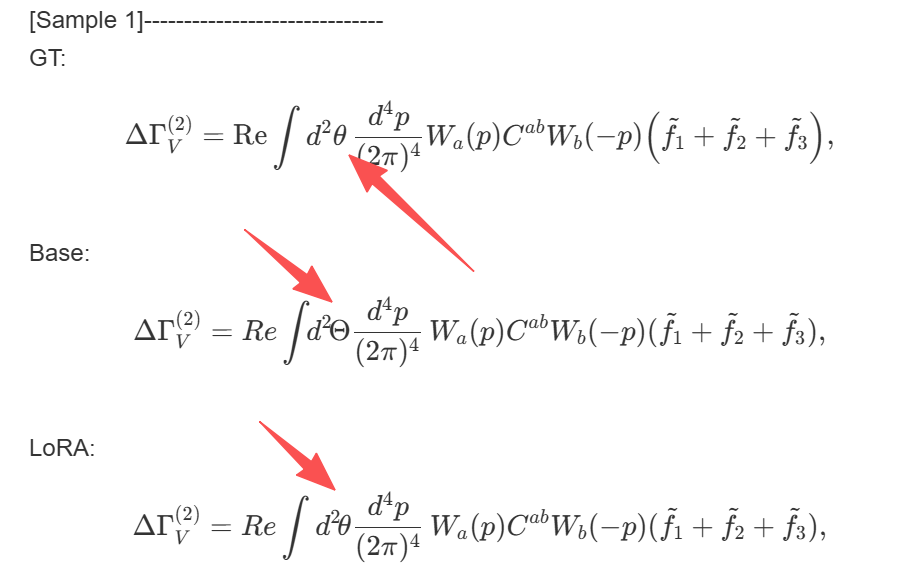
微调前后模型效果对比1,GT为真值,Base为基础模型,LoRA为微调后的模型。
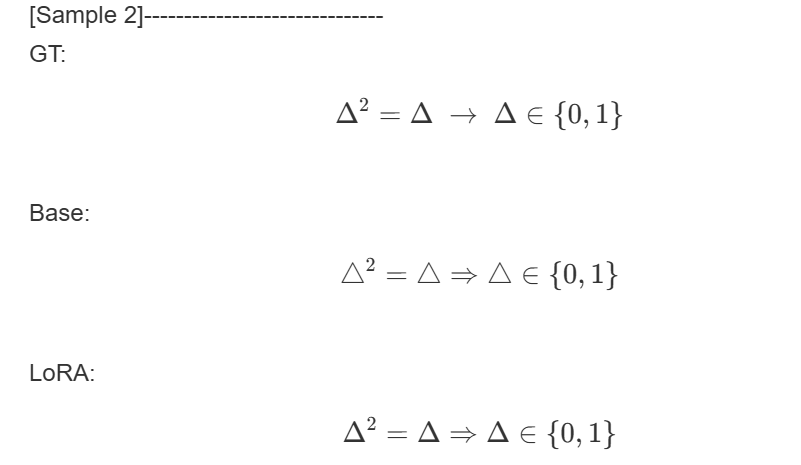
微调前后模型效果对比2。
微调前后模型效果对比3。
Qwen/Qwen3-VL-4B-Instruct
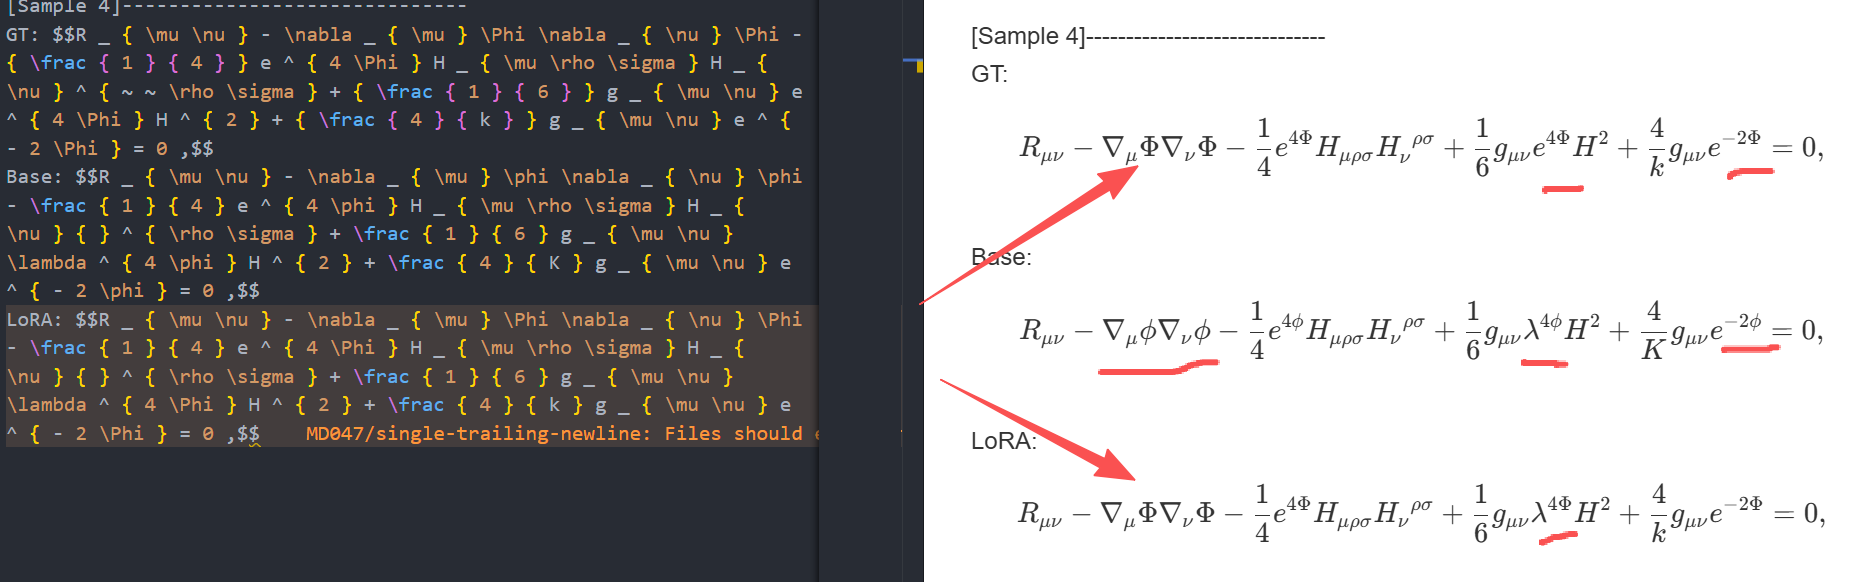
微调前后模型效果对比1,这里是使用batch size为1,训练出来的效果,可以看到这里是较差的提取效果。
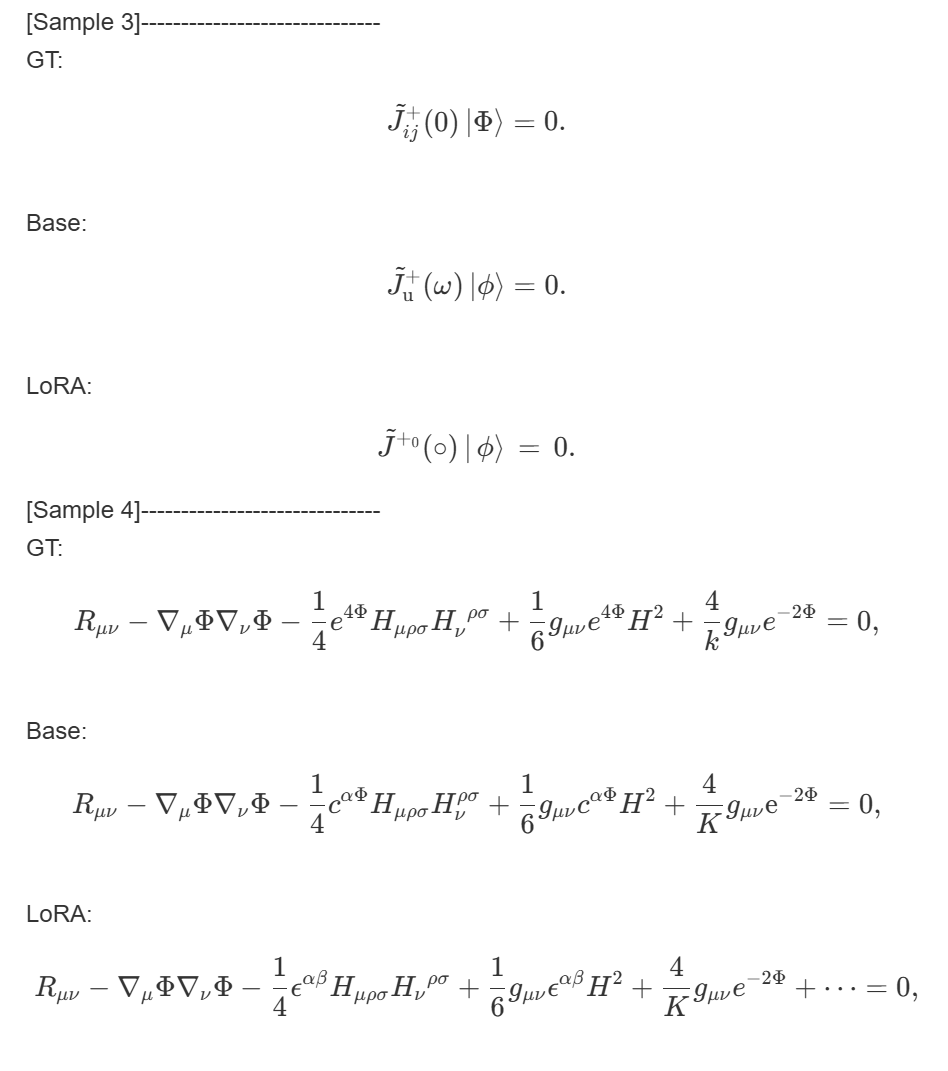
微调前后模型效果对比2,这里是使用batch size为8,训练出来的效果,可以看到效果比之前好很多。
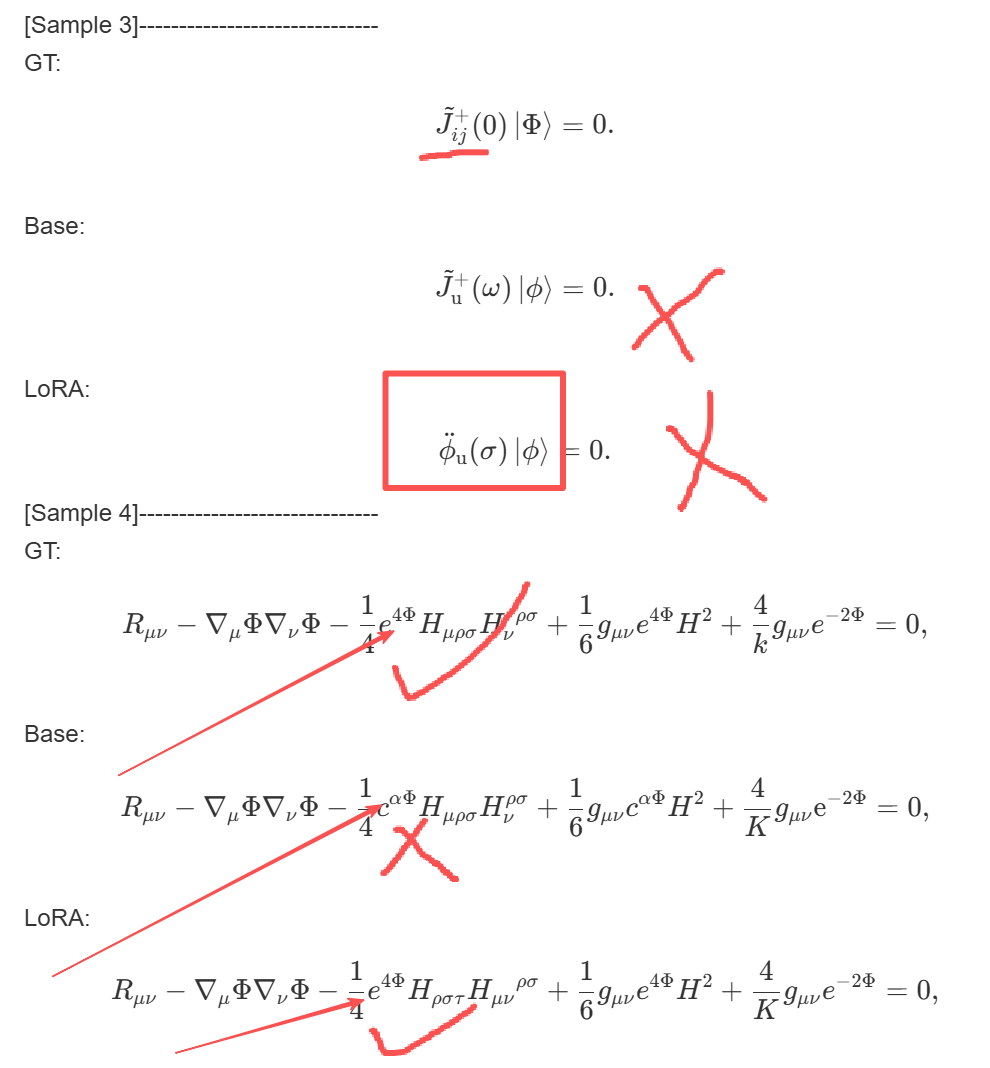
总结
上面显示的是微调前后模型效果对比。
虽然看似 Qwen/Qwen3-VL-30B-A3B-Instruct 部分示例里面前后对比是有提升的,不过我也发现模型在微调之后出现了其他的问题。
比如偶尔有一些示例不如微调前的模型,我觉得是模型有点过拟合导致的。因为从微调的图表中就显示了,我们训练的轮次有些过于多了。
本次模型微调里面我也不仅仅微调了一次,而是多次,我在这次的训练里面也尝试了多种参数,以及不同的子数据集进行训练,所以在训练的过程中也发现了一些有用的观察。
本来我是想要使用手写公式识别的数据集进行训练的。
不过第一次使用手写公式数据集训练的过程中,模型拟合似乎并不好,因为手写的公式数据集里面,不同的一个字符写法可能有很多种,如果我在仅仅使用少量数据集的情况下进行训练,模型微调的效果并不好,于是,换回了非手写的公式。
后面我就使用的是small 子训练集进行微调,刚开始我只是设置了一轮的微调,但是效果并不好,微调前后模型输出的内容几乎一模一样,两轮也是类似的。
接着我慢慢调整训练轮次,在轮次到 9 的时候,很明显的显示 loss 不再是一直向下,反倒是有部分上升了,我觉得就先设置训练轮次为 8 了。
还有一点是 batch size 的设置,这个参数对训练结果有较大的影响,从 Qwen/Qwen3-VL-4B-Instruct 能看出来, batch size 设置为1的时候,模型训练的效果会差一些,我估计是过拟合了,batch size 设置为8的时候,效果相比来说比较好。
在此之后,我觉得是由于批次大小的因素导致的,所以我又把数据集换回了手写的数据集,然后进行微调,结果如我所料,模型在微调后效果有明显的提升。
总结来说,微调前的模型即使是 Qwen/Qwen3-VL-30B-A3B-Instruct 的表现也是 微调之后的模型在测试集上的表现是有不少提升的,在微调前五个测试用例里面只有一个识别的结果是正确的,也就是20%的准确率,微调后的模型在测试集上的表现有 60% 左右的准确率。
如果在数据集上进行全量的微调,我觉得模型效果能够达到一个更优秀的准确率,有条件的小伙伴可以尝试下。
感兴趣的读者,可以试试其他的参数设置,比如rank,lora_alpha、学习率,batch_size等等,然后对比前后调整的差异。
补充模型训练信息
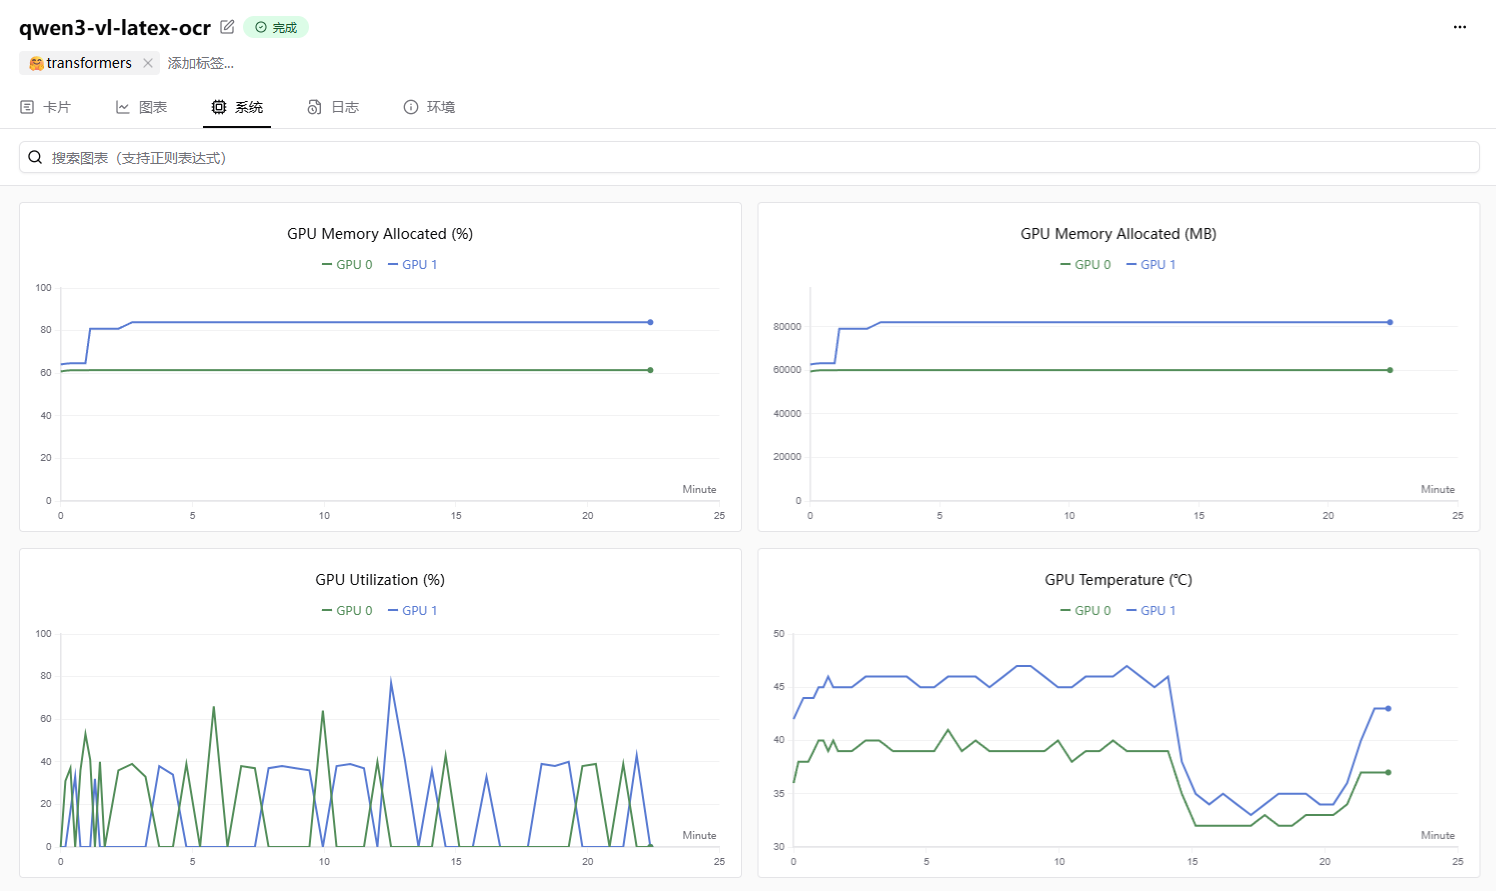
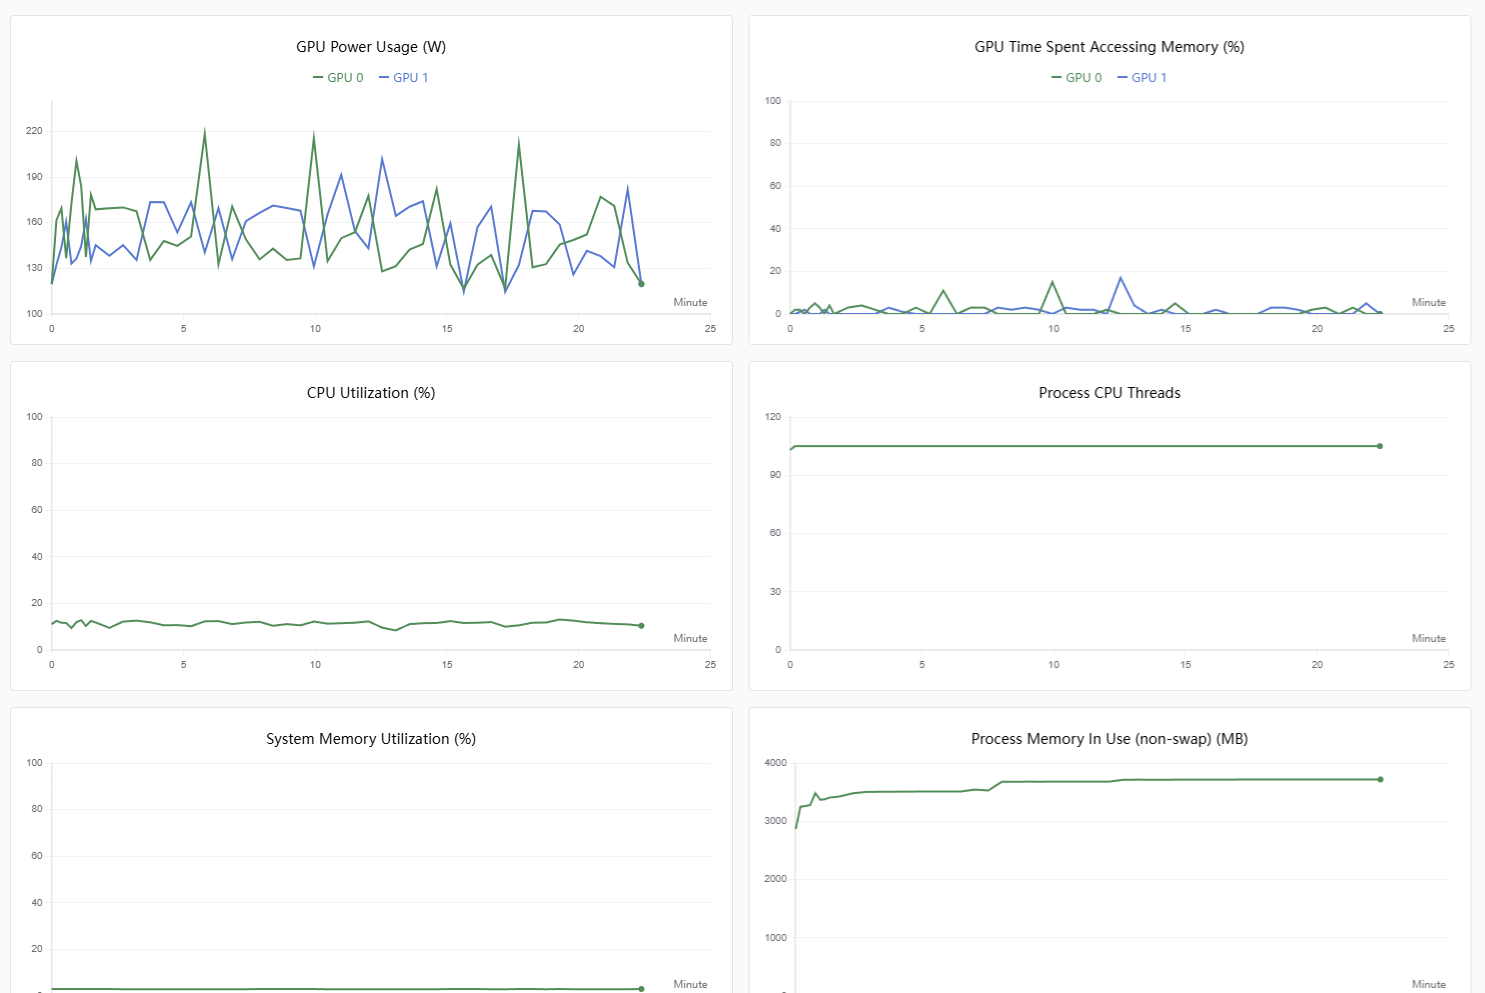
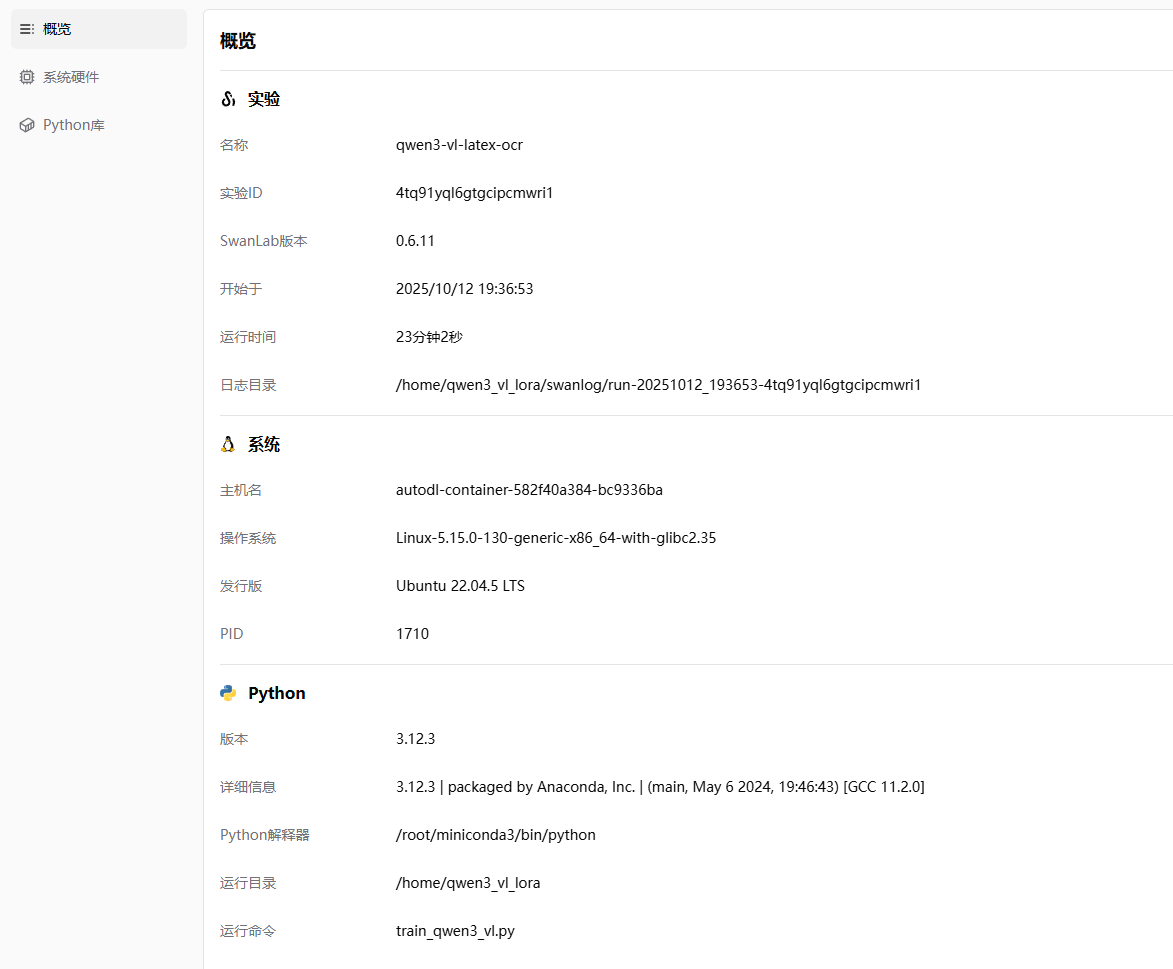
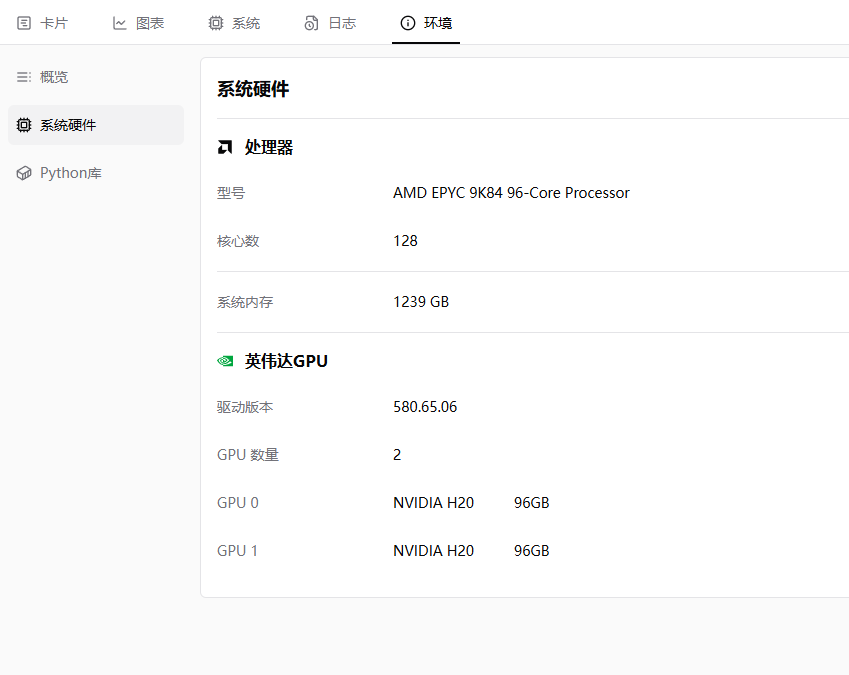
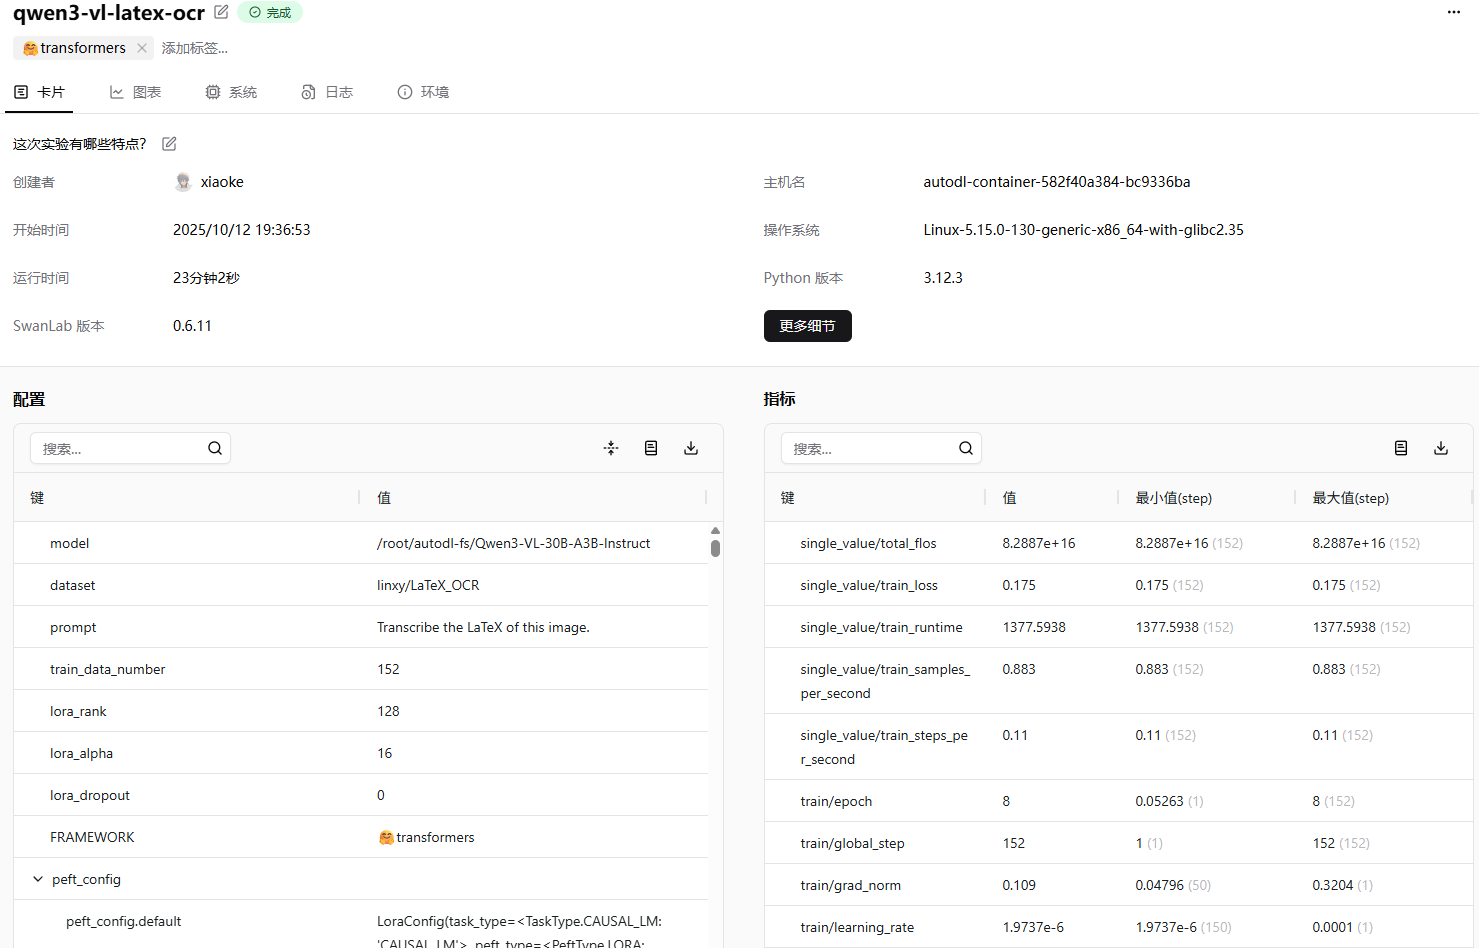
常见错误解决办法
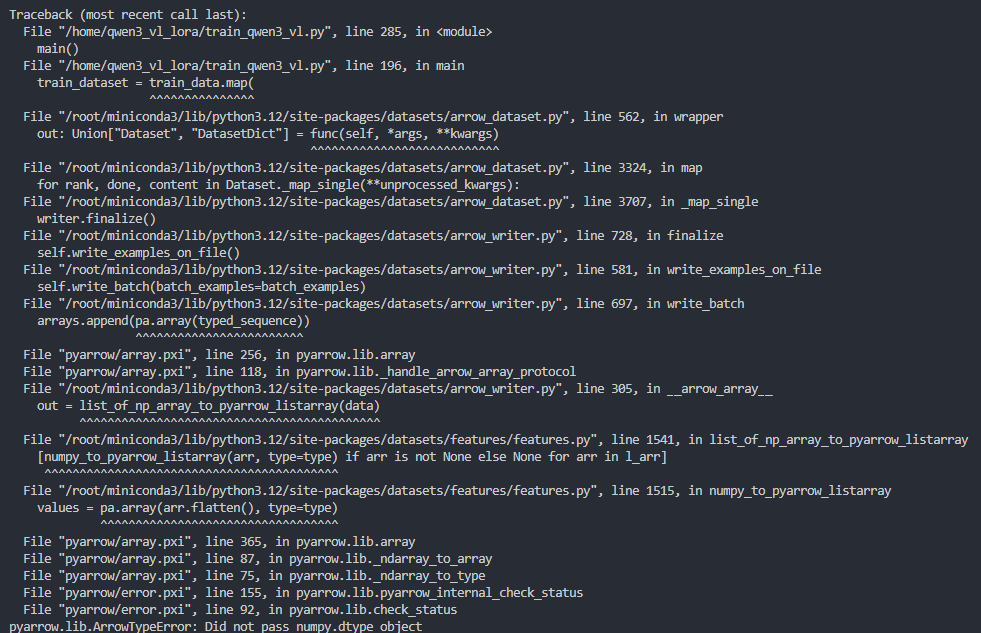
如果遇到上图所示的错误,也就是:
pyarrow.lib.ArrowTypeError: Did not pass numpy.dtype object这种情况,我觉得是由于numpy的版本导致的。 你可以使用下面的命令进行版本修复:
pip install --upgrade numpy运行这个命令,然后重新运行代码, 应该是可以修复这个错误的。
Qwen/Qwen3-VL-4B-Instruct Lora 可视化微调案例 - LaTexOCR
Qwen3-VL在文本理解和生成、视觉感知和推理、扩展的上下文长度、增强的空间和视频动态理解方面都有显著改进。具有适用于从边缘到云的 Dense 和 MoE架构,并具有 Instruct 和推理增强型 Thinking 版本,可实现灵活的按需部署。
值得注意的一个增强功能是OCR能力,模型卡片中介绍到模型能支持 32 种语言(从 19 种增加);在弱光、模糊和倾斜条件下表现稳健;更适合处理稀有/古代字符和行话;改进了长文档结构解析。
本文我们将简要介绍基于 transformers、peft 等框架,使用 Qwen/Qwen3-VL-30B-A3B-Instruct 和 Qwen3-VL-4B-Instruct 模型在 LaTeX_OCR 上进行Lora微调训练,同时使用 SwanLab 监控训练过程与评估模型效果。
备注:本教程使用的代码同时支持 2.5 系列的模型,比如 Qwen/Qwen2.5-VL-3B-Instruct 在本脚本上可以正常运行。
训练使用代码:在同级目录同名目录下
数据集:LaTeX_OCR
模型:Qwen3-VL-30B-A3B-Instruct & Qwen3-VL-4B-Instruct
Qwen/Qwen3-VL-30B-A3B-Instruct 显存需求:124+GB,如果显存不足,可以将per_device_train_batch_size调小,笔者使用两张 H20 进行训练,batch size 默认是8,基于此设置,大概需要 15 分钟,批次大小对时间有影响。
Qwen/Qwen2.5-VL-3B-Instruct 显存需求:20+GB,笔者使用 1 张 H20 进行训练,你也可以使用 24 GB显存的显卡,比如 3090,4090 等,batch size 为 1 的时候需要消耗 5 分钟。
目录
Qwen/Qwen3-VL-4B-Instruct Lora 可视化微调案例 - LaTexOCR
环境配置
准备数据集
模型下载
集成SwanLab
Lora 简介
Lora 配置
微调的完整代码
代码
训练配置
模型路径设置
对比微调前后模型的输出结果
代码
运行配置
模型微调效果
Qwen/Qwen3-VL-30B-A3B-Instruct
Qwen/Qwen3-VL-4B-Instruct
微调后模型效果展示
Qwen/Qwen3-VL-30B-A3B-Instruct
Qwen/Qwen3-VL-4B-Instruct
总结
补充模型训练信息
常见错误解决办法
环境配置
确保你的电脑上至少有一张英伟达显卡,并已安装好了CUDA环境。本次的训练的模型如果你选择的是Qwen/Qwen3-VL-30B-A3B-Instruct,那么是比较大的,需要大概124GB的显存,建议用两张H20才能够完成本次实验。
如果计算资源有限,建议使用 Qwen3-VL-4B-Instruct 完成本次实验,只需要一张 24 GB 的显卡即可完成本次实验。
安装Python(版本>=3.12)以及能够调用CUDA加速的PyTorch,镜像采用 Pytorch2.8.0 Python3.12 CUDA12.8。
安装与Qwen3-VL微调相关的第三方库,可以使用以下命令:
python -m pip install --upgrade pip更换 pypi 源,加速库的安装
pip config set global.index-url https://pypi.tuna.tsinghua.edu.cn/simple我们本次主要用到的一些依赖库如下:
notebook==7.4.7
numpy<2.0
datasets==4.2.0
peft==0.17.1
accelerate==1.10.1
mpmath==1.3.0
networkx==3.4.2
regex==2025.9.18
sympy==1.14.0
tokenizers==0.22.1
torch==2.8.0
torchvision>=0.23.0
transformers>=4.41.2
triton==3.4.0
qwen-vl-utils==0.0.14
matplotlib>=3.10.7
modelscope==1.30.0
python-dotenv>=1.1.1
swanlab你可以复制上面的内容,并写入到requirements.txt文件中,然后运行下面的命令安装所有依赖库:
pip install -r requirements.txt准备数据集
small 是小数据集,样本数 110 条,用于测试。
full 是印刷体约 100k 的完整数据集。实际上样本数略小于 100k,因为他们用 LaTeX 的抽象语法树剔除了很多不能渲染的 LaTeX。
synthetic_handwrite 是手写体 100k 的完整数据集,基于 full 的公式,使用手写字体合成而来,可以视为人类在纸上的手写体。样本数实际上略小于 100k,理由同上。
human_handwrite 是手写体较小数据集,更符合人类在电子屏上的手写体。主要来源于 CROHME。他们用 LaTeX 的抽象语法树校验过了。
5.human_handwrite_print 是来自 human_handwrite 的印刷体数据集,公式部分和 human_handwrite 相同,图片部分由公式用 LaTeX 渲染而来。
你可以去源数据集的页面查看数据集的子集,比如下图显示的就是数据集的各个子集字段名。 每个数据集基本都是只有两个字段,比如text和image。
我们可以使用下面的代码进行数据集的加载。
为了便于实验,你可以在 name 中选择 small、full、synthetic_handwrite、human_handwrite 或 human_handwrite_print,并通过 split 指定 train、validation、test 等划分。
下面示例展示如何加载训练划分并快速检查样本:
from datasets import load_dataset

train_dataset = load_dataset("linxy/LaTeX_OCR", name="small", split="train")
print(train_dataset[2]["text"])
print(train_dataset[2])
print(len(train_dataset))输出:
\rho _ { L } ( q ) = \sum _ { m = 1 } ^ { L } \ P _ { L } ( m ) \ { \frac { 1 } { q ^ { m - 1 } } } .

{
'image': <PIL.PngImagePlugin.PngImageFile image mode=RGB size=200x50 at 0x15A5D6CE210>,

'text': '\\rho _ { L } ( q ) = \\sum _ { m = 1 } ^ { L } \\ P _ { L } ( m ) \\ { \\frac { 1 } { q ^ { m - 1 } } } .'
}

50若需同时获取训练、验证、测试三个划分,可直接加载整个 DatasetDict:
from datasets import load_dataset

dataset = load_dataset("linxy/LaTeX_OCR", name="small")
print(dataset)输出:
DatasetDict({
    train: Dataset({
        features: ['image', 'text'],
        num_rows: 50
    })
    validation: Dataset({
        features: ['image', 'text'],
        num_rows: 30
    })
    test: Dataset({
        features: ['image', 'text'],
        num_rows: 30
    })
})模型下载
在开始模型训练之前,我们需要下载对应的模型。
为了避免由于网络问题导致的模型下载失败,我们使用modelscope对模型进行下载。
模型的地址在:
你可以使用下面的命令,将模型下载到指定的目录下面,下面是以将模型下载到 ./Qwen3-VL-30B-A3B-Instruct 目录下为例:
modelscope download --model Qwen/Qwen3-VL-30B-A3B-Instruct --local_dir ./Qwen3-VL-30B-A3B-Instruct或者是使用下面的命令,下载Qwen/Qwen3-VL-4B-Instruct模型到指定的目录下:
modelscope download --model Qwen/Qwen3-VL-4B-Instruct --local_dir ./Qwen3-VL-4B-Instruct需要注意的是,Qwen/Qwen3-VL-30B-A3B-Instruct 大概需要60GB的存储空间,Qwen/Qwen3-VL-4B-Instruct 大概需要8GB的存储空间,在开始下载之前,如果需要微调的是 30 B的模型,确保磁盘空间闲置大小在 65 GB 以上,如果是 4 B 的模型,存储空间大小要在 10 GB 以上。
如果你需要使用我的代码在AutoDL上直接运行,那么你需要将模型下载到/root/autodl-fs/Qwen3-VL-30B-A3B-Instruct。
fs会长时间占用用户的空间,如果用户没有及时清理的话会一直扣费,所以我建议你换成 auto-tmp 比较好,注意,换成了 auto-tmp 之后你需要修改下加载模型的代码。
集成SwanLab
SwanLab与Transformers已经做好了集成,用法是在Trainer的callbacks参数中添加SwanLabCallback实例,就可以自动记录超参数和训练指标,简化代码如下:
from swanlab.integration.transformers import SwanLabCallback
from transformers import Trainer

swanlab_callback = SwanLabCallback()

trainer = Trainer(
    ...
    callbacks=[swanlab_callback],
)注意:SwanLab的使用是免费的,个人使用的情况下。
登录完成之后的页面是下图所示的样子。
点击其中一个,你可以看到具体的实验训练详情。
点击其中一个就会显示具体的loss变化,还有其他的一些指标。当然,SwanLab还有其他的指标可以进行监控,你可以去官网的文档中查看。
SwanLab地址:
在我的代码里面,api_key我设置成了从环境变量中加载,所以你需要创建一个名为.env的文件,并添加SWAN_LAB=你的API Key。
SWAN_LAB=你的API Key其中api_key可以在下面这个图中显示的位置上获取。
Lora 简介
Lora 的全称是 Low-Rank Adaptation,也就是低秩适配。 传统的模型微调方法,也就是全参数微调,需要更新模型中所有的参数。
Lora的核心思想是权重变化矩阵 $\Delta W$ 可以被近似地分解为两个更小的矩阵的乘积,然后仅更新两个较小的矩阵。
它在推理时不会增加额外的计算延迟。这是因为它旁路的结构可以在推理前被合并回原始的权重矩阵中。
也就是说,我们可以通过简单的矩阵加法 $W' = W_0 + BA$,将适配器的权重融合进主干网络,从而得到一个新的权重矩阵。
《LoRA: Low-Rank Adaptation of Large Language Models
》论文地址:
Lora 配置
lora_config_dict = {
        "lora_rank": 128,
        "lora_alpha": 16,
        "lora_dropout": 0,
    }

    target_modules = ["q_proj", "k_proj", "v_proj", "o_proj"]
    config = LoraConfig(
        task_type=TaskType.CAUSAL_LM,
        target_modules=target_modules,
        inference_mode=False,
        r=lora_config_dict["lora_rank"],
        lora_alpha=lora_config_dict["lora_alpha"],
        lora_dropout=lora_config_dict["lora_dropout"],
        bias="none",
)上面是我们创建Lora配置的代码。如果你需要调整,可以调整lora_config_dict和target_modules,主要是设置了他们。
target_modules:LoRA 适配器要作用于模型中的哪些模块。这里设置为 ["q_proj", "k_proj", "v_proj", "o_proj"].
这些都是 Transformer 模型自注意力机制中的 核心线性投射层,负责生成查询、键、值和输出。
r=128: 这是 LoRA 的 秩 rank。
lora_alpha=16: 这是 LoRA 的 缩放因子 alpha,也就是公式中的α 。
lora_dropout=0: 这个参数设置了 LoRA 层的 丢弃率 dropout rate。 论文中完整的前向传播公式是下面这样的。
$$h=W_{0}x+\Delta Wx=W_{0}x+BAx$$
α 是一个常量,这样做的好处是当改变秩 r 的大小时,可以减少重新调整超参数的需要 。
带上 α 的前向传播公式是下面这样的。
$$h = W_{0}x + \frac{α}{r}BAx$$
微调的完整代码
代码
点击展开/收起微调的完整代码
import os

import torch
from typing import Any, Dict, List

from datasets import load_dataset
from qwen_vl_utils import process_vision_info
from peft import LoraConfig, TaskType, get_peft_model
from transformers import (
    TrainingArguments,
    Trainer,
    AutoProcessor,
    AutoTokenizer,
    AutoConfig,
)
import importlib
import matplotlib.pyplot as plt
from swanlab.integration.transformers import SwanLabCallback
from dotenv import load_dotenv


class Qwen3VLDataCollator:

    def __init__(self, tokenizer):
        self.tokenizer = tokenizer

    def __call__(self, features: List[Dict[str, Any]]) -> Dict[str, torch.Tensor]:
        input_id_tensors = [
            torch.as_tensor(sample["input_ids"], dtype=torch.long) for sample in features
        ]
        attention_tensors = [
            torch.as_tensor(sample["attention_mask"], dtype=torch.long) for sample in features
        ]
        label_tensors = [
            torch.as_tensor(sample["labels"], dtype=torch.long) for sample in features
        ]

        max_length = max(t.size(0) for t in input_id_tensors)
        pad_id = (
            self.tokenizer.pad_token_id
            if getattr(self.tokenizer, "pad_token_id", None) is not None
            else self.tokenizer.eos_token_id
        )
        if pad_id is None:
            raise ValueError("pad_token_id 与 eos_token_id 均为 None,无法进行padding。")

        input_ids = torch.full((len(features), max_length), pad_id, dtype=torch.long)
        attention_mask = torch.zeros((len(features), max_length), dtype=torch.long)
        labels = torch.full((len(features), max_length), -100, dtype=torch.long)

        for idx, (ids, attn, lbl) in enumerate(zip(input_id_tensors, attention_tensors, label_tensors)):
            length = ids.size(0)
            input_ids[idx, :length] = ids
            attention_mask[idx, :length] = attn
            labels[idx, :length] = lbl

        pixel_tensors = []
        for sample in features:
            pv = sample["pixel_values"]
            if not isinstance(pv, torch.Tensor):
                pv = torch.tensor(pv, dtype=torch.float32)
            pixel_tensors.append(pv)
        pixel_values = torch.cat(pixel_tensors, dim=0)

        image_grid_thw = torch.stack(
            [torch.as_tensor(sample["image_grid_thw"], dtype=torch.long).view(-1) for sample in features], dim=0
        )

        return {
            "input_ids": input_ids,
            "attention_mask": attention_mask,
            "labels": labels,
            "pixel_values": pixel_values,
            "image_grid_thw": image_grid_thw,
        }


PROMPT_TEXT = "Transcribe the LaTeX of this image."


def process_func(example, tokenizer, processor):
    MAX_LENGTH = 8192
    image = example["image"]
    output_content = example["text"]
    messages = [
        {
            "role": "user",
            "content": [
                {
                    "type": "image",
                    "image": image,
                },
                {"type": "text", "text": PROMPT_TEXT},
            ],
        }
    ]
    text = processor.apply_chat_template(
        messages, tokenize=False, add_generation_prompt=True
    )
    image_inputs, video_inputs = process_vision_info(messages)
    inputs = processor(
        text=[text],
        images=image_inputs,
        videos=video_inputs,
        do_resize=True,
    )

    instruction_input_ids = inputs["input_ids"][0]

    instruction_attention_mask = inputs["attention_mask"][0]

    instruction_pixel_values = inputs["pixel_values"]

    instruction_image_grid_thw = inputs["image_grid_thw"][0]

    response = tokenizer(f"{output_content}", add_special_tokens=False)
    response_input_ids = response["input_ids"]
    response_attention_mask = response.get(
        "attention_mask", [1] * len(response_input_ids)
    )

    eos_token_id = tokenizer.eos_token_id
    if eos_token_id is not None:
        if not response_input_ids or response_input_ids[-1] != eos_token_id:
            response_input_ids = response_input_ids + [eos_token_id]
            response_attention_mask = response_attention_mask + [1]
    else:
        pad_token_id = tokenizer.pad_token_id
        if pad_token_id is None:
            raise ValueError("需要定义 eos_token_id 或 pad_token_id 才能结束响应序列。")
        response_input_ids = response_input_ids + [pad_token_id]
        response_attention_mask = response_attention_mask + [1]

    input_ids = instruction_input_ids + response_input_ids
    attention_mask = instruction_attention_mask + response_attention_mask
    labels = (
        [-100] * len(instruction_input_ids) + response_input_ids
    )
    if len(input_ids) > MAX_LENGTH:
        input_ids = input_ids[:MAX_LENGTH]
        attention_mask = attention_mask[:MAX_LENGTH]
        labels = labels[:MAX_LENGTH]

    return {
        "input_ids": input_ids,
        "attention_mask": attention_mask,
        "labels": labels,
        "pixel_values": instruction_pixel_values,
        "image_grid_thw": instruction_image_grid_thw,
    }


def main():
    load_dotenv()
    os.environ["SWANLAB_API_KEY"] = os.getenv("SWAN_LAB")

    data_fraction = 0.002

    ds = load_dataset("linxy/LaTeX_OCR", "synthetic_handwrite")

    ds = ds.shuffle(seed=222)

    train_data = ds["train"].select(range(int(len(ds["train"]) * data_fraction)))
    print(f"训练数据大小: {len(train_data)}")
    test_data = ds["test"].select(range(int(len(ds["test"]) * data_fraction)))
    print(f"测试数据大小: {len(test_data)}")

    # model_id = "/root/autodl-fs/Qwen3-VL-30B-A3B-Instruct"
    # model_id = "Qwen/Qwen2.5-VL-3B-Instruct"
    # output_dir = "/root/autodl-fs/output/Qwen3-VL-30B"

    model_id = "/root/autodl-tmp/Qwen3-VL-4B-Instruct"
    output_dir = "/root/autodl-tmp/Qwen3-VL-4B"


    tokenizer = AutoTokenizer.from_pretrained(model_id, cache_dir=os.environ.get("HF_HOME", "./"), use_fast=False, trust_remote_code=True)
    processor = AutoProcessor.from_pretrained(model_id, cache_dir=os.environ.get("HF_HOME", "./"), use_fast=False)

    config = AutoConfig.from_pretrained(model_id, cache_dir=os.environ.get("HF_HOME", "./"), trust_remote_code=True)
    arch = (config.architectures or [None])[0]
    module_name = f"transformers.models.{config.model_type}.modeling_{config.model_type}"
    module = importlib.import_module(module_name)
    model_cls = getattr(module, arch)
    model = model_cls.from_pretrained(
        model_id,
        cache_dir=os.environ.get("HF_HOME", "./"),
        device_map="auto",
        trust_remote_code=True,
    )

    model.to(dtype=torch.bfloat16)

    model.config.use_cache = False

    map_kwargs = {"tokenizer": tokenizer, "processor": processor}
    train_dataset = train_data.map(
        process_func,
        remove_columns=train_data.column_names,
        fn_kwargs=map_kwargs,
    )

    lora_config_dict = {
        "lora_rank": 128,
        "lora_alpha": 16,
        "lora_dropout": 0,
    }

    target_modules = ["q_proj", "k_proj", "v_proj", "o_proj"]
    config = LoraConfig(
        task_type=TaskType.CAUSAL_LM,
        target_modules=target_modules,
        inference_mode=False,
        r=lora_config_dict["lora_rank"],
        lora_alpha=lora_config_dict["lora_alpha"],
        lora_dropout=lora_config_dict["lora_dropout"],
        bias="none",
    )

    peft_model = get_peft_model(model, config)

    peft_model.enable_input_require_grads()

    swanlab_callback = SwanLabCallback(
        project="Qwen3-VL-finetune",
        experiment_name="qwen3-vl-latex-ocr",
        config={
            "model": model_id,
            "dataset": "linxy/LaTeX_OCR",
            "prompt": PROMPT_TEXT,
            "train_data_number": len(train_data),
            "lora_rank": lora_config_dict["lora_rank"],
            "lora_alpha": lora_config_dict["lora_alpha"],
            "lora_dropout": lora_config_dict["lora_dropout"],
        },
    )

    args = TrainingArguments(
        output_dir=output_dir,
        per_device_train_batch_size=8, # 每个GPU的batch size
        gradient_accumulation_steps=1, # 梯度累积步数
        logging_steps=10,
        logging_first_step=5,
        num_train_epochs=8, # 训练轮数
        save_steps=50, # 每多少步保存一次模型
        save_total_limit=3, # 最多保存模型数量
        learning_rate=1e-4, # 学习率
        gradient_checkpointing=True, # 梯度检查点
        gradient_checkpointing_kwargs={"use_reentrant": False},
        report_to="none",
    )

    eval_dataset = test_data.map(
        process_func,
        remove_columns=test_data.column_names,
        fn_kwargs=map_kwargs,
    )

    trainer = Trainer(
        model=peft_model,
        args=args,
        train_dataset=train_dataset,
        eval_dataset=eval_dataset,
        data_collator=Qwen3VLDataCollator(tokenizer=tokenizer),
        callbacks=[swanlab_callback],
    )

    trainer.train()

    logs = trainer.state.log_history
    steps = [log['step'] for log in logs if 'loss' in log]
    losses = [log['loss'] for log in logs if 'loss' in log]
    plt.plot(steps, losses)
    plt.xlabel('Step')
    plt.ylabel('Loss')
    plt.title('Training Loss (Qwen3-VL-30B)')

    os.makedirs(output_dir, exist_ok=True)
    plt.savefig(os.path.join(output_dir, "training_loss.png"))

    trainer.model.save_pretrained(output_dir)
    tokenizer.save_pretrained(output_dir)
    processor.save_pretrained(output_dir)

if __name__ == "__main__":
main()训练配置
训练配置如下:
args = TrainingArguments(
    output_dir=output_dir,
    per_device_train_batch_size=8, # 每个GPU的batch size
    gradient_accumulation_steps=1, # 梯度累积步数
    logging_steps=10,
    logging_first_step=5,
    num_train_epochs=8, # 训练轮数
    save_steps=50, # 每多少步保存一次模型
    save_total_limit=3, # 最多保存模型数量
    learning_rate=1e-4, # 学习率
    gradient_checkpointing=True, # 梯度检查点
    gradient_checkpointing_kwargs={"use_reentrant": False},
    report_to="none",
)模型路径设置
模型路径设置的部分是:
# model_id = "/root/autodl-fs/Qwen3-VL-30B-A3B-Instruct"
# model_id = "Qwen/Qwen2.5-VL-3B-Instruct"
# output_dir = "/root/autodl-fs/output/Qwen3-VL-30B"

model_id = "/root/autodl-tmp/Qwen3-VL-4B-Instruct"
output_dir = "/root/autodl-tmp/Qwen3-VL-4B"你可以基于我原有的代码进行修改,可以替换成你想要进行微调的模型。
对比微调前后模型的输出结果
代码
我们可以使用下面的代码来对比微调前后模型的输出结果。 点击查看代码
import os
import sys
from typing import List, Tuple

import torch
from datasets import load_dataset
from peft import PeftModel
from transformers import AutoProcessor, AutoTokenizer, AutoConfig
import importlib

from qwen_vl_utils import process_vision_info


PROMPT_TEXT = "Transcribe the LaTeX of this image."
# 使用本地基础模型与LoRA目录
# BASE_MODEL_ID = "/root/autodl-fs/Qwen3-VL-30B-A3B-Instruct"
# PEFT_DIR = "/root/autodl-fs/output/Qwen3-VL-30B"
BASE_MODEL_ID = "/root/autodl-tmp/Qwen3-VL-4B-Instruct"
PEFT_DIR = "/root/autodl-tmp/Qwen3-VL-4B"
# 是否在内存内合并LoRA(不落盘)
MERGE_LORA_IN_MEMORY = True
NUM_TEST_SAMPLES = 5

DEVICE = torch.device("cuda" if torch.cuda.is_available() else "cpu")
DTYPE = torch.bfloat16 if DEVICE.type == "cuda" else torch.float32


def load_backbone(model_id: str):
    tokenizer = AutoTokenizer.from_pretrained(model_id, cache_dir=os.environ.get("HF_HOME", "./"), use_fast=False, trust_remote_code=True)
    processor = AutoProcessor.from_pretrained(model_id, cache_dir=os.environ.get("HF_HOME", "./"), use_fast=False, trust_remote_code=True)

    config = AutoConfig.from_pretrained(model_id, cache_dir=os.environ.get("HF_HOME", "./"), trust_remote_code=True)
    arch = (config.architectures or [None])[0]
    module_name = f"transformers.models.{config.model_type}.modeling_{config.model_type}"
    module = importlib.import_module(module_name)
    model_cls = getattr(module, arch)

    model = model_cls.from_pretrained(
        model_id,
        cache_dir=os.environ.get("HF_HOME", "./"),
        device_map="auto" if DEVICE.type == "cuda" else None,
        trust_remote_code=True,
    )
    model.to(dtype=DTYPE)

    return model, tokenizer, processor


def load_lora_model(peft_dir: str, base_model_id: str = BASE_MODEL_ID):
    if not os.path.isdir(peft_dir):
        raise FileNotFoundError(f"未找到微调模型目录: {peft_dir}")

    # 基座
    base_model, _base_tok, _base_proc = load_backbone(base_model_id)

    # 先加载LoRA
    peft_model = PeftModel.from_pretrained(base_model, peft_dir)
    model = peft_model
    if MERGE_LORA_IN_MEMORY:
        try:
            model = peft_model.merge_and_unload()
            print("LoRA内存合并成功。")
        except Exception:
            print("警告: LoRA内存合并失败,继续使用未合并模型。")
            # 合并失败则退回未合并模型
            model = peft_model
    model.to(dtype=DTYPE)
    model.eval()


    # tokenizer/processor 优先从LoRA目录读取,保证chat_template与词表一致
    tokenizer = AutoTokenizer.from_pretrained(peft_dir, cache_dir=os.environ.get("HF_HOME", "./"), use_fast=False, trust_remote_code=True)
    processor = AutoProcessor.from_pretrained(peft_dir, cache_dir=os.environ.get("HF_HOME", "./"), use_fast=False, trust_remote_code=True)
    return model, tokenizer, processor


def build_inputs(processor, image, prompt_text: str):
    messages = [
        {
            "role": "user",
            "content": [
                {"type": "image", "image": image},
                {"type": "text", "text": prompt_text},
            ],
        }
    ]
    text = processor.apply_chat_template(messages, tokenize=False, add_generation_prompt=True)
    image_inputs, video_inputs = process_vision_info(messages)
    inputs = processor(text=[text], images=image_inputs, videos=video_inputs, do_resize=True)
    return inputs


def ensure_block_dollars(text: str) -> str:
    if text is None:
        return "$$$$"
    s = str(text).strip()
    if s.startswith("$$") and s.endswith("$$"):
        return s
    if s.startswith("$") and s.endswith("$") and not s.startswith("$$") and not s.endswith("$$"):
        inner = s[1:-1].strip()
        return f"$${inner}$$"
    if s.count("$$") >= 2:
        return s
    return f"$${s}$$"


@torch.inference_mode()
def generate_answer(model, tokenizer, processor, image, max_new_tokens: int = 512) -> str:
    inputs = build_inputs(processor, image, PROMPT_TEXT)

    input_ids = torch.as_tensor(inputs["input_ids"], device=DEVICE)
    if input_ids.ndim == 1:
        input_ids = input_ids.unsqueeze(0)
    attention_mask = inputs.get("attention_mask", None)
    if attention_mask is not None:
        attention_mask = torch.as_tensor(attention_mask, device=DEVICE)
        if attention_mask.ndim == 1:
            attention_mask = attention_mask.unsqueeze(0)

    pixel_values = inputs.get("pixel_values")
    pixel_values = torch.as_tensor(pixel_values, device=DEVICE)

    image_grid_thw = inputs.get("image_grid_thw")
    image_grid_thw = torch.as_tensor(image_grid_thw, device=DEVICE)

    gen_kwargs = {
        "input_ids": input_ids,
        "pixel_values": pixel_values,
        "max_new_tokens": max_new_tokens,
        "do_sample": False,
        "use_cache": True,
    }
    if attention_mask is not None:
        gen_kwargs["attention_mask"] = attention_mask
    if image_grid_thw is not None:
        gen_kwargs["image_grid_thw"] = image_grid_thw

    outputs = model.generate(**gen_kwargs)
    gen_seq = outputs[0].tolist()
    prompt_len = input_ids.shape[1]
    gen_ids = gen_seq[prompt_len:]
    text = tokenizer.decode(gen_ids, skip_special_tokens=True)
    return text.strip()


def main():
    print("Loading dataset linxy/LaTeX_OCR (synthetic_handwrite)...")
    ds = load_dataset("linxy/LaTeX_OCR", "synthetic_handwrite")
    ds = ds.shuffle(seed=222)
    # test_split = ds["train"].select(range(NUM_TEST_SAMPLES))
    test_split = ds["test"].select(range(NUM_TEST_SAMPLES))

    print("Loading base model...")
    base_model, base_tokenizer, base_processor = load_backbone(BASE_MODEL_ID)
    try:
        if hasattr(base_model, "gradient_checkpointing"):
            base_model.gradient_checkpointing_disable()
        if hasattr(base_model, "config"):
            base_model.config.use_cache = True
        if hasattr(base_model, "generation_config") and base_model.generation_config is not None:
            base_model.generation_config.use_cache = True
    except Exception:
        pass
    base_model.eval()

    print(f"Loading LoRA fine-tuned model from: {PEFT_DIR}")
    try:
        lora_model, lora_tokenizer, lora_processor = load_lora_model(PEFT_DIR, BASE_MODEL_ID)
        try:
            if hasattr(lora_model, "gradient_checkpointing"):
                lora_model.gradient_checkpointing_disable()
            if hasattr(lora_model, "config"):
                lora_model.config.use_cache = True
        except Exception:
            pass
    except Exception as e:
        print(f"加载微调模型失败: {e}")
        print("仅对基础模型进行推理对比。")
        lora_model = None
        lora_tokenizer = base_tokenizer
        lora_processor = base_processor

    print(f"\n===== Inference Comparison on {NUM_TEST_SAMPLES} samples =====\n")
    for idx, sample in enumerate(test_split):
        image = sample["image"]
        gt = sample.get("text", "")
        print(f"[Sample {idx}]------------------------------")
        print(f"GT: {ensure_block_dollars(gt)}")

        base_pred = ensure_block_dollars(generate_answer(base_model, base_tokenizer, base_processor, image))
        print(f"Base: {base_pred}")

        if lora_model is not None:
            lora_pred = ensure_block_dollars(generate_answer(lora_model, lora_tokenizer, lora_processor, image))
            print(f"LoRA: {lora_pred}")
        else:
            print("LoRA: <not loaded>")

        print()


if __name__ == "__main__":
main()运行配置
模型路径设置的位置和其他的一些设置项,在文件的开始部分代码中,具体如下。
PROMPT_TEXT = "Transcribe the LaTeX of this image." # 使用的提示词。

# 使用本地基础模型与LoRA目录
# BASE_MODEL_ID = "/root/autodl-fs/Qwen3-VL-30B-A3B-Instruct"
# PEFT_DIR = "/root/autodl-fs/output/Qwen3-VL-30B"
BASE_MODEL_ID = "/root/autodl-tmp/Qwen3-VL-4B-Instruct"
PEFT_DIR = "/root/autodl-tmp/Qwen3-VL-4B"
# 是否在内存内合并LoRA(不落盘)
MERGE_LORA_IN_MEMORY = True
NUM_TEST_SAMPLES = 5 # 是使用的测试样本数模型微调效果
Qwen/Qwen3-VL-30B-A3B-Instruct
下面的图是Qwen/Qwen3-VL-30B-A3B-Instruct模型微调图表,使用的batch size为8。
从图的效果看,loss基本都处于一个稳定下降的状态,证明我们的训练效果是在拟合数据集的。
Qwen/Qwen3-VL-4B-Instruct
下面的图是Qwen/Qwen3-VL-4B-Instruct模型微调图表,batch size为1。
下面的图是qwen/Qwen3-VL-4B-Instruct模型微调图表,batch size为8。
微调后模型效果展示
Qwen/Qwen3-VL-30B-A3B-Instruct
微调前后模型效果对比1。
微调前后模型效果对比2。
微调前后模型效果对比3。
Qwen/Qwen3-VL-4B-Instruct
微调前后模型效果对比1,这里是使用batch size为1,训练出来的效果,可以看到这里是较差的提取效果。
微调前后模型效果对比2,这里是使用batch size为8,训练出来的效果,可以看到效果比之前好很多。
总结
上面显示的是微调前后模型效果对比。
虽然看似 Qwen/Qwen3-VL-30B-A3B-Instruct 部分示例里面前后对比是有提升的,不过我也发现模型在微调之后出现了其他的问题。
比如偶尔有一些示例不如微调前的模型,我觉得是模型有点过拟合导致的。因为从微调的图表中就显示了,我们训练的轮次有些过于多了。
本次模型微调里面我也不仅仅微调了一次,而是多次。
刚开始我只是设置了一轮的微调,但是效果并不好,微调前后模型输出的内容几乎一模一样,两轮也是类似的。
接着我慢慢调整训练轮次,在轮次到9的时候,很明显loss不再是一直向下,反倒是有部分上升了,我觉得就先设置训练轮次为8了。
本来我是想要使用手写公式识别的数据集进行训练的。
不过训练的过程中,模型拟合似乎并不好,因为手写的公式数据集里面,不同的一个字符写法可能有很多种,如果我在仅仅使用少量数据集的情况下进行训练,模型微调的效果并不好,于是,换回了非手写的公式。
还有一点是 batch size 的设置,这个参数对训练结果有较大的影响,从 Qwen/Qwen3-VL-4B-Instruct 能看出来, batch size 设置为1的时候,模型训练的效果会差一些,我估计是过拟合了,batch size 设置为8的时候,效果相比来说比较好。
感兴趣的读者,可以试试其他的参数设置,比如rank,lora_alpha、学习率,batch_size等等,然后对比前后调整的差异。
补充模型训练信息
常见错误解决办法
如果遇到上图所示的错误,也就是:
pyarrow.lib.ArrowTypeError: Did not pass numpy.dtype object这种情况,我觉得是由于numpy的版本导致的。 你可以使用下面的命令进行版本修复:
pip install --upgrade numpy运行这个命令,然后重新运行代码, 应该是可以修复这个错误的。