InternLM-Chat-7B Transformers 部署调用
InternLM-Chat-7B Transformers 部署调用
环境准备
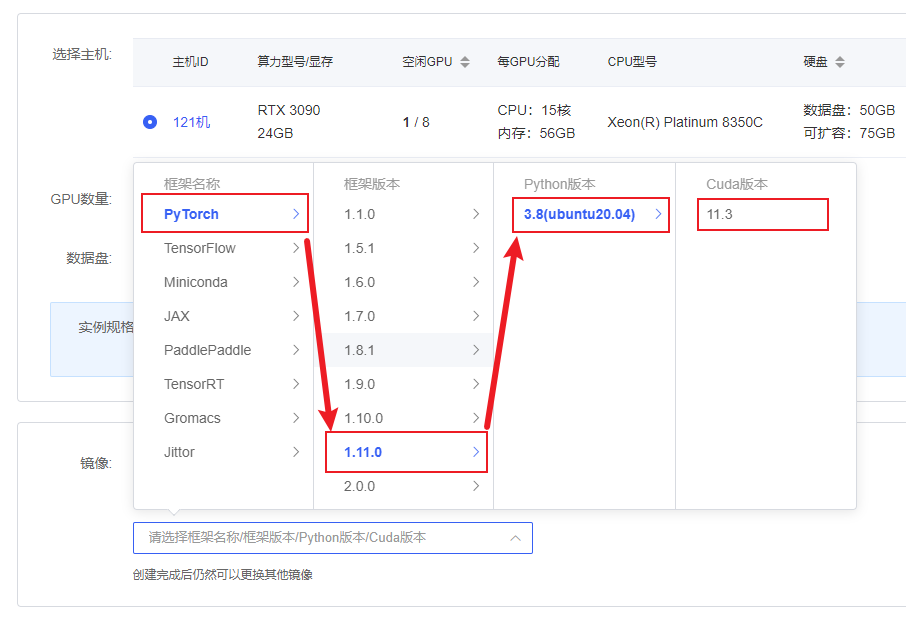
接下来打开自己刚刚租用服务器的JupyterLab,并且打开其中的终端开始环境配置、模型下载和运行demo.

pip换源和安装依赖包
# 升级pip
python -m pip install --upgrade pip
# 更换 pypi 源加速库的安装
pip config set global.index-url https://pypi.tuna.tsinghua.edu.cn/simple

pip install modelscope==1.9.5
pip install transformers==4.35.2
pip install streamlit==1.24.0
pip install sentencepiece==0.1.99
pip install accelerate==0.24.1模型下载
使用modelscope(魔塔社区)中的snapshot_download函数下载模型,第一个参数为模型名称,参数cache_dir为模型的下载路径。
在/root/autodl-tmp路径下新建download.py文件
#将当前工作目录切换到/root/autodl-tmp目录下
cd /root/autodl-tmp
#创建一个名为download.py的空文件
touch download.py并在其中输入以下内容:
import torch
from modelscope import snapshot_download, AutoModel, AutoTokenizer
import os
model_dir = snapshot_download('Shanghai_AI_Laboratory/internlm-chat-7b', cache_dir='/root/autodl-tmp', revision='master')粘贴代码后记得保存文件(Ctrl+S),如下图所示。
 保存后返回终端界面,运行
Python /root/autodl-tmp/download.py执行下载,模型大小为14GB,下载模型大概需要10~20分钟。
代码准备
在/root/autodl-tmp路径下新建trans.py文件并在其中输入以下内容
# 导入所需的库
import torch
from transformers import AutoTokenizer, AutoModelForCausalLM

# 从预训练模型加载 tokenizer 和 model
# AutoTokenizer 用于处理文本输入并准备模型输入
# AutoModelForCausalLM 是一个生成式语言模型,支持生成对话
# trust_remote_code=True 表示信任从远程加载的代码
#通过AutoTokenizer.from_pretrained()函数加载预训练模型的tokenizer
tokenizer = AutoTokenizer.from_pretrained("/root/autodl-tmp/Shanghai_AI_Laboratory/internlm-chat-7b", trust_remote_code=True)

model = AutoModelForCausalLM.from_pretrained("/root/autodl-tmp/Shanghai_AI_Laboratory/internlm-chat-7b",trust_remote_code=True).to(torch.bfloat16).cuda()
# 将模型加载到 GPU(如果可用)并设置为评估模式
model = model.eval().cuda()

# 准备对话的历史记录
# 在开始对话之前,历史记录为空列表
#调用model.chat(tokenizer, "hello", history=[])来生成对话,将使用模型和tokenizer来根据给定的历史记录生成回复。生成的回复存储在response变量中
response, history = model.chat(tokenizer, "hello", history=[])

# 打印模型生成的响应文本
print(response)粘贴代码后记得保存文件,上面的代码有比较详细的注释,大家如有不理解的地方,欢迎提出issue。
部署
在终端输入以下命令启动transformers服务
cd /root/autodl-tmp
python trans.py耐心等待一下它加载,得到返回值如下所示:
Hello!How can I assist you today?

然后可以在以上trans.py代码的基础上加一个对话,代码如下所示:
response,history = model.chat(tokenizer,"please provide three suggestions about time management",history=history)

print(response)耐心等待加载,首先会出来第一个对话内容模型生成的响应文本如下图所示,然后再等待一会它会接着出现第二个对话模型生成的响应文本如下所示:


internLM-Chat-7B FastApi 部署调用
环境准备
接下来打开刚刚租用服务器的JupyterLab,并且打开其中的终端开始环境配置、模型下载和运行demo。
pip换源和安装依赖包
# 升级pip
python -m pip install --upgrade pip
# 更换 pypi 源加速库的安装
pip config set global.index-url https://pypi.tuna.tsinghua.edu.cn/simple

pip install fastapi==0.104.1
pip install uvicorn==0.24.0.post1
pip install requests==2.25.1
pip install modelscope==1.9.5
pip install transformers==4.35.2
pip install streamlit==1.24.0
pip install sentencepiece==0.1.99
pip install accelerate==0.24.1模型下载
使用 modelscope 中的snapshot_download函数下载模型,第一个参数为模型名称,参数cache_dir为模型的下载路径。
在 /root/autodl-tmp 路径下新建 download.py 文件并在其中输入以下内容,粘贴代码后记得保存文件,如下图所示。并运行 python /root/autodl-tmp/download.py执行下载,模型大小为 14 GB,下载模型大概需要 10~20 分钟
import torch
from modelscope import snapshot_download, AutoModel, AutoTokenizer
import os
model_dir = snapshot_download('Shanghai_AI_Laboratory/internlm-chat-7b', cache_dir='/root/autodl-tmp', revision='master')
代码准备
在/root/autodl-tmp路径下新建api.py文件并在其中输入以下内容,粘贴代码后记得保存文件。下面的代码有很详细的注释,大家如有不理解的地方,欢迎提出issue。
from fastapi import FastAPI, Request
from transformers import AutoTokenizer, AutoModelForCausalLM
import uvicorn
import json
import datetime
import torch

# 设置设备参数
DEVICE = "cuda"  # 使用CUDA
DEVICE_ID = "0"  # CUDA设备ID,如果未设置则为空
CUDA_DEVICE = f"{DEVICE}:{DEVICE_ID}" if DEVICE_ID else DEVICE  # 组合CUDA设备信息

# 清理GPU内存函数
def torch_gc():
    if torch.cuda.is_available():  # 检查是否可用CUDA
        with torch.cuda.device(CUDA_DEVICE):  # 指定CUDA设备
            torch.cuda.empty_cache()  # 清空CUDA缓存
            torch.cuda.ipc_collect()  # 收集CUDA内存碎片

# 创建FastAPI应用
app = FastAPI()

# 处理POST请求的端点
@app.post("/")
async def create_item(request: Request):
    global model, tokenizer  # 声明全局变量以便在函数内部使用模型和分词器
    json_post_raw = await request.json()  # 获取POST请求的JSON数据
    json_post = json.dumps(json_post_raw)  # 将JSON数据转换为字符串
    json_post_list = json.loads(json_post)  # 将字符串转换为Python对象
    prompt = json_post_list.get('prompt')  # 获取请求中的提示
    history = json_post_list.get('history')  # 获取请求中的历史记录
    max_length = json_post_list.get('max_length')  # 获取请求中的最大长度
    top_p = json_post_list.get('top_p')  # 获取请求中的top_p参数
    temperature = json_post_list.get('temperature')  # 获取请求中的温度参数
    # 调用模型进行对话生成
    response, history = model.chat(
        tokenizer,
        prompt,
        history=history,
        max_length=max_length if max_length else 2048,  # 如果未提供最大长度,默认使用2048
        top_p=top_p if top_p else 0.7,  # 如果未提供top_p参数,默认使用0.7
        temperature=temperature if temperature else 0.95  # 如果未提供温度参数,默认使用0.95
    )
    now = datetime.datetime.now()  # 获取当前时间
    time = now.strftime("%Y-%m-%d %H:%M:%S")  # 格式化时间为字符串
    # 构建响应JSON
    answer = {
        "response": response,
        "history": history,
        "status": 200,
        "time": time
    }
    # 构建日志信息
    log = "[" + time + "] " + '", prompt:"' + prompt + '", response:"' + repr(response) + '"'
    print(log)  # 打印日志
    torch_gc()  # 执行GPU内存清理
    return answer  # 返回响应

# 主函数入口
if __name__ == '__main__':
    # 加载预训练的分词器和模型
    tokenizer = AutoTokenizer.from_pretrained("/root/autodl-tmp/Shanghai_AI_Laboratory/internlm-chat-7b", trust_remote_code=True)
    model = AutoModelForCausalLM.from_pretrained("/root/autodl-tmp/Shanghai_AI_Laboratory/internlm-chat-7b", trust_remote_code=True).to(torch.bfloat16).cuda()
    model.eval()  # 设置模型为评估模式
    # 启动FastAPI应用
    # 用6006端口可以将autodl的端口映射到本地,从而在本地使用api
uvicorn.run(app, host='0.0.0.0', port=6006, workers=1) # 在指定端口和主机上启动应用Api 部署
在终端输入以下命令启动api服务
cd /root/autodl-tmp
python api.py默认部署在 6006 端口,通过 POST 方法进行调用,可以使用curl调用,如下所示:
curl -X POST "http://127.0.0.1:6006" \
     -H 'Content-Type: application/json' \
-d '{"prompt": "你好", "history": []}'也可以使用python中的requests库进行调用,如下所示:
import requests
import json

def get_completion(prompt):
    headers = {'Content-Type': 'application/json'}
    data = {"prompt": prompt, "history": []}
    response = requests.post(url='http://127.0.0.1:6006', headers=headers, data=json.dumps(data))
    return response.json()['response']

if __name__ == '__main__':
print(get_completion('你好'))得到的返回值如下所示:
{
  "response":"你好!有什么可以帮助你的吗?",
  "history":[["你好","你好!有什么可以帮助你的吗?"]],
  "status":200,
  "time":"2023-11-19 20:08:40"
}InternLM-Chat-7B 对话 Web
环境准备
接下来打开刚刚租用服务器的JupyterLab,并且打开其中的终端开始环境配置、模型下载和运行demo。
pip换源和安装依赖包
# 升级pip
python -m pip install --upgrade pip
# 更换 pypi 源加速库的安装
pip config set global.index-url https://pypi.tuna.tsinghua.edu.cn/simple

pip install modelscope==1.9.5
pip install transformers==4.35.2
pip install streamlit==1.24.0
pip install sentencepiece==0.1.99
pip install accelerate==0.24.1模型下载
使用 modelscope 中的snapshot_download函数下载模型,第一个参数为模型名称,参数cache_dir为模型的下载路径。
在 /root/autodl-tmp 路径下新建 download.py 文件并在其中输入以下内容,粘贴代码后记得保存文件,如下图所示。并运行 python /root/autodl-tmp/download.py执行下载,模型大小为 14 GB,下载模型大概需要 10~20 分钟
import torch
from modelscope import snapshot_download, AutoModel, AutoTokenizer
import os
model_dir = snapshot_download('Shanghai_AI_Laboratory/internlm-chat-7b', cache_dir='/root/autodl-tmp', revision='master')代码准备
首先clone代码,打开autodl平台自带的学术镜像加速。学术镜像加速详细使用请看:https://www.autodl.com/docs/network_turbo/
source /etc/network_turbo然后切换路径, clone代码.
cd /root/autodl-tmp
git clone https://github.com/InternLM/InternLM.git切换commit版本,与教程commit版本保持一致,可以让大家更好的复现。
cd InternLM
git checkout 3028f07cb79e5b1d7342f4ad8d11efad3fd13d17最后取消镜像加速,因为该加速可能对正常网络造成一定影响,避免对后续下载其他模型造成困扰。
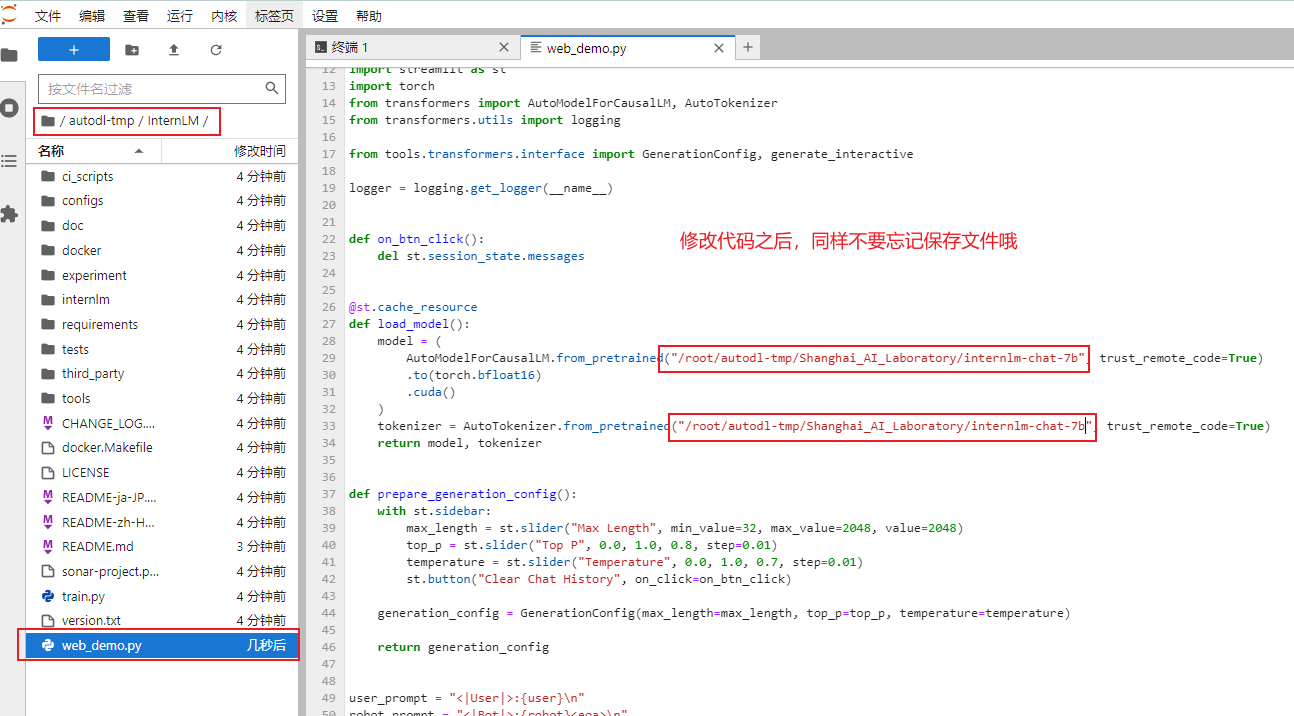
unset http_proxy && unset https_proxy将 /root/autodl-tmp/InternLM/web_demo.py中 29 行和 33 行的模型更换为本地的/root/autodl-tmp/Shanghai_AI_Laboratory/internlm-chat-7b。
web demo运行
运行以下命令即可启动推理服务
cd /root/autodl-tmp/InternLM
streamlit run web_demo.py --server.address 127.0.0.1 --server.port 6006将 autodl的端口映射到本地的 http://localhost:6006 仅在此处展示一次,以下两个 Demo 都是同样的方法把 autodl中的 6006端口映射到本机的 http://localhost:6006的方法都是相同的,方法如图所示。
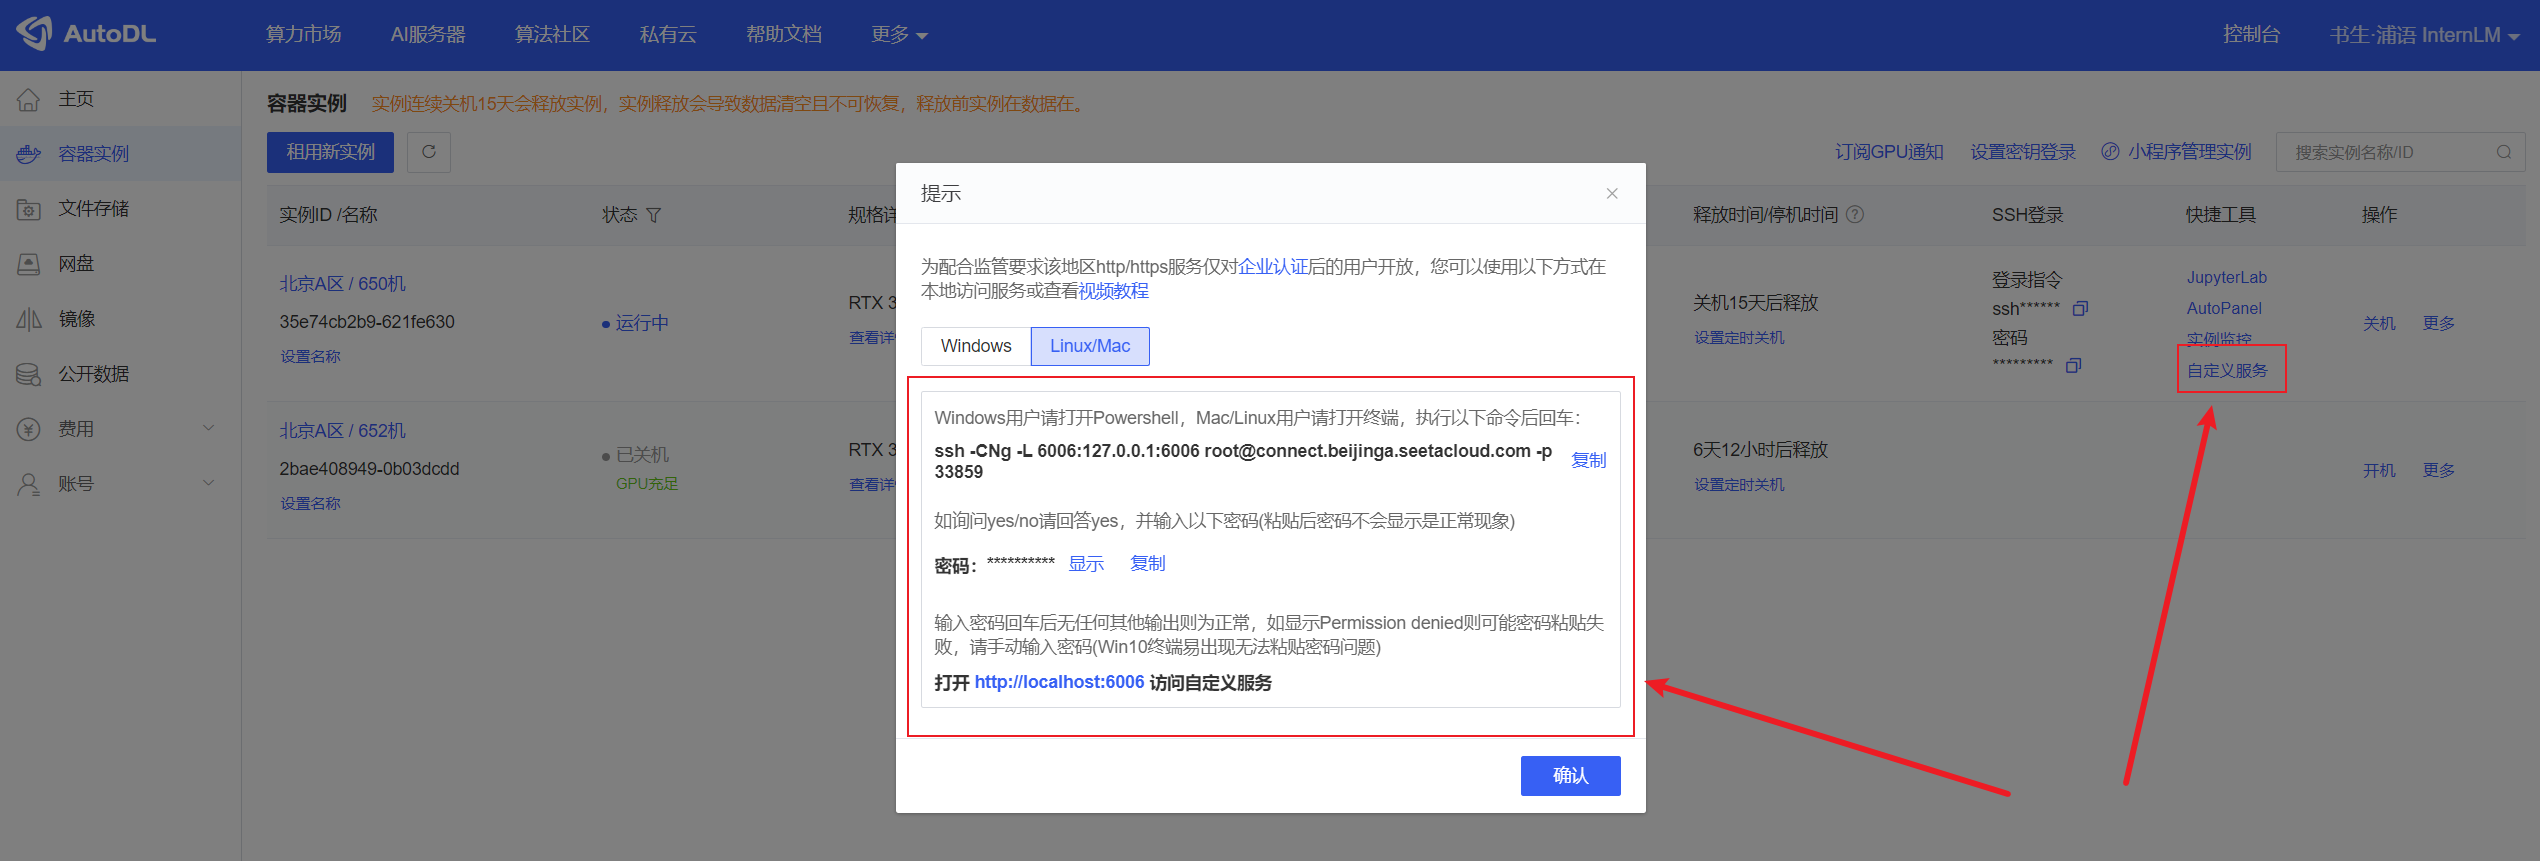
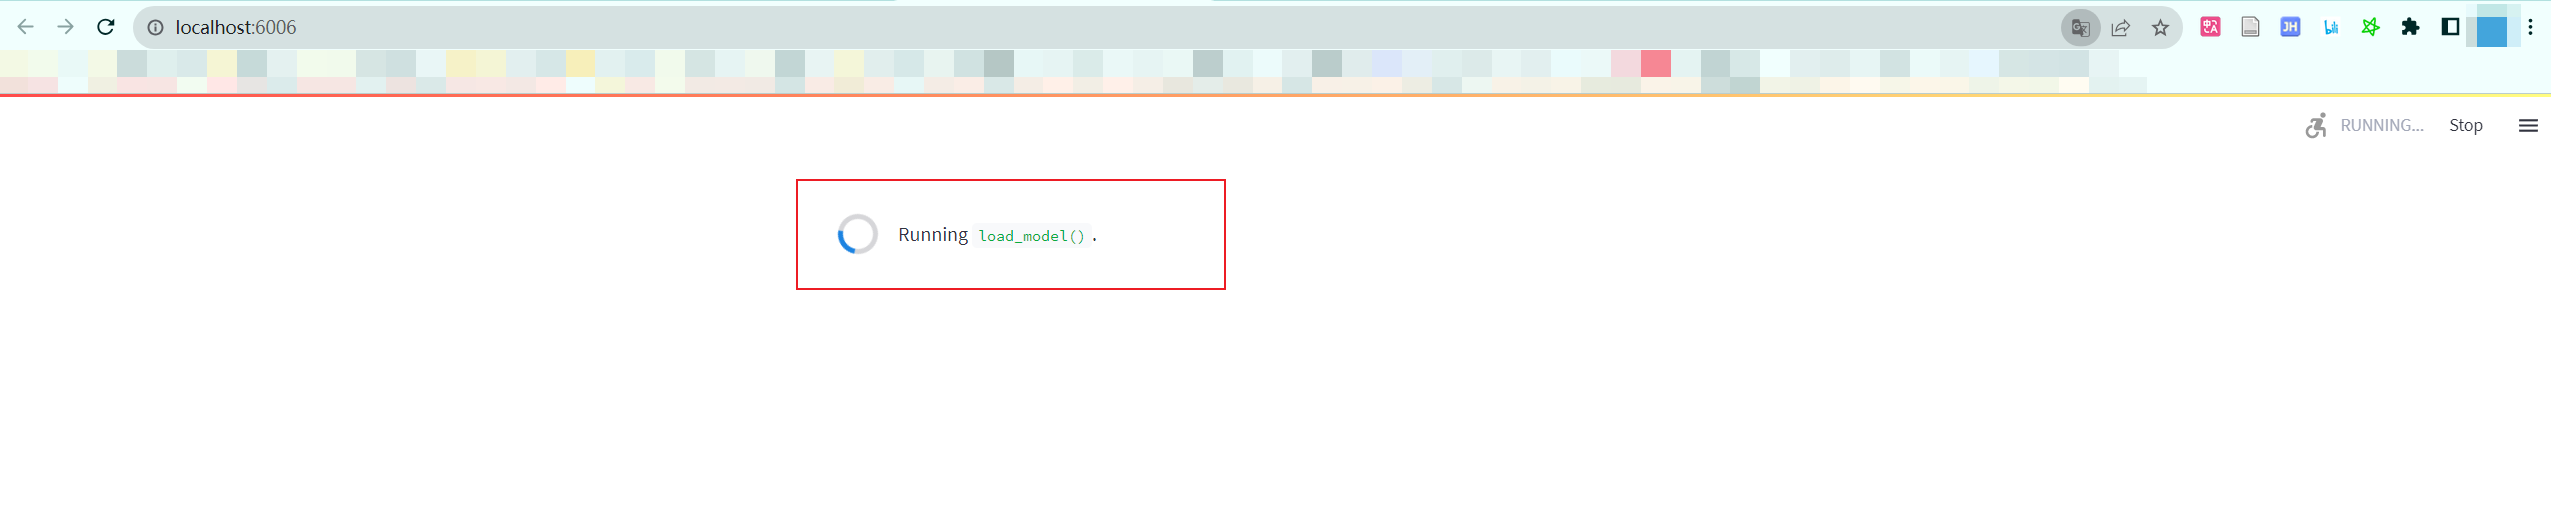
注意:要在浏览器打开http://localhost:6006页面后,模型才会加载,如下图所示:
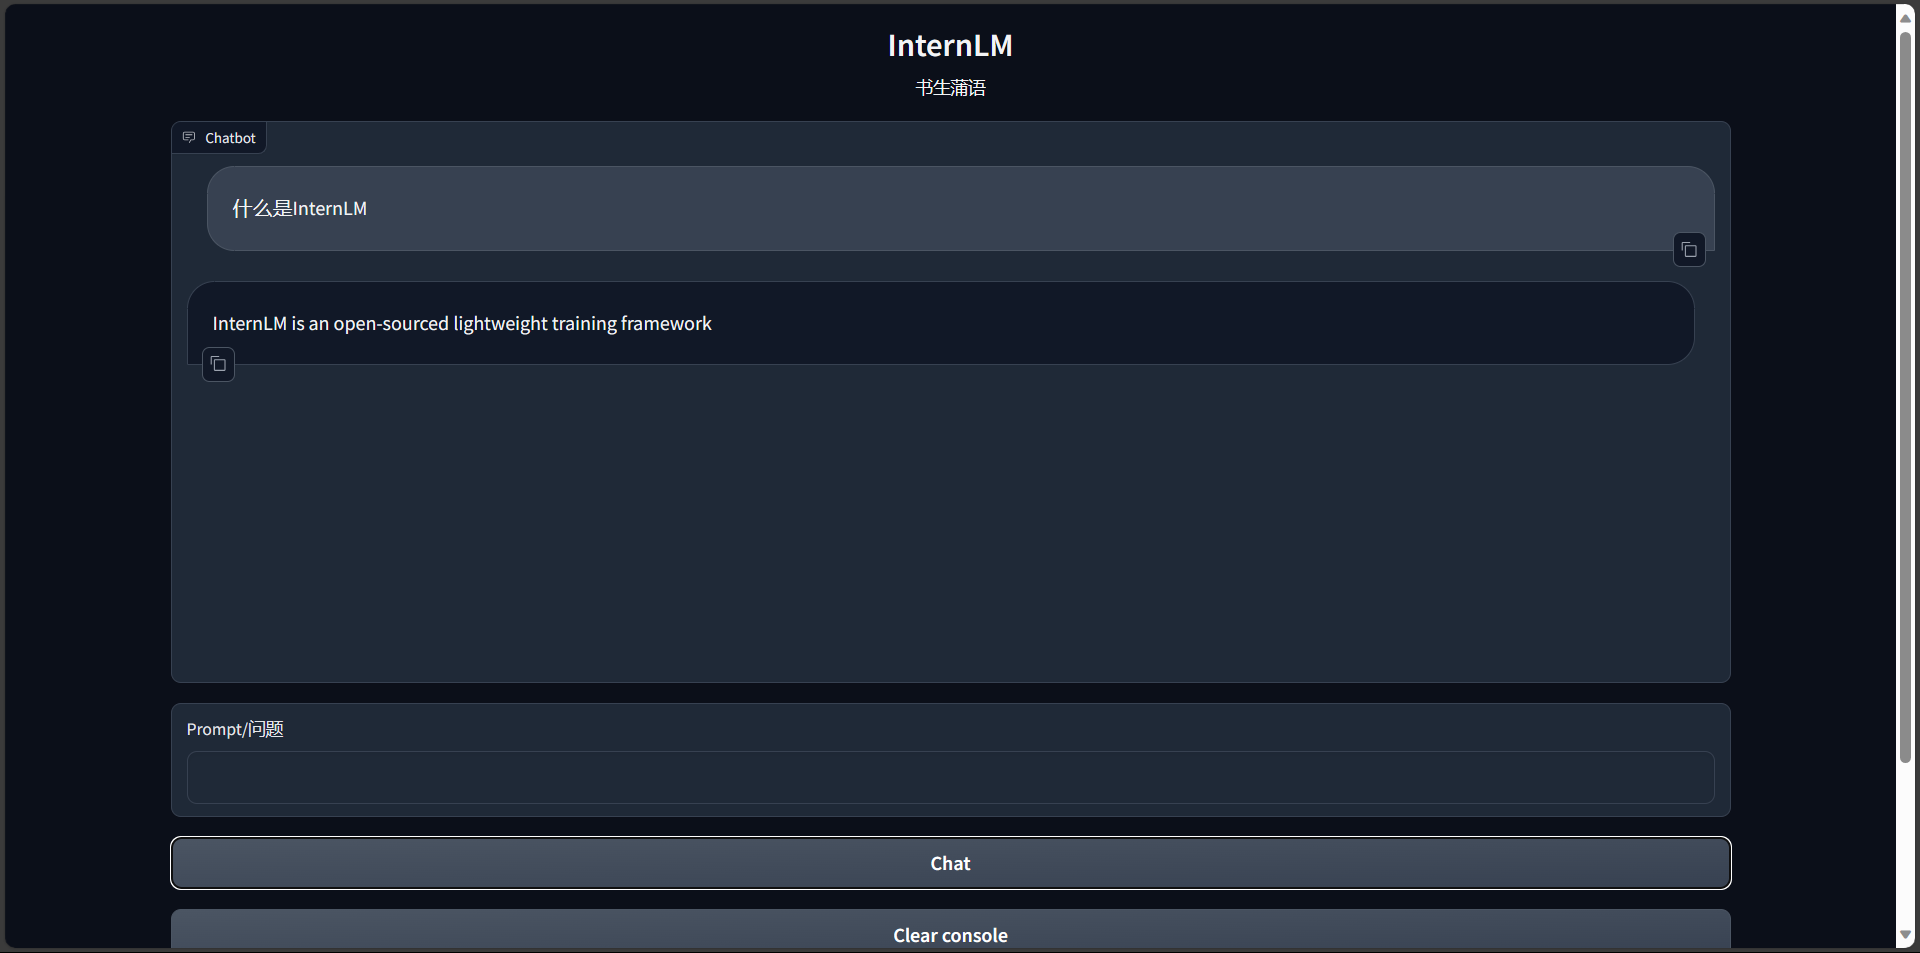
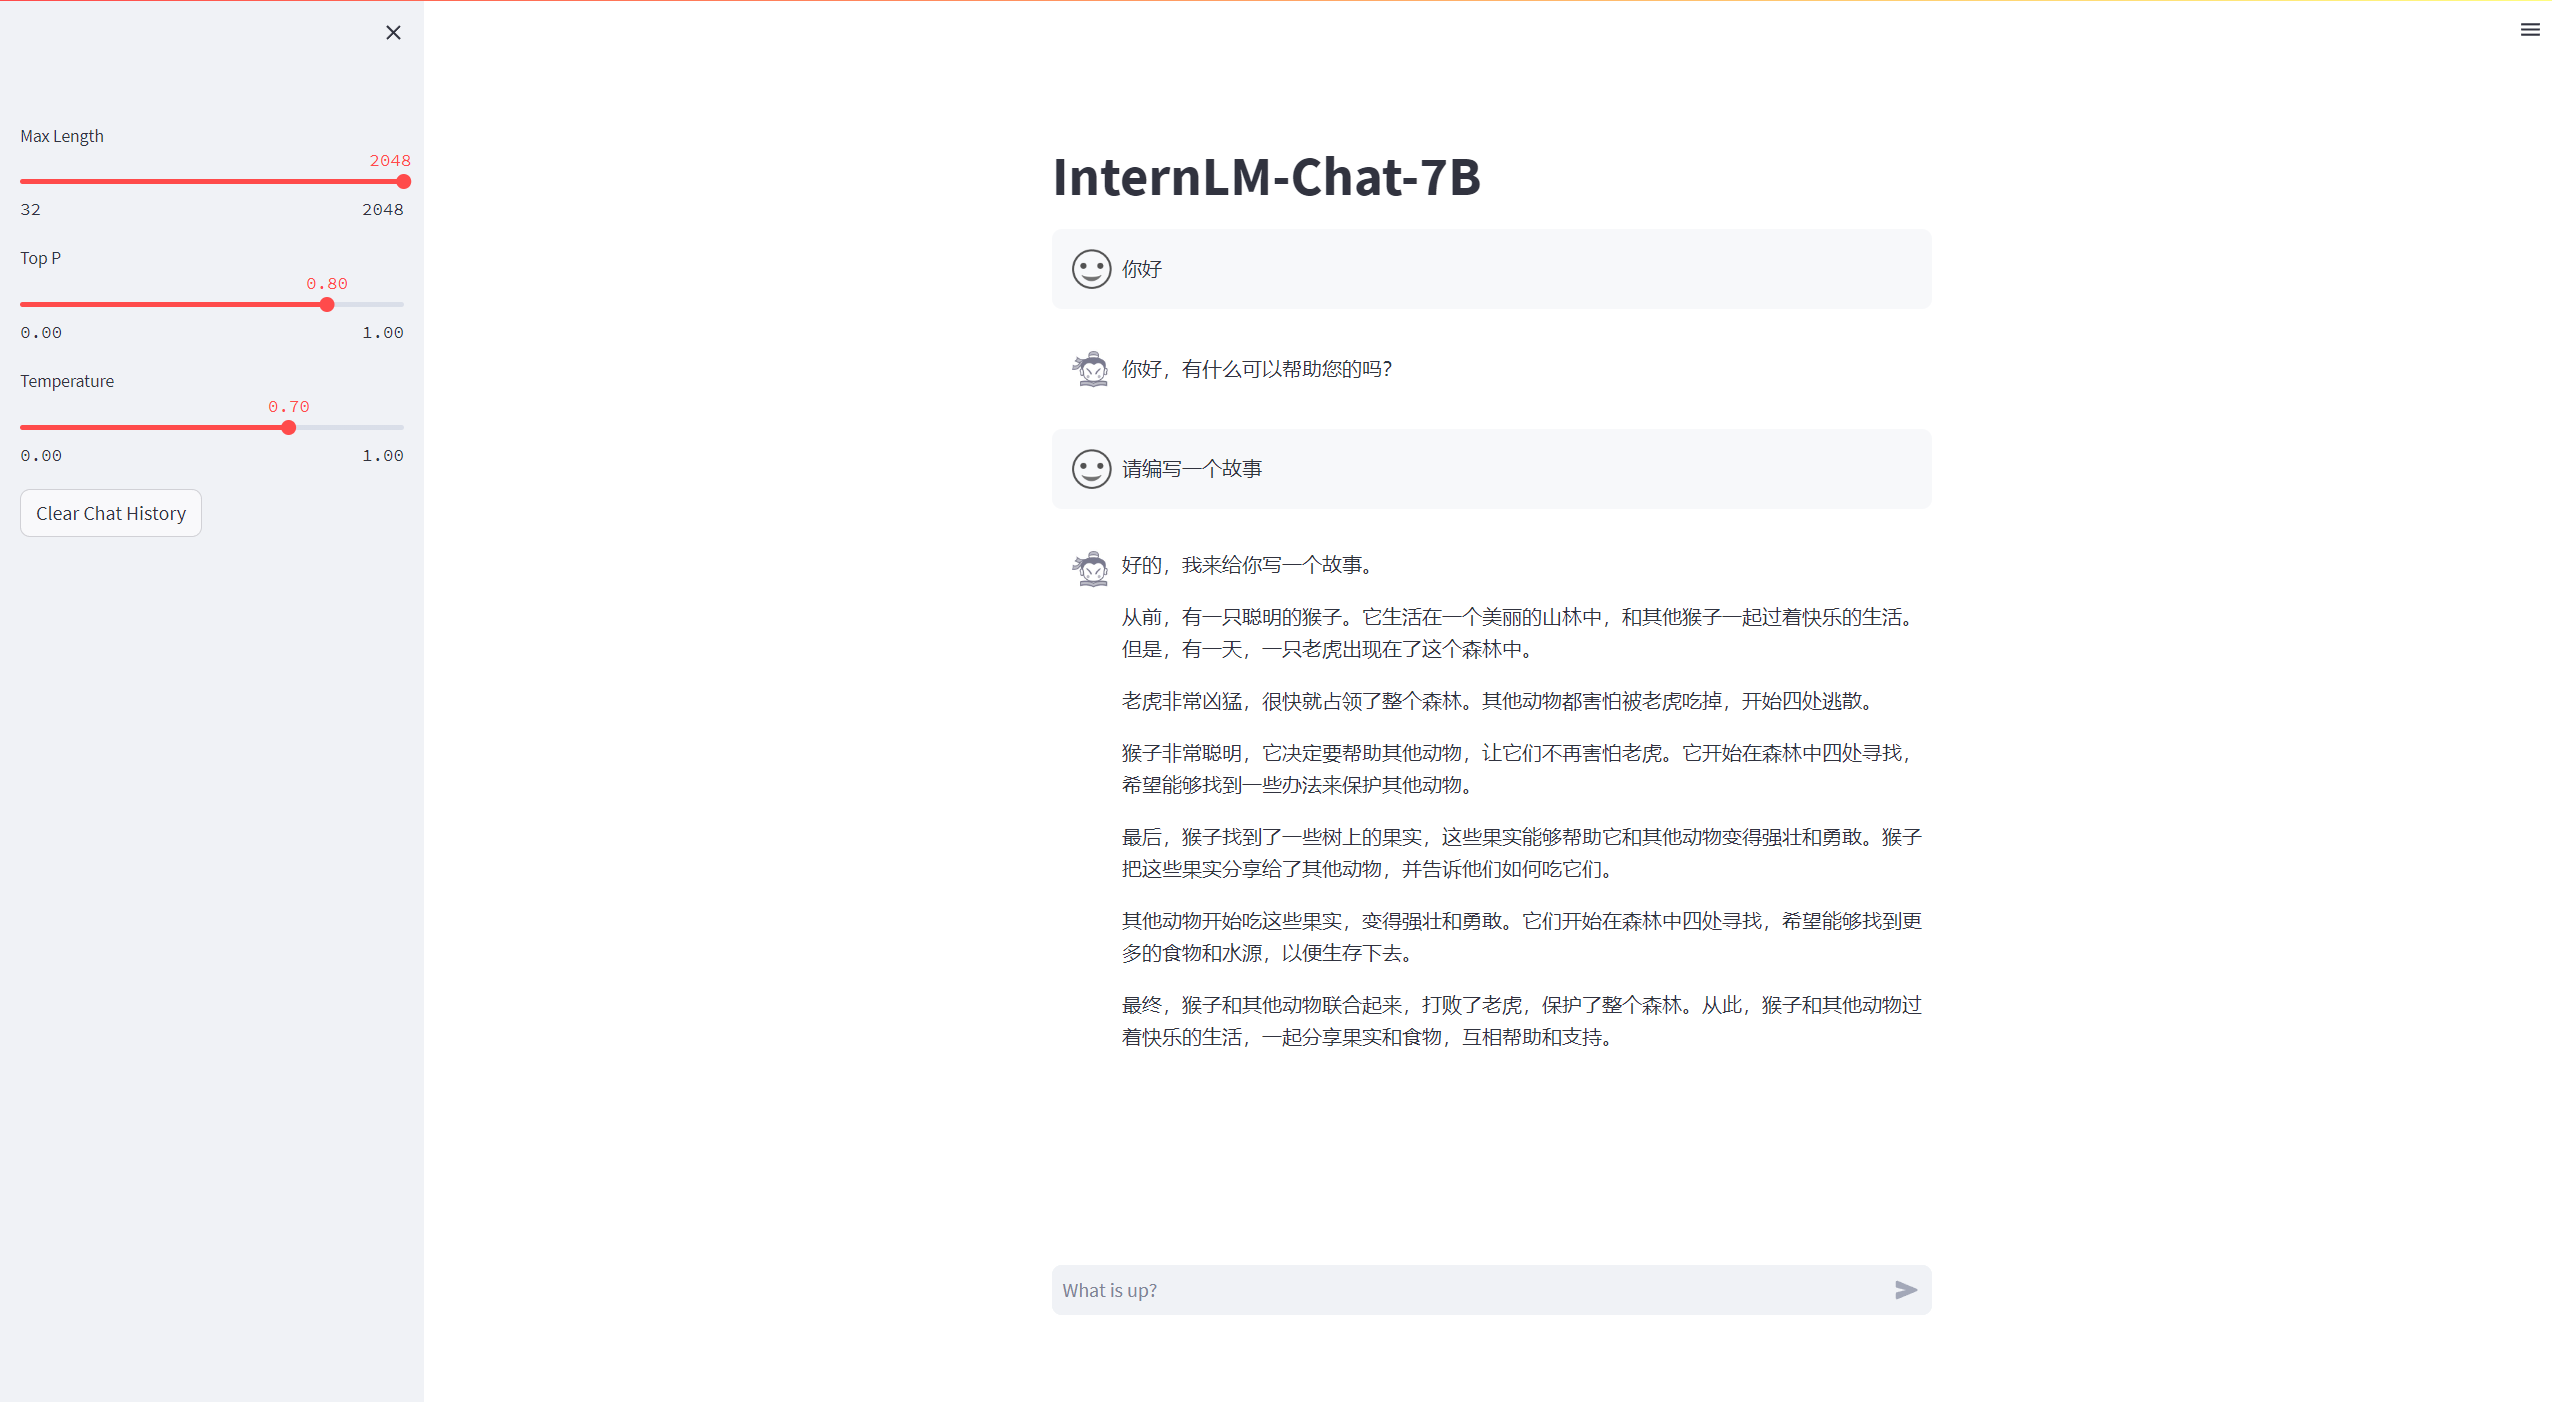
在加载完模型之后,就可以既可与InternLM-Chat-7B进行对话了,如下图所示:
Lagent+InternLM-Chat-7B-V1.1
环境准备
选择和第一个 InternLM 一样的 AutoDL 镜像环境,运行以下命令安装依赖,如果上一个 InternLM-Chat-7B 已经配置好环境不需要重复安装.
# 升级pip
python -m pip install --upgrade pip
# 更换 pypi 源加速库的安装
pip config set global.index-url https://pypi.tuna.tsinghua.edu.cn/simple

pip install modelscope==1.9.5
pip install transformers==4.35.2
pip install streamlit==1.24.0
pip install sentencepiece==0.1.99
pip install accelerate==0.24.1模型下载
在 /root/autodl-tmp 路径下新建 download.py 文件并在其中输入以下内容,并运行 python /root/autodl-tmp/download.py执行下载,模型大小为 14 GB,下载模型大概需要 10~20 分钟
import torch
from modelscope import snapshot_download, AutoModel, AutoTokenizer
import os
model_dir = snapshot_download('Shanghai_AI_Laboratory/internlm-chat-7b-v1_1', cache_dir='/root/autodl-tmp', revision='master')Lagent 安装
首先我们运行以下命令打开学术加速 clone lagent仓库,并通过 pip install -e .源码安装 Lagent
source /etc/network_turbo
cd /root/autodl-tmp
git clone https://github.com/InternLM/lagent.git
git checkout 511b03889010c4811b1701abb153e02b8e94fb5e # 尽量保证和教程commit版本一致
cd lagent
pip install -e . # 源码安装
unset http_proxy && unset https_proxy修改代码
由于代码修改的地方比较多,大家直接将/root/autodl-tmp/lagent/examples/react_web_demo.py 内容替换为以下代码
import copy
import os

import streamlit as st
from streamlit.logger import get_logger

from lagent.actions import ActionExecutor, GoogleSearch, PythonInterpreter
from lagent.agents.react import ReAct
from lagent.llms import GPTAPI
from lagent.llms.huggingface import HFTransformerCasualLM


class SessionState:

    def init_state(self):
        """Initialize session state variables."""
        st.session_state['assistant'] = []
        st.session_state['user'] = []

        #action_list = [PythonInterpreter(), GoogleSearch()]
        action_list = [PythonInterpreter()]
        st.session_state['plugin_map'] = {
            action.name: action
            for action in action_list
        }
        st.session_state['model_map'] = {}
        st.session_state['model_selected'] = None
        st.session_state['plugin_actions'] = set()

    def clear_state(self):
        """Clear the existing session state."""
        st.session_state['assistant'] = []
        st.session_state['user'] = []
        st.session_state['model_selected'] = None
        if 'chatbot' in st.session_state:
            st.session_state['chatbot']._session_history = []


class StreamlitUI:

    def __init__(self, session_state: SessionState):
        self.init_streamlit()
        self.session_state = session_state

    def init_streamlit(self):
        """Initialize Streamlit's UI settings."""
        st.set_page_config(
            layout='wide',
            page_title='lagent-web',
            page_icon='./docs/imgs/lagent_icon.png')
        # st.header(':robot_face: :blue[Lagent] Web Demo ', divider='rainbow')
        st.sidebar.title('模型控制')

    def setup_sidebar(self):
        """Setup the sidebar for model and plugin selection."""
        model_name = st.sidebar.selectbox(
            '模型选择:', options=['gpt-3.5-turbo','internlm'])
        if model_name != st.session_state['model_selected']:
            model = self.init_model(model_name)
            self.session_state.clear_state()
            st.session_state['model_selected'] = model_name
            if 'chatbot' in st.session_state:
                del st.session_state['chatbot']
        else:
            model = st.session_state['model_map'][model_name]

        plugin_name = st.sidebar.multiselect(
            '插件选择',
            options=list(st.session_state['plugin_map'].keys()),
            default=[list(st.session_state['plugin_map'].keys())[0]],
        )

        plugin_action = [
            st.session_state['plugin_map'][name] for name in plugin_name
        ]
        if 'chatbot' in st.session_state:
            st.session_state['chatbot']._action_executor = ActionExecutor(
                actions=plugin_action)
        if st.sidebar.button('清空对话', key='clear'):
            self.session_state.clear_state()
        uploaded_file = st.sidebar.file_uploader(
            '上传文件', type=['png', 'jpg', 'jpeg', 'mp4', 'mp3', 'wav'])
        return model_name, model, plugin_action, uploaded_file

    def init_model(self, option):
        """Initialize the model based on the selected option."""
        if option not in st.session_state['model_map']:
            if option.startswith('gpt'):
                st.session_state['model_map'][option] = GPTAPI(
                    model_type=option)
            else:
                st.session_state['model_map'][option] = HFTransformerCasualLM(
                    '/root/autodl-tmp/Shanghai_AI_Laboratory/internlm-chat-7b-v1_1')
        return st.session_state['model_map'][option]

    def initialize_chatbot(self, model, plugin_action):
        """Initialize the chatbot with the given model and plugin actions."""
        return ReAct(
            llm=model, action_executor=ActionExecutor(actions=plugin_action))

    def render_user(self, prompt: str):
        with st.chat_message('user'):
            st.markdown(prompt)

    def render_assistant(self, agent_return):
        with st.chat_message('assistant'):
            for action in agent_return.actions:
                if (action):
                    self.render_action(action)
            st.markdown(agent_return.response)

    def render_action(self, action):
        with st.expander(action.type, expanded=True):
            st.markdown(
                "<p style='text-align: left;display:flex;'> <span style='font-size:14px;font-weight:600;width:70px;text-align-last: justify;'>插    件</span><span style='width:14px;text-align:left;display:block;'>:</span><span style='flex:1;'>"  # noqa E501
                + action.type + '</span></p>',
                unsafe_allow_html=True)
            st.markdown(
                "<p style='text-align: left;display:flex;'> <span style='font-size:14px;font-weight:600;width:70px;text-align-last: justify;'>思考步骤</span><span style='width:14px;text-align:left;display:block;'>:</span><span style='flex:1;'>"  # noqa E501
                + action.thought + '</span></p>',
                unsafe_allow_html=True)
            if (isinstance(action.args, dict) and 'text' in action.args):
                st.markdown(
                    "<p style='text-align: left;display:flex;'><span style='font-size:14px;font-weight:600;width:70px;text-align-last: justify;'> 执行内容</span><span style='width:14px;text-align:left;display:block;'>:</span></p>",  # noqa E501
                    unsafe_allow_html=True)
                st.markdown(action.args['text'])
            self.render_action_results(action)

    def render_action_results(self, action):
        """Render the results of action, including text, images, videos, and
        audios."""
        if (isinstance(action.result, dict)):
            st.markdown(
                "<p style='text-align: left;display:flex;'><span style='font-size:14px;font-weight:600;width:70px;text-align-last: justify;'> 执行结果</span><span style='width:14px;text-align:left;display:block;'>:</span></p>",  # noqa E501
                unsafe_allow_html=True)
            if 'text' in action.result:
                st.markdown(
                    "<p style='text-align: left;'>" + action.result['text'] +
                    '</p>',
                    unsafe_allow_html=True)
            if 'image' in action.result:
                image_path = action.result['image']
                image_data = open(image_path, 'rb').read()
                st.image(image_data, caption='Generated Image')
            if 'video' in action.result:
                video_data = action.result['video']
                video_data = open(video_data, 'rb').read()
                st.video(video_data)
            if 'audio' in action.result:
                audio_data = action.result['audio']
                audio_data = open(audio_data, 'rb').read()
                st.audio(audio_data)


def main():
    logger = get_logger(__name__)
    # Initialize Streamlit UI and setup sidebar
    if 'ui' not in st.session_state:
        session_state = SessionState()
        session_state.init_state()
        st.session_state['ui'] = StreamlitUI(session_state)

    else:
        st.set_page_config(
            layout='wide',
            page_title='lagent-web',
            page_icon='./docs/imgs/lagent_icon.png')
        # st.header(':robot_face: :blue[Lagent] Web Demo ', divider='rainbow')
    model_name, model, plugin_action, uploaded_file = st.session_state[
        'ui'].setup_sidebar()

    # Initialize chatbot if it is not already initialized
    # or if the model has changed
    if 'chatbot' not in st.session_state or model != st.session_state[
            'chatbot']._llm:
        st.session_state['chatbot'] = st.session_state[
            'ui'].initialize_chatbot(model, plugin_action)

    for prompt, agent_return in zip(st.session_state['user'],
                                    st.session_state['assistant']):
        st.session_state['ui'].render_user(prompt)
        st.session_state['ui'].render_assistant(agent_return)
    # User input form at the bottom (this part will be at the bottom)
    # with st.form(key='my_form', clear_on_submit=True):

    if user_input := st.chat_input(''):
        st.session_state['ui'].render_user(user_input)
        st.session_state['user'].append(user_input)
        # Add file uploader to sidebar
        if uploaded_file:
            file_bytes = uploaded_file.read()
            file_type = uploaded_file.type
            if 'image' in file_type:
                st.image(file_bytes, caption='Uploaded Image')
            elif 'video' in file_type:
                st.video(file_bytes, caption='Uploaded Video')
            elif 'audio' in file_type:
                st.audio(file_bytes, caption='Uploaded Audio')
            # Save the file to a temporary location and get the path
            file_path = os.path.join(root_dir, uploaded_file.name)
            with open(file_path, 'wb') as tmpfile:
                tmpfile.write(file_bytes)
            st.write(f'File saved at: {file_path}')
            user_input = '我上传了一个图像,路径为: {file_path}. {user_input}'.format(
                file_path=file_path, user_input=user_input)
        agent_return = st.session_state['chatbot'].chat(user_input)
        st.session_state['assistant'].append(copy.deepcopy(agent_return))
        logger.info(agent_return.inner_steps)
        st.session_state['ui'].render_assistant(agent_return)


if __name__ == '__main__':
    root_dir = os.path.dirname(os.path.dirname(os.path.abspath(__file__)))
    root_dir = os.path.join(root_dir, 'tmp_dir')
    os.makedirs(root_dir, exist_ok=True)
main()Demo 运行
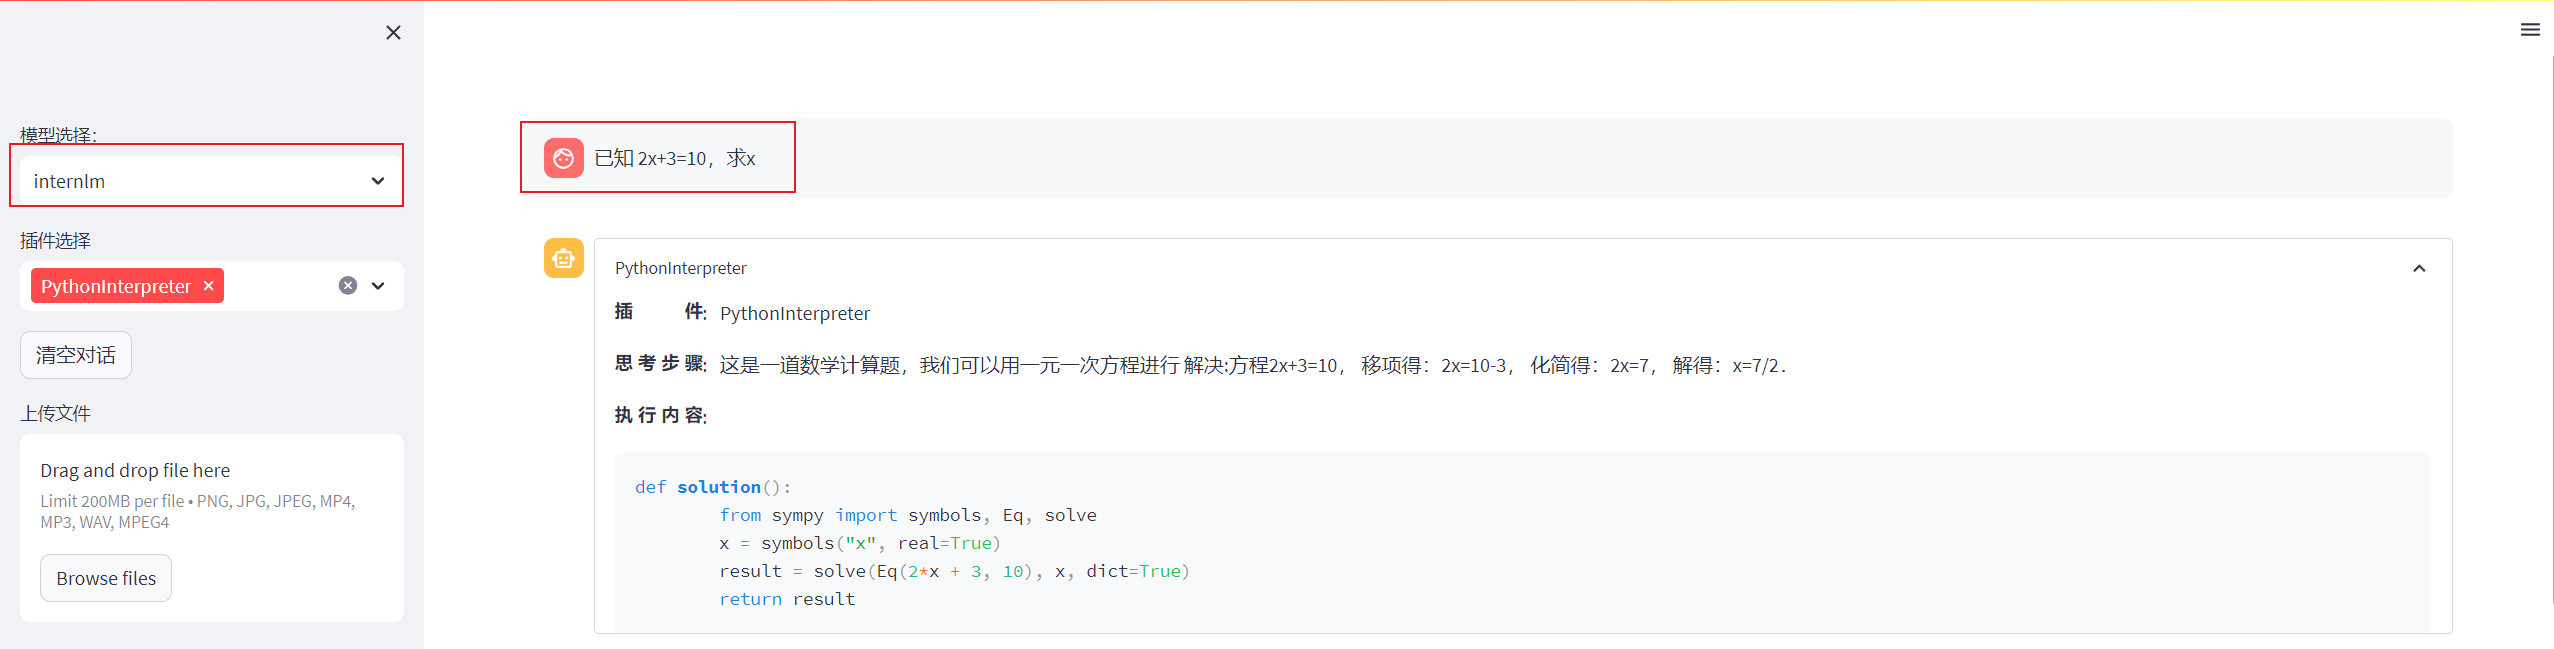
streamlit run /root/autodl-tmp/lagent/examples/react_web_demo.py --server.address 127.0.0.1 --server.port 6006用同样的方法将端口映射到本地,运行成功后,我们在 Web 页面选择 InternLM 模型,等待模型加载完毕后,输入数学问题 已知 2x+3=10,求x ,此时 InternLM-Chat-7B-V1.1 模型理解题意生成解此题的 Python代码,Lagent 调度送入 Python 代码解释器求出该问题的解。
浦语灵笔图文理解&创作
环境准备
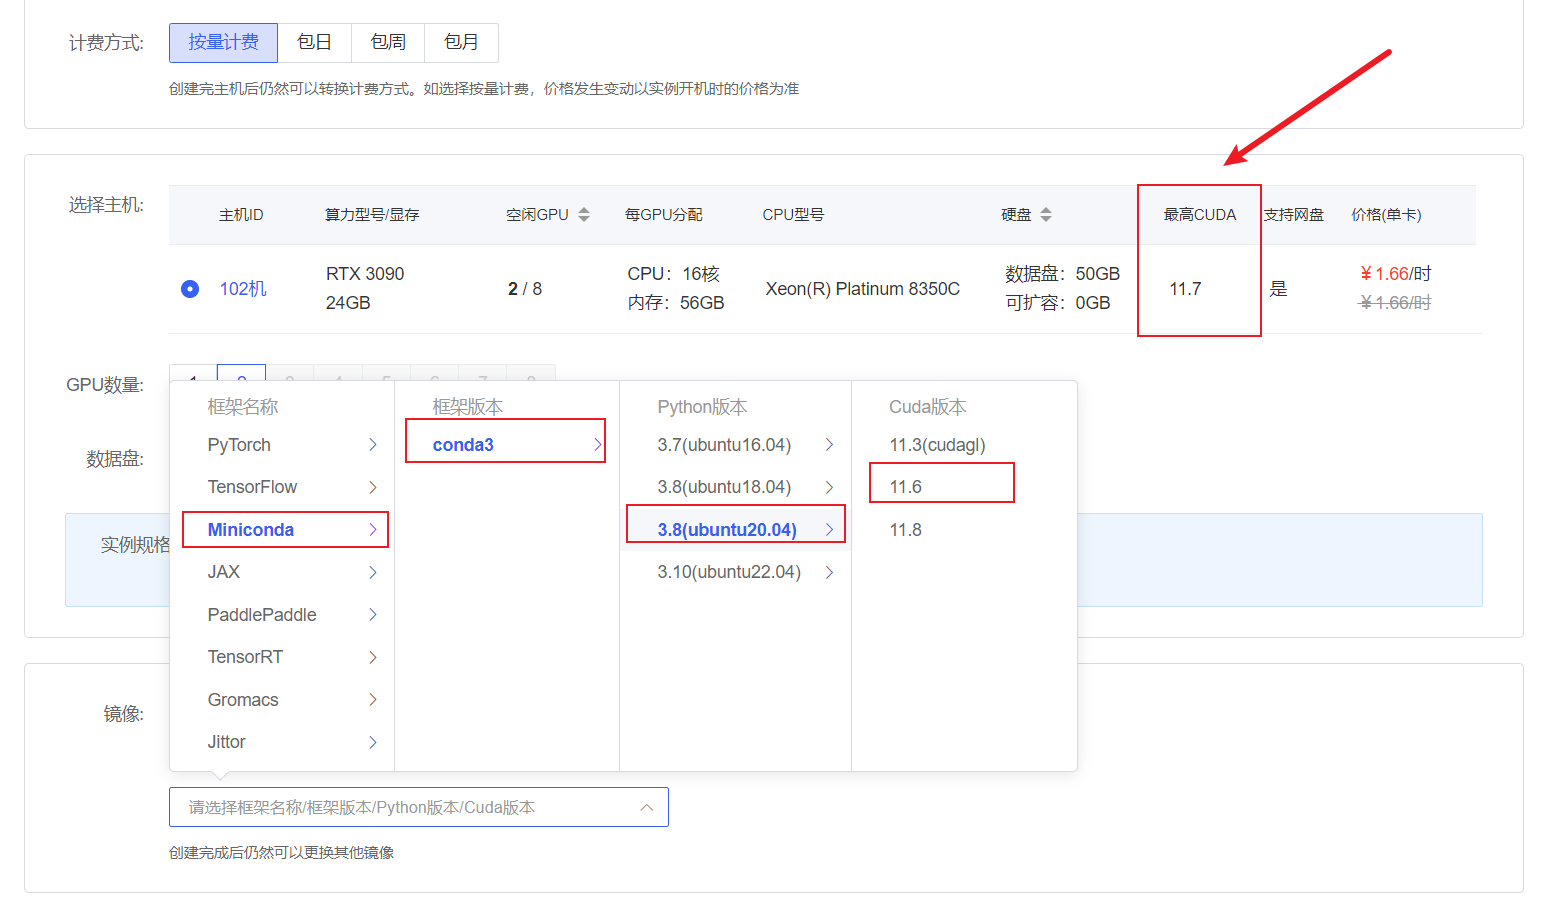
首先在 AutoDL 上租一台显卡驱动支持 11.7 以上的双卡 3090 机器. 在选择镜像是选择 Miniconda --> conda3 --> 3.8(ubuntu20.04)--> 11.6
打开 jupyter lab 中的终端,首先运行以下命令安装 PyTorch 2.0.1
# 升级pip
python -m pip install --upgrade pip
pip install torch==2.0.1+cu117 torchvision==0.15.2+cu117 torchaudio==2.0.2 --index-url https://download.pytorch.org/whl/cu117接下来运行以下命令,安装 transformers、gradio 等依赖包。请严格安装以下版本安装!
pip install transformers==4.33.1 timm==0.4.12 sentencepiece==0.1.99 gradio==3.44.4 markdown2==2.4.10 xlsxwriter==3.1.2 einops accelerate模型下载
安装modelscope,下载模型的老朋友了
pip install modelscope==1.9.5在 /root/autodl-tmp 路径下新建 download.py 文件并在其中输入以下内容,并运行 python /root/autodl-tmp/download.py执行下载
import torch
from modelscope import snapshot_download, AutoModel, AutoTokenizer
import os
model_dir = snapshot_download('Shanghai_AI_Laboratory/internlm-xcomposer-7b', cache_dir='/root/autodl-tmp', revision='master')代码准备
在 /root/autodl-tmp git clone InternLM-XComposer 仓库的代码
source /etc/network_turbo
cd /root/autodl-tmp
git clone https://github.com/InternLM/InternLM-XComposer.git
git checkout 3e8c79051a1356b9c388a6447867355c0634932d  # 最好保证和教程的commit版本一致
unset http_proxy && unset https_proxyDemo 运行
在终端运行以下代码:
cd /root/autodl-tmp/InternLM-XComposer
python examples/web_demo.py  \
    --folder /root/autodl-tmp/Shanghai_AI_Laboratory/internlm-xcomposer-7b \
    --num_gpus 2 \
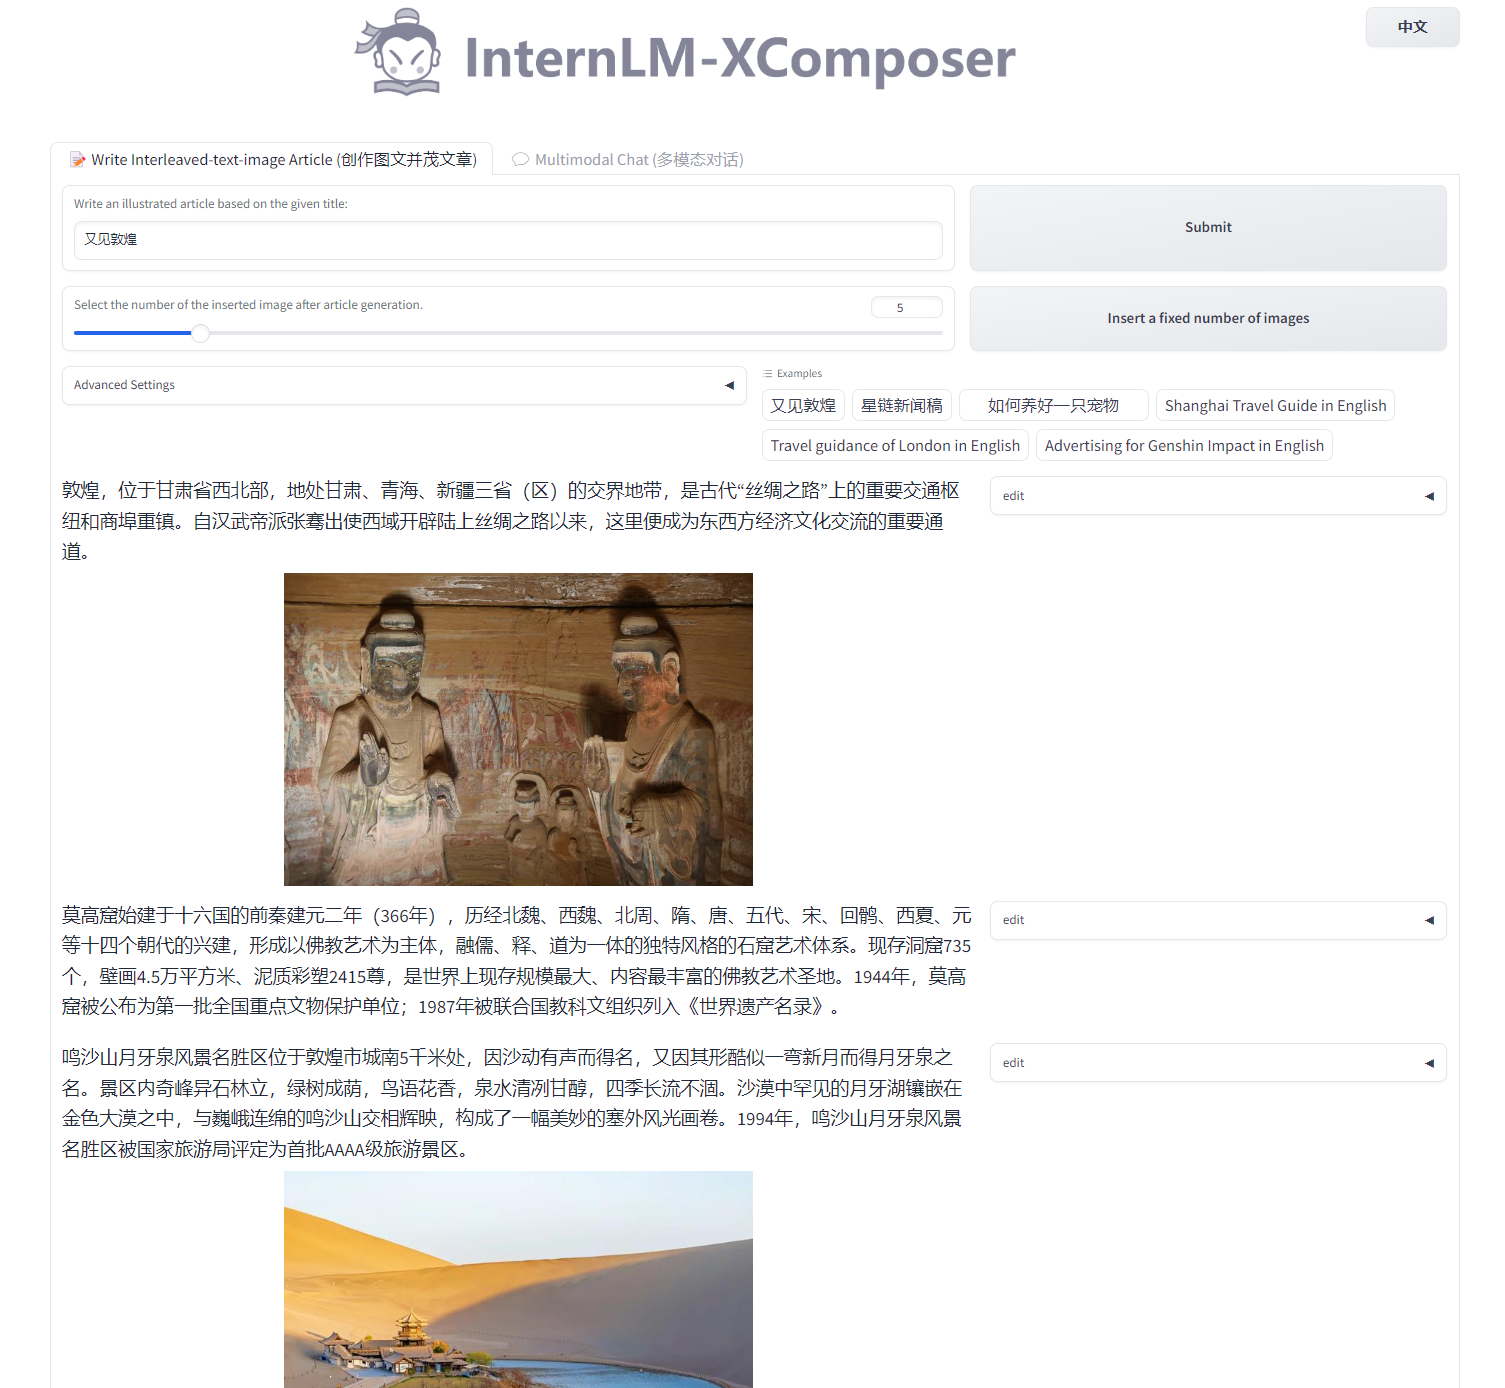
--port 6006将autodl的端口映射到本地之后,用浏览器代开http://localhost:6006/,我们以又见敦煌为提示词,体验图文创作的功能,如下图所示:
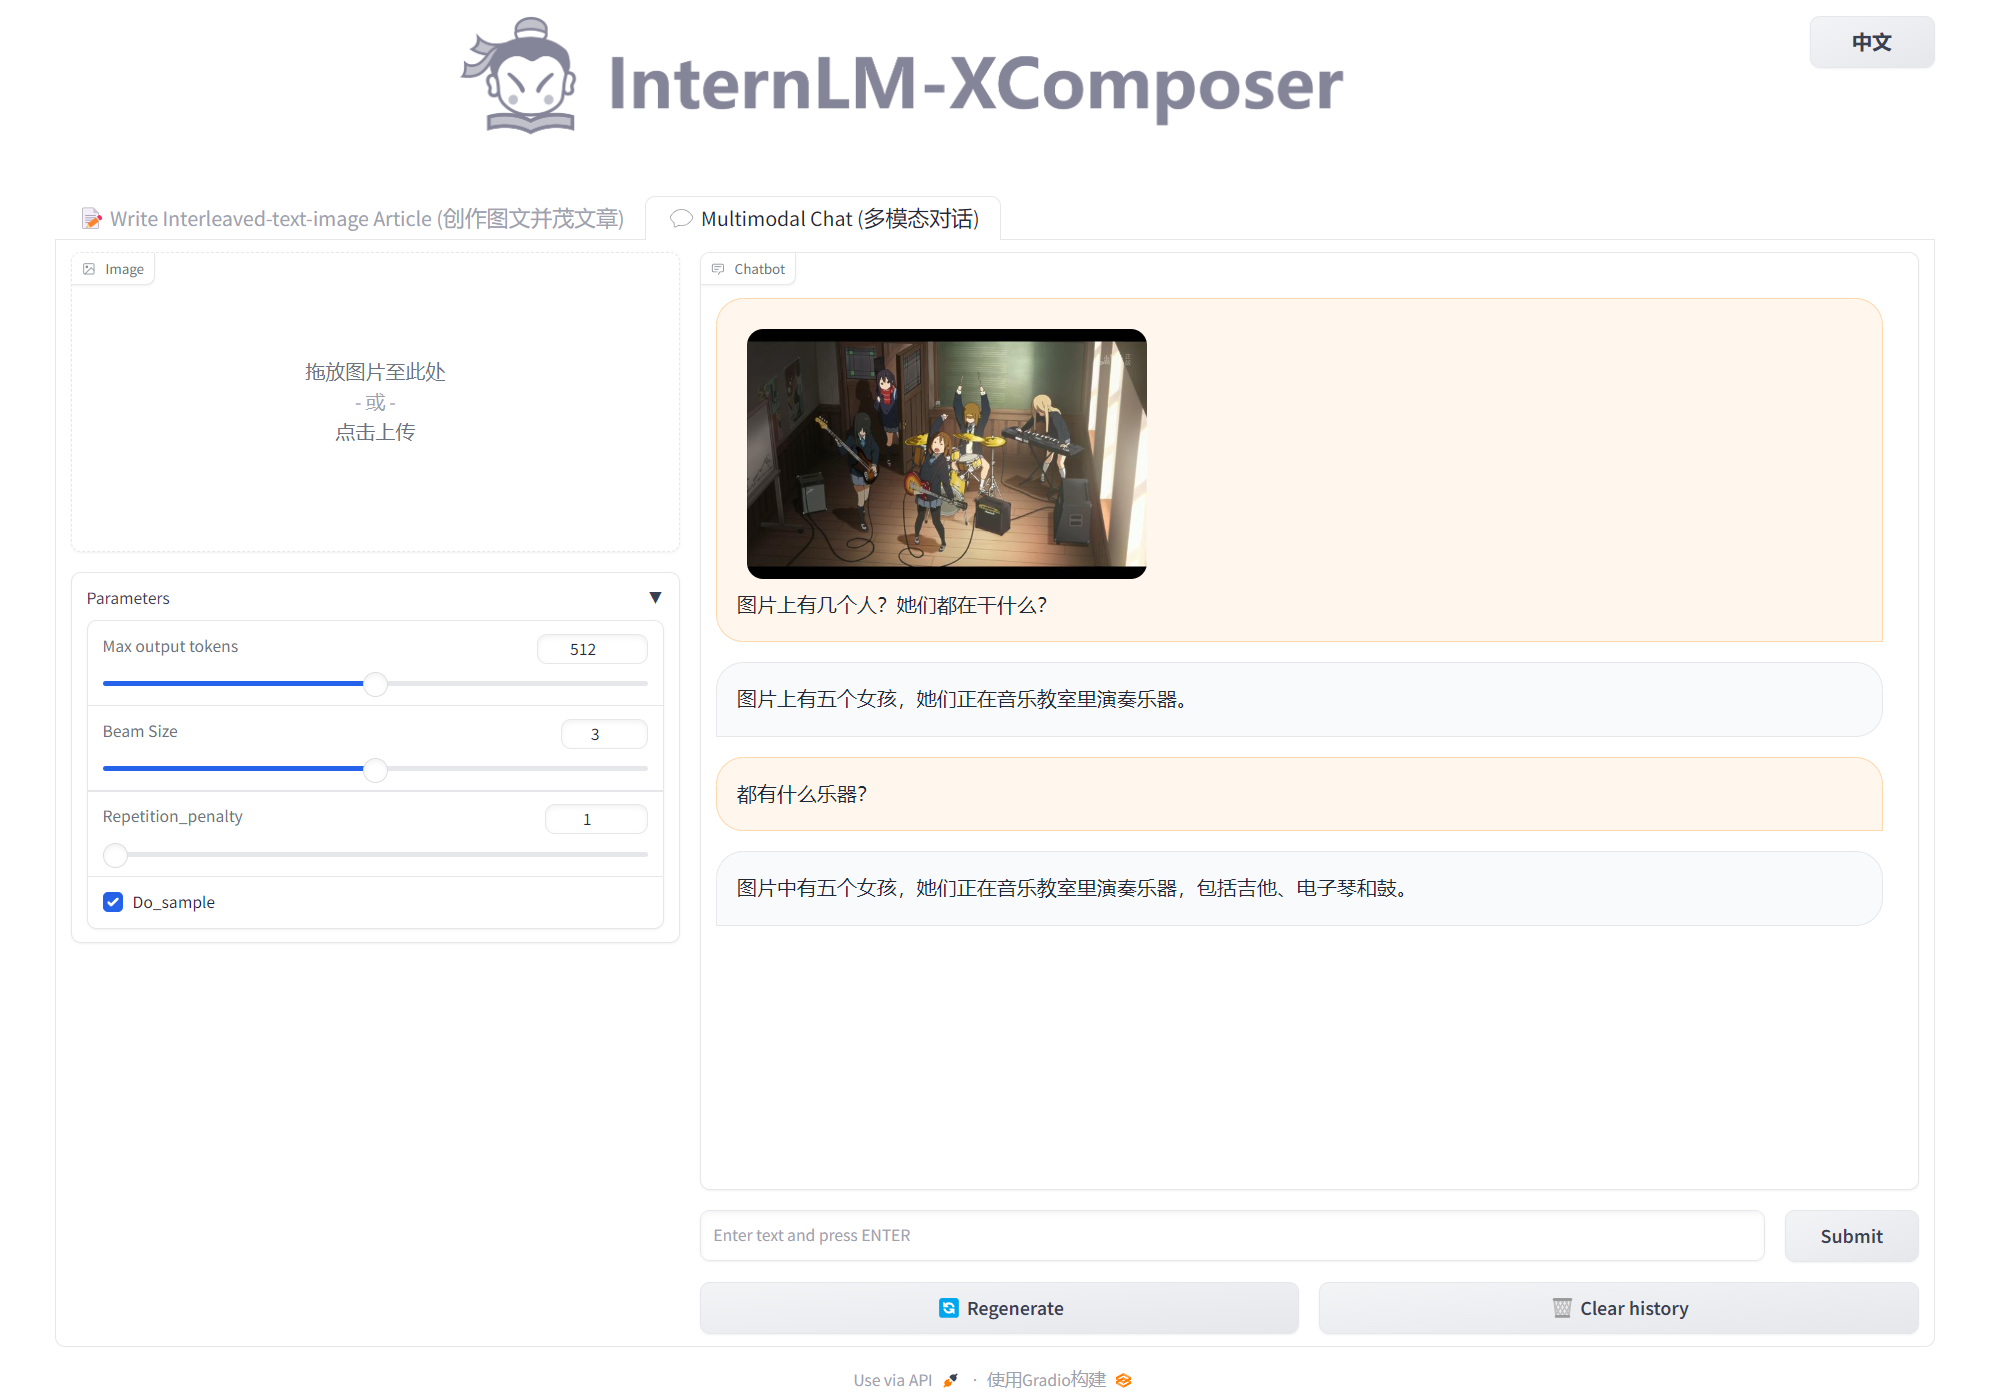
接下来,我们可以体验以下图片理解的能力,如下所示~
基于 InternLM 和 LangChain 搭建知识库助手
环境配置
在已完成 InternLM 的部署基础上,还需要安装以下依赖包:
pip install langchain==0.0.292
pip install gradio==4.4.0
pip install chromadb==0.4.15
pip install sentence-transformers==2.2.2
pip install unstructured==0.10.30
pip install markdown==3.3.7同时,我们需要使用到开源词向量模型 Sentence Transformer,可以将其模型参数以类似于下载 InternLM 模型参数的方式下载到本地 /root/autodl-tmp/embedding_model。同时,在本节中,InternLM-Chat-7B-V1.1 的模型参数文件存储在本地 /root/autodl-tmp/model。
知识库搭建
我们选择由上海人工智能实验室开源的一系列大模型工具开源仓库作为语料库来源,包括:
首先我们需要将上述远程开源仓库 Clone 到本地,可以使用以下命令:
# 进入到数据库盘
cd /root/autodl-tmp
# 打开学术资源加速
source /etc/network_turbo
# clone 上述开源仓库
git clone https://github.com/open-compass/opencompass.git
git clone https://github.com/InternLM/lmdeploy.git
git clone https://github.com/InternLM/xtuner.git
git clone https://github.com/InternLM/InternLM-XComposer.git
git clone https://github.com/InternLM/lagent.git
git clone https://github.com/InternLM/InternLM.git
# 关闭学术资源加速
unset http_proxy && unset https_proxy接着,为语料处理方便,我们将选用上述仓库中所有的 markdown、txt 文件作为示例语料库。注意,也可以选用其中的代码文件加入到知识库中,但需要针对代码文件格式进行额外处理。
我们首先将上述仓库中所有满足条件的文件路径找出来,我们定义一个函数,该函数将递归指定文件夹路径,返回其中所有满足条件(即后缀名为 .md 或者 .txt 的文件)的文件路径:
import os
def get_files(dir_path):
    # args:dir_path,目标文件夹路径
    file_list = []
    for filepath, dirnames, filenames in os.walk(dir_path):
        # os.walk 函数将递归遍历指定文件夹
        for filename in filenames:
            # 通过后缀名判断文件类型是否满足要求
            if filename.endswith(".md"):
                # 如果满足要求,将其绝对路径加入到结果列表
                file_list.append(os.path.join(filepath, filename))
            elif filename.endswith(".txt"):
                file_list.append(os.path.join(filepath, filename))
return file_list得到所有目标文件路径之后,我们可以使用 LangChain 提供的 FileLoader 对象来加载目标文件,得到由目标文件解析出的纯文本内容。由于不同类型的文件需要对应不同的 FileLoader,我们判断目标文件类型,并针对性调用对应类型的 FileLoader,同时,调用 FileLoader 对象的 load 方法来得到加载之后的纯文本对象:
from tqdm import tqdm
from langchain.document_loaders import UnstructuredFileLoader
from langchain.document_loaders import UnstructuredMarkdownLoader

def get_text(dir_path):
    # args:dir_path,目标文件夹路径
    # 首先调用上文定义的函数得到目标文件路径列表
    file_lst = get_files(dir_path)
    # docs 存放加载之后的纯文本对象
    docs = []
    # 遍历所有目标文件
    for one_file in tqdm(file_lst):
    file_type = one_file.split('.')[-1]
        if file_type == 'md':
            loader = UnstructuredMarkdownLoader(one_file)
        elif file_type == 'txt':
            loader = UnstructuredFileLoader(one_file)
        else:
            # 如果是不符合条件的文件,直接跳过
            continue
        docs.extend(loader.load())
return docs使用上文函数,我们得到的 docs 为一个纯文本对象对应的列表。得到该列表之后,我们就可以将它引入到 LangChain 框架中构建向量数据库。由纯文本对象构建向量数据库,我们需要先对文本进行分块,接着对文本块进行向量化。
LangChain 提供了多种文本分块工具,此处我们使用字符串递归分割器,并选择分块大小为 500,块重叠长度为 150:
from langchain.text_splitter import RecursiveCharacterTextSplitter

text_splitter = RecursiveCharacterTextSplitter(
    chunk_size=500, chunk_overlap=150)
split_docs = text_splitter.split_documents(docs)from langchain.embeddings.huggingface import HuggingFaceEmbeddings
embeddings = HuggingFaceEmbeddings(model_name="/root/autodl-tmp/embedding_model")同时,我们选择 Chroma 作为向量数据库,基于上文分块后的文档以及加载的开源向量化模型,将语料加载到指定路径下的向量数据库:
from langchain.vectorstores import Chroma

# 定义持久化路径
persist_directory = 'data_base/vector_db/chroma'
# 加载数据库
vectordb = Chroma.from_documents(
    documents=split_docs,
    embedding=embeddings,
    persist_directory=persist_directory  # 允许我们将persist_directory目录保存到磁盘上
)
# 将加载的向量数据库持久化到磁盘上
vectordb.persist()将上述代码整合在一起为知识库搭建的脚本:
# 首先导入所需第三方库
from langchain.document_loaders import UnstructuredFileLoader
from langchain.document_loaders import UnstructuredMarkdownLoader
from langchain.text_splitter import RecursiveCharacterTextSplitter
from langchain.vectorstores import Chroma
from langchain.embeddings.huggingface import HuggingFaceEmbeddings
from tqdm import tqdm
import os

# 获取文件路径函数
def get_files(dir_path):
    # args:dir_path,目标文件夹路径
    file_list = []
    for filepath, dirnames, filenames in os.walk(dir_path):
        # os.walk 函数将递归遍历指定文件夹
        for filename in filenames:
            # 通过后缀名判断文件类型是否满足要求
            if filename.endswith(".md"):
                # 如果满足要求,将其绝对路径加入到结果列表
                file_list.append(os.path.join(filepath, filename))
            elif filename.endswith(".txt"):
                file_list.append(os.path.join(filepath, filename))
    return file_list

# 加载文件函数
def get_text(dir_path):
    # args:dir_path,目标文件夹路径
    # 首先调用上文定义的函数得到目标文件路径列表
    file_lst = get_files(dir_path)
    # docs 存放加载之后的纯文本对象
    docs = []
    # 遍历所有目标文件
    for one_file in tqdm(file_lst):
        file_type = one_file.split('.')[-1]
        if file_type == 'md':
            loader = UnstructuredMarkdownLoader(one_file)
        elif file_type == 'txt':
            loader = UnstructuredFileLoader(one_file)
        else:
            # 如果是不符合条件的文件,直接跳过
            continue
        docs.extend(loader.load())
    return docs

# 目标文件夹
tar_dir = [
    "/root/autodl-tmp/InternLM",
    "/root/autodl-tmp/InternLM-XComposer",
    "/root/autodl-tmp/lagent",
    "/root/autodl-tmp/lmdeploy",
    "/root/autodl-tmp/opencompass",
    "/root/autodl-tmp/xtuner"
]

# 加载目标文件
docs = []
for dir_path in tar_dir:
    docs.extend(get_text(dir_path))

# 对文本进行分块
text_splitter = RecursiveCharacterTextSplitter(
    chunk_size=500, chunk_overlap=150)
split_docs = text_splitter.split_documents(docs)

# 加载开源词向量模型
embeddings = HuggingFaceEmbeddings(model_name="/root/autodl-tmp/embedding_model")

# 构建向量数据库
# 定义持久化路径
persist_directory = 'data_base/vector_db/chroma'
# 加载数据库
vectordb = Chroma.from_documents(
    documents=split_docs,
    embedding=embeddings,
    persist_directory=persist_directory  # 允许我们将persist_directory目录保存到磁盘上
)
# 将加载的向量数据库持久化到磁盘上
vectordb.persist()运行上述脚本,即可在本地构建已持久化的向量数据库,后续直接导入该数据库即可,无需重复构建。
InternLM 接入 LangChain
为便捷构建 LLM 应用,我们需要基于本地部署的 InternLM,自定义一个 LLM 类,将 InternLM 接入到 LangChain 框架中。完成自定义 LLM 类之后,可以以完全一致的方式调用 LangChain 的接口,而无需考虑底层模型调用的不一致。
基于本地部署的 InternLM 自定义 LLM 类并不复杂,我们只需从 LangChain.llms.base.LLM 类继承一个子类,并重写构造函数与 _call 函数即可:
from langchain.llms.base import LLM
from typing import Any, List, Optional
from langchain.callbacks.manager import CallbackManagerForLLMRun
from transformers import AutoTokenizer, AutoModelForCausalLM

class InternLM_LLM(LLM):
    # 基于本地 InternLM 自定义 LLM 类
    tokenizer : AutoTokenizer = None
    model: AutoModelForCausalLM = None

    def __init__(self, model_path :str):
        # model_path: InternLM 模型路径
        # 从本地初始化模型
        super().__init__()
        print("正在从本地加载模型...")
        self.tokenizer = AutoTokenizer.from_pretrained(model_path, trust_remote_code=True)
        self.model = AutoModelForCausalLM.from_pretrained(model_path, trust_remote_code=True).to(torch.bfloat16).cuda()
        self.model = self.model.eval()
        print("完成本地模型的加载")

    def _call(self, prompt : str, stop: Optional[List[str]] = None,
                run_manager: Optional[CallbackManagerForLLMRun] = None,
                **kwargs: Any):
        # 重写调用函数
        response, history = self.model.chat(self.tokenizer, prompt , history=[])
        return response

    @property
    def _llm_type(self) -> str:
return "InternLM"在上述类定义中,我们分别重写了构造函数和 _call 函数:对于构造函数,我们在对象实例化的一开始加载本地部署的 InternLM 模型,从而避免每一次调用都需要重新加载模型带来的时间过长;_call 函数是 LLM 类的核心函数,LangChain 会调用该函数来调用 LLM,在该函数中,我们调用已实例化模型的 chat 方法,从而实现对模型的调用并返回调用结果。
在整体项目中,我们将上述代码封装为 llm.py,后续将直接从该文件中引入自定义的 LLM 类。
构建检索问答链
LangChain 通过提供检索问答链对象来实现对于 RAG 全流程的封装。即我们可以调用一个 LangChain 提供的 RetrievalQA 对象,通过初始化时填入已构建的数据库和自定义 LLM 作为参数,来简便地完成检索增强问答的全流程,LangChain 会自动完成基于用户提问进行检索、获取相关文档、拼接为合适的 Prompt 并交给 LLM 问答的全部流程。
首先我们需要将上文构建的向量数据库导入进来,我们可以直接通过 Chroma 以及上文定义的词向量模型来加载已构建的数据库:
from langchain.vectorstores import Chroma
from langchain.embeddings.huggingface import HuggingFaceEmbeddings
import os

# 定义 Embeddings
embeddings = HuggingFaceEmbeddings(model_name="/root/autodl-tmp/embedding_model")

# 向量数据库持久化路径
persist_directory = 'data_base/vector_db/chroma'

# 加载数据库
vectordb = Chroma(
    persist_directory=persist_directory,
    embedding_function=embeddings
)上述代码得到的 vectordb 对象即为我们已构建的向量数据库对象,该对象可以针对用户的 query 进行语义向量检索,得到与用户提问相关的知识片段。
接着,我们实例化一个基于 InternLM 自定义的 LLM 对象:
from LLM import InternLM_LLM
llm = InternLM_LLM(model_path = "/root/autodl-tmp/model")
llm.predict("你是谁")构建检索问答链,还需要构建一个 Prompt Template,该 Template 其实基于一个带变量的字符串,在检索之后,LangChain 会将检索到的相关文档片段填入到 Template 的变量中,从而实现带知识的 Prompt 构建。我们可以基于 LangChain 的 Template 基类来实例化这样一个 Template 对象:
from langchain.prompts import PromptTemplate

# 我们所构造的 Prompt 模板
template = """使用以下上下文来回答最后的问题。如果你不知道答案,就说你不知道,不要试图编造答案。尽量使答案简明扼要。总是在回答的最后说“谢谢你的提问!”。
{context}
问题: {question}
有用的回答:"""

# 调用 LangChain 的方法来实例化一个 Template 对象,该对象包含了 context 和 question 两个变量,在实际调用时,这两个变量会被检索到的文档片段和用户提问填充
QA_CHAIN_PROMPT = PromptTemplate(input_variables=["context","question"],template=template)最后,可以调用 LangChain 提供的检索问答链构造函数,基于我们的自定义 LLM、Prompt Template 和向量知识库来构建一个基于 InternLM 的检索问答链:
from langchain.chains import RetrievalQA

qa_chain = RetrievalQA.from_chain_type(llm,retriever=vectordb.as_retriever(),return_source_documents=True,chain_type_kwargs={"prompt":QA_CHAIN_PROMPT})得到的 qa_chain 对象即可以实现我们的核心功能,即基于 InternLM 模型的专业知识库助手。我们可以对比该检索问答链和纯 LLM 的问答效果:
# 检索问答链回答效果
question = "什么是InternLM"
result = qa_chain({"query": question})
print("检索问答链回答 question 的结果:")
print(result["result"])

# 仅 LLM 回答效果
result_2 = llm(question)
print("大模型回答 question 的结果:")
print(result_2)部署 Web Demo
在完成上述核心功能后,我们可以基于 Gradio 框架将其部署到 Web 网页,从而搭建一个小型 Demo,便于测试与使用。
我们首先将上文的代码内容封装为一个返回构建的检索问答链对象的函数,并在启动 Gradio 的第一时间调用该函数得到检索问答链对象,后续直接使用该对象进行问答对话,从而避免重复加载模型:
from langchain.vectorstores import Chroma
from langchain.embeddings.huggingface import HuggingFaceEmbeddings
import os
from LLM import InternLM_LLM
from langchain.prompts import PromptTemplate
from langchain.chains import RetrievalQA

def load_chain():
    # 加载问答链
    # 定义 Embeddings
    embeddings = HuggingFaceEmbeddings(model_name="/root/autodl-tmp/embedding_model")

    # 向量数据库持久化路径
    persist_directory = 'data_base/vector_db/chroma'

    # 加载数据库
    vectordb = Chroma(
        persist_directory=persist_directory,  # 允许我们将persist_directory目录保存到磁盘上
        embedding_function=embeddings
    )

    # 加载自定义 LLM
    llm = InternLM_LLM(model_path = "/root/autodl-tmp/model")

    # 定义一个 Prompt Template
    template = """使用以下上下文来回答最后的问题。如果你不知道答案,就说你不知道,不要试图编造答
    案。尽量使答案简明扼要。总是在回答的最后说“谢谢你的提问!”。
    {context}
    问题: {question}
    有用的回答:"""

    QA_CHAIN_PROMPT = PromptTemplate(input_variables=["context","question"],template=template)

    # 运行 chain
    qa_chain = RetrievalQA.from_chain_type(llm,retriever=vectordb.as_retriever(),return_source_documents=True,chain_type_kwargs={"prompt":QA_CHAIN_PROMPT})

return qa_chain接着我们定义一个类,该类负责加载并存储检索问答链,并响应 Web 界面里调用检索问答链进行回答的动作:
class Model_center():
    """
    存储检索问答链的对象
    """
    def __init__(self):
        # 构造函数,加载检索问答链
        self.chain = load_chain()

    def qa_chain_self_answer(self, question: str, chat_history: list = []):
        """
        调用问答链进行回答
        """
        if question == None or len(question) < 1:
            return "", chat_history
        try:
            chat_history.append(
                (question, self.chain({"query": question})["result"]))
            # 将问答结果直接附加到问答历史中,Gradio 会将其展示出来
            return "", chat_history
        except Exception as e:
            return e, chat_history

    def clear_history(self):
self.chain.clear_history()然后我们只需按照 Gradio 的框架使用方法,实例化一个 Web 界面并将点击动作绑定到上述类的回答方法即可:
import gradio as gr

# 实例化核心功能对象
model_center = Model_center()
# 创建一个 Web 界面
block = gr.Blocks()
with block as demo:
    with gr.Row(equal_height=True):
        with gr.Column(scale=15):
            # 展示的页面标题
            gr.Markdown("""<h1><center>InternLM</center></h1>
                <center>书生蒲语</center>
                """)

    with gr.Row():
        with gr.Column(scale=4):
            # 创建一个聊天机器人对象
            chatbot = gr.Chatbot(height=450, show_copy_button=True)
            # 创建一个文本框组件,用于输入 prompt。
            msg = gr.Textbox(label="Prompt/问题")

            with gr.Row():
                # 创建提交按钮。
                db_wo_his_btn = gr.Button("Chat")
            with gr.Row():
                # 创建一个清除按钮,用于清除聊天机器人组件的内容。
                clear = gr.ClearButton(
                    components=[chatbot], value="Clear console")

        # 设置按钮的点击事件。当点击时,调用上面定义的 qa_chain_self_answer 函数,并传入用户的消息和聊天历史记录,然后更新文本框和聊天机器人组件。
        db_wo_his_btn.click(model_center.qa_chain_self_answer, inputs=[
                            msg, chatbot], outputs=[msg, chatbot])

        # 点击后清空后端存储的聊天记录
        clear.click(model_center.clear_history)
    gr.Markdown("""提醒:<br>
    1. 初始化数据库时间可能较长,请耐心等待。
    2. 使用中如果出现异常,将会在文本输入框进行展示,请不要惊慌。 <br>
    """)
gr.close_all()
# 直接启动
demo.launch()通过将上述代码封装为 run_gradio.py 脚本,直接通过 python 命令运行,即可在本地启动知识库助手的 Web Demo,默认会在 7860 端口运行,使用类似于部署的方式将服务器端口映射到本地端口即可访问: